Implementing different basic shapes in your webpage layouts can go a long way in building visual identity. Basic shapes can be an essential aspect of web design that can symbolize ideas as well as express moods. Hence it's only wise to keep the idea of utilizing certain shapes on your website at the back of your head. And with SP Page Builder the work only gets simpler and easier as it can be. From the heading, you should already be guessing what today’s tutorial is about.
That’s right, in this article, you will learn how you can add custom shapes to your Joomla webpage layout effortlessly. So without further ado, let's jump in!
Does SP Page Builder Come With Custom Shapes Options?
No, but it doesn’t mean SP Page Builder limits you from creating shapes in different sizes according to your requirement. Say goodbye to the hassle of loading your site with unnecessary images and slowing your site down in an attempt to add different basic shapes for your web page layout. With SP Page Builder 4 you can easily implement your basic shapes effortlessly with the help of existing addons just by following through with some simple tricks!
How to Add SPPB Built-in Shapes to Your Rows?
To help you add further styling to your webpage, SP Page Builder lets you add fantastic shapes to your rows. Here’s how you can style your rows with different shapes:
Navigate to your SP Page Builder 4 front-end editor and create a row. Select the created section and go to the Row settings from the Row Editor. On the Style tab, scroll down to find two options: Top Shape and Bottom Shape.

Enable both options. As you enable the options you should be able to choose from a drop-down menu of options to decide on the shapes that you want on the top or bottom of your row. Choose your preferred option and you can, of course, decide to edit and change its size and colors however you want.

Create Basic Custom Shapes
So far we have discussed how you can add shapes at the top and bottom of your rows. Now let's jump in to glance through some simple tricks that you can use to create some basic shapes and place them anywhere on your webpage! Just follow through the simple steps described below.
Step 1: Get SP Page Builder Pro
Like always, get your SP Page Builder Pro first. Visit the SP Page Builder website, and select the plan that seems right for you. Download and install SP Page builder Pro on your Joomla CMS. Go to your Joomla dashboard > Systems > Extension and upload your SP Page Builder Pro zip file and you are all set to go. As simple as that!
Step 2: Plan the Page Layout & Decide Where to Add your Custom Shapes
Next comes the planning of your webpage layout. Always remember that your webpage design can either make or break your website. It is always recommended and absolutely necessary to have a well-thought-out design ready with the right elements just in the right place.
Step 3: Prepare Your Page Layout
Once you are sure about your layouts, let's start creating the shapes manually. For this demonstration, we have created a simple section that includes the basic shapes.
From your SP Page Builder frontend editor create a section. For this particular demonstration, we chose a 6+6 layout from the column generation option. We adjusted the look of the full row and chose the Heading and Text Block addons for the first column and we left the second column to implement our shapes.
At this point, you should also increase the height of your row for the convenience of your design. To adjust the Row height go to the Row settings from the Row editor. From the Style tab, scroll down to the Height Options and set the Min Height to 500. Hit Save.
Also, we will be demonstrating 4 different shapes in this tutorial, hence we will be initially taking 4 Div addons to our right column.

Step 4: Create and Add a Circle
To create a full circle, choose the first Div addon from your right column. Set your addon’s Width and Height to 100 and proceed to the General Settings option. From the Style tab, scroll down to the Background Option and choose Color. Choose your preferred color and set the Border Radius to 100. Next, navigate to the Advance tab just next to the Style tab. Enable the Custom Position option. Set the Select Position to Absolute and for our layout convenience, we are setting the values for the x-axis to 50 and the y-axis to 30.

There you go, you have created your first circle! As simple as that!
Create and Add a Hollow Circle
SP Page Builder also lets you create hollow circles easily in minutes. Let's take another Div addon and set the Height and Width to 100. Proceed to the General Settings and from the Style tab scroll down to enable the Border option. Pick a Color and Width for your border and set the style to Solid. And finally, set the Border Radius to 100. You should be able to see your hollow circle at this point. To further place it in the position that fits your need, you can navigate to the Advanced tab and enable the Enable Custom Position button. Select the position to Absolute and set the values for your x & y axes.

But for this demonstration, we will skip the hollow circle from our layout.
Step 5: Create and Add a Square
Next, let's see how you can create a square for your webpage layout. Move to the second Div addon that you had taken previously and set the Width and Height to 100. Navigate to the Style tab from the General Settings and choose a color for your shape.
Change the position of the square from the Advanced settings tab by enabling the Enable Custom Position option. Set the x-axis value to 50 and the y-axis to 390. Your square shape is pretty much done at this point!

Create and Add a Rectangle
You can also create a rectangle in exactly a similar way. All you need to do is pay attention to the value you set for the addon’s Width!
Step 6: Create and Add a Triangle
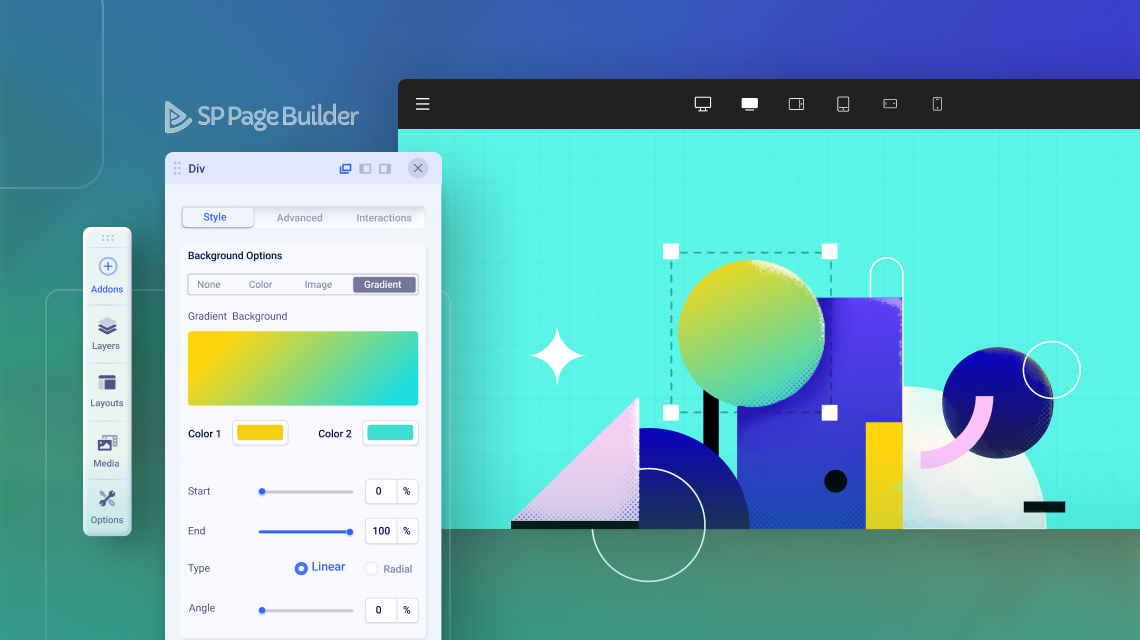
Creating triangles is also pretty simple. Go to the next Div addon and set the Width and Height to 300. From the General settings Style tab, scroll down to Background Option and choose Gradient. Choose the color of your triangle from the Color 2 option. Now we set the Start & End values to 50. For our layout purpose, we set the Angle to 135%.
Next, go ahead and click on the Color 1 option and change the RGBA values to such that the opacity is set to 0. For example, RGBA(255, 254, 254, 0). You should be able to see your triangle now!

Step 7: Create and Add a Cylindrical Shape
Let's see how you can add your cylindrical shapes. Click on your next Div addon in the same column and set the Width to 325 and Height to 75. Navigate to the General settings Style tab and scroll down to the Background Options and choose Color for your cylinder shape. Set the Radius to 100.
Reposition your addon by enabling the Enable custom position option and addon and select the addon position to Absolute. Set the x and y axis according to your necessity. Here we set the axes to 170 and 400 respectively.

Step 8: Final Result
Repeat the steps that have been shown so far to add the rest of the necessary shapes according to your layout, make adjustments where needed and give one final check. Save the changes when you are happy and you are ready to go! Here is our final result:

Customizing Your Added Shapes
SP Page Builder is always there to provide you with something extra. Let's see how you can add shades/shadows to your custom shapes. Decide on the shape you want to add the shadow on. Select the shape and go to the General settings Style tab. Scroll down and enable the Shadowbox option.

Once you are there select the color according to your preference and edit the shape of your shadow using the horizontal and vertical values. Setting the Blur value lets you make the added shadow prominent or faint. Set the Spread value if you wish to extend the area of the added shade.
Things to Keep in Mind
In case you are adding most of your Div addons in a single column, it's only wise to rename the addons to avoid any confusion later. From the SP Page Builder frontend editor, navigate to Layers and choose the column in which you added all your Div addons. Expand the column to find all your used Div addons. Hover over each of the used addons to display the 3 vertical dots and click on it to display the options. Choose Rename option to rename them to avoid confusion.

Winding-Up
When used correctly, basic shapes do have the ability to help build eye-catching websites that your visitors will remember. Understanding the feelings, moods, and concepts behind shapes can help you pick the best ones for your web design. And what else could be better than SP Page Builder 4 that will ease up your work tenfolds?
What interesting shapes could you come up with using SP Page Builder 4? Let us know in the comments. Happy developing!