

Joomla Basics: Getting started with a brand new Joomla website
Hello world, welcome to the empire of Joomla! If you have been searching an extensive, feature rich, flexible and heavily customizable website for any purpose, Joomla can serve it. It’s fast, reliable, and easily manageable with a minimum skill. In this blog series of Joomla Basics, we will explore the complete basic guides to Joomla. Let’s start step by step.
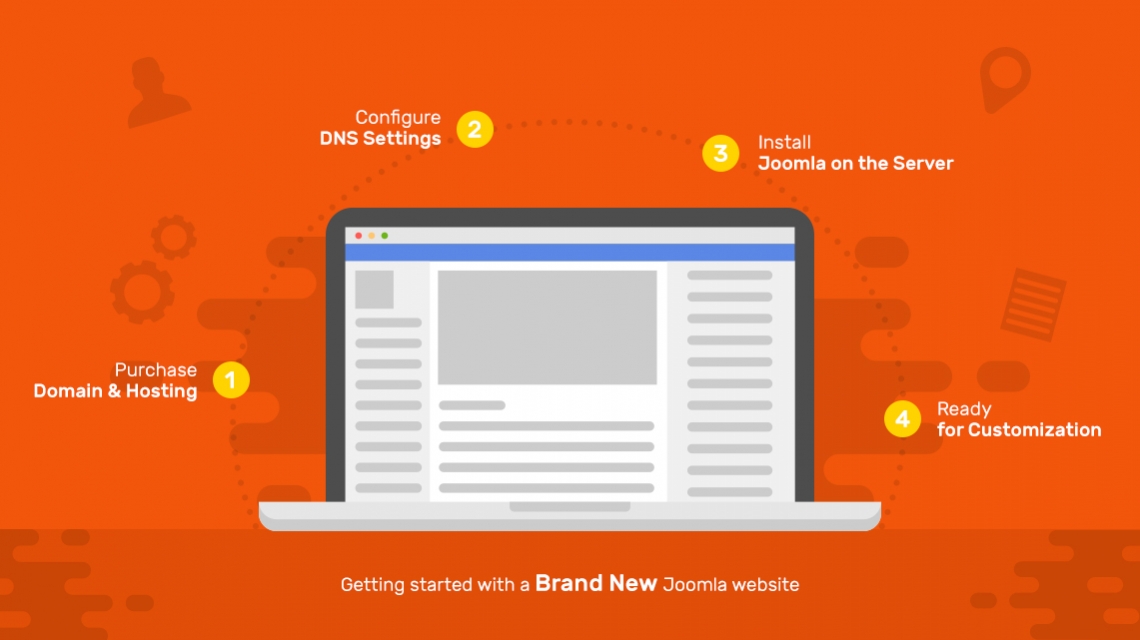
Purchase Domain and Hosting
In order to launch a website, at first you need a domain name and a server space to host your site online. You can purchase a domain name from providers like GoDaddy, Namecheap, Name, and so on.
Besides buying the domain name, you also need a hosting space where the website files and folders will be stored. A hosting space can be purchased from companies like DigitalOcean, SiteGround, HostGator etc. You can also get a hosting package from your domain registrar.
Configure DNS Settings
Once you’ve purchased a domain name and a hosting space, you need to link them. Collect the hosting space’s nameserver and IP related information and enter these details into the domain registrar’s respective DNS settings dashboard. After saving the hosting IP or nameserver related information inside the domain registrar’s DNS settings, it will take up to 72 hours to complete the DNS propagation. After this time, your server and domain name are ready to take your website online.
Install Joomla on the Server
Installing a CMS on the server can be done in a number of different ways. It can follow a so simple to very complex method depending on your server and preferences. If you use a low-cost shared hosting plan, you need to use one of the simplest installation methods, because you don’t get root access to the server in these packages.
On the other hand, in case of a VPS or dedicated server, you may configure the server by your own. This includes installing the server operating system, the web server, the database server, the CMS etc. VPS services like DigitalOcean offers both manual and ready-to-use instances that can be deployed in a few clicks. If you want a quick kick-off, you can use this method.
So, you can install Joomla either using the one-click method or the manual method. At first contact your hosting provider to know the available installation methods. Each hosting provider has different guidelines, so you need to follow the official one. In these methods, generally you need to select the CMS (e.g. Joomla) and click the ‘Install’ button, the CMS will be installed right away. Some hosting providers like DigitalOcean lets you choose LAMP or LEMP along with the CMS.
If you want to go for the manual Joomla installation method, you have a lot of options ahead. You can download Joomla from the official website, unzip the package and upload the unzipped contents inside the server’s web root (/public html) using your favorite FTP client. You will also need to create a database and connect the database to the CMS. Since you have to do a wide range of tasks, I recommend you to follow the detailed tutorials provided by your hosting support.
In case of manual server configuration and CMS installation, there are lots of areas to look at, such as directory permissions, server computer security, web server settings, PHP settings, database settings, and so on. So, if you are a newbie, you need to study these topics at first. If you want an easier workflow, choose the one-click or quick installation method provided by the hosting service. Contact them before purchasing the hosting package.
Whatever CMS installation method you may choose, once you’ve installed Joomla on your server, upon the DNS propagation, you should see your fresh Joomla website by visiting your site address.
This is the very beginning of starting a Joomla website. Now that, I’ve described how to get your brand new Joomla site launched. There are more tasks ahead to customize the site for your unique purpose. It involves installing a suitable template, creating pages, adding contents, and so on. We’ll see them in upcoming posts on this series. Till then, stay with us. Thank you.


I am Eric
Impossible to install helix3_quickstart_j3_v2.2
All of the elements of preinstallation are on green but the installation failled.
Many Many unsuccessful attempt
For exemple The installation with "Health Guide - Club Template quickstart" of shape 5 is possible.
I want to renew Doctor Medical Clinic Joomla Template but y have many interrogation of the possibility of this installation.
Couldhelp me before subscribe a renewal
I s essential for me
Sincerely
Dr Eric PIGEON
Dermatologist
OS
Linux Plesk 12.5 (Debian 8 "Jessie") (64bits)
Serveur KS-2A - Atom N2800 - 4GB - 1x2To
Facebook groups (for both Free and Paid users):
Page Builder: https://www.facebook.com/groups/463387677186168/
Helix: https://www.facebook.com/groups/819713448150532/
Forum (only for paid users): https://www.joomshaper.com/forums
Thanks.