

One of the ways to make your website stand out from the crowd and wow your audience is by adding a video to your website. But just adding a simple video to a particular section of your site might not do the magic that you are looking forward to. Adding an overlay on top of your added video can be an excellent substitute for those boring, regular video clips that you have been planning to add to your webpage. So if you are looking for a creative way to get your favorite video clip noticed on your website and stand out from the competition, then getting a video mask might just do the wonder for you!
And as always, SP Page Builder Pro is here to make your day with some more amazing and simple tricks! Hence we are here today with another tutorial for all our SP Page Builder Pro users on how you can adorn your best-loved video clip using a mask.
Without any further ado, let’s dive in!
What are Video Masks on Websites?
Video masks in websites are the overlays on top of your videos, usually used in the form of images or animations that will act as a frame around the video. They are generally meant to complement your video clip and can result in a good way to attract, engage and bring visitors back to your site! Giving a ‘makeover’ to your clip not just makes it entertaining but can potentially engage your visitors by drawing attention.
Types of Masks that Can be Used on Your Webpage Videos
The type of mask or overlays that you want to use for your video is up to you to decide. Make sure that it matches with the rest of the elements of your layout and compliments the used video as well as the message that you want to convey. Here are the main types of video overlay you can use in your video.
- Animated Masks: Animated masks are frames with animated effects that also come in the form of videos and sets around the border of your clip.
- Shape Masks: Shape masks take the form of different shapes like circles, squares, hearts, ovals, etc, and are considered the basic and mostly used masks for videos.
- Text Masks: In this case, the mask comes in the form of text and the video consequently takes the shape of the text mask. This gives your video an interesting look and is quite a trend nowadays.
How to Add Video Mask to Your Joomla Site Easily
Time to learn how to beautify your video clip with just a few simple tricks. Follow through these simple steps and your video mask should be all set to hit the ground and that too without a single line of code! Let’s delve in.
Step 1: Get SP Page Builder Pro
First thing first, get SP Page Builder Pro. Install the downloaded zip file by navigating to your Joomla control panel > Extensions > Extension Manager.
Once installed, go ahead and create a new SP Page Builder page. To do so navigate to the Components from your Joomla dashboard and choose SP Page Builder Pro. Hit Get Started and create a new page.
For this particular demonstration, we are using both Helix Ultimate and SP Page Builder for our convenience.
Step 2: Decide on Your Video and Mask Beforehand
Make sure to have both your video mask and the video ready beforehand to avoid any confusion during the rest of the procedure.
In our case, we have already created our video mask and saved them to SP Page Builder’s Media Manager. Pay attention that your mask should be in png format with transparent background and your video should be in MP4 format.
Step 3: Navigate to SP Page Builder Frontend Editor
Here starts the fun part! Once you have both your mask and video ready, navigate to the SP Page Builder Pro frontend editor and create a section. For this demonstration, we are choosing a 6+6 column.
Step 4: Add a Row to Your Column
Go ahead and start adding your addons at this point. To our right column, we will add a new row. When you add a new row to the column you should get two columns. Delete one of the columns to get a full-width row inside your column.

Step 5: Insert Video Into the Added Row
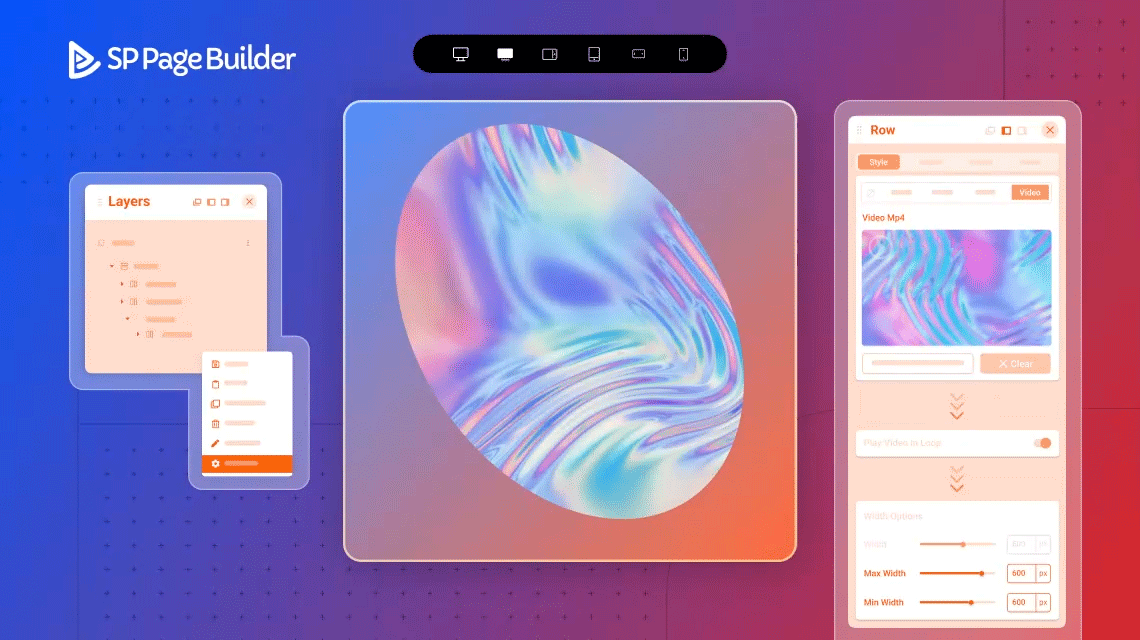
Now navigate to the Row settings of the row that you just added inside the right column. To do that simply go to the Layers option from the SP Page Builder frontend sidebar. Expand your Canvas section and locate the column where you inserted your row initially. Click on the three dots right next to the Row and the related settings options should pop up. Hit Settings.

From the Style tab, choose Video from the Background Option. Upload your video here and make sure to enable the Play Video in Loop option.

You have successfully added the video!
For our left column, we have used an Animated header addon and a Text addon. Change the texts for your Animated Header and make the following adjustments:
- From the Animated Heading Settings choose Animation: Blinds.
- From the Color settings, change the animated text color: #399d0d.
- From the Typography Settings choose font style Arial and set the Size to 70px.
- From the Animated Heading general settings only set the top Margin to 100px.

Step 6: Add the Mask on Top of Your Video Row
Next, it's time to add the mask on top of your video. To do that, add an Image addon to the same column where you added your video. Replace the default image with the video mask that you had created and saved to the Media Manager initially.
Adjust the size of the mask image to cover the video around the edges. Here’s a simple trick to do that! Go to the Image addon General settings Style tab and adjust the Image Margin. In our case, we have put -26px for the top and bottom Margins and -25px for the left and right Margins.

At this point, we want to match the background color of the entire row with the color of our mask image. From the Row editor, go to the Row Settings and select the Style tab. From the background option, select the Color tab and choose your desired color from the palette. The hex code for our background color is #ffffa2.

Step 7: Increase or Decrease the Video Column Size
Let's set the size of our video column according to our preference. For that again choose the Row settings from the layers panel. From the Style tab, scroll down to the Width Option and adjust the value. We are choosing to set the value of the width to 650px.

Step 8: Adjust Your View Ports
As we all know SP Page Builder 4 comes with 6 different viewports. So far we have created and adjusted the row and addon options according to the laptop viewport. Let's give a quick check to the rest of the viewports. To do so simply click on each of the device icons displayed at the top of the page. Please note that at this point you might have to adjust each of the viewports margins and widths individually.
Step 9: Final Result
Make one final adjustment to the layout and hit Save. Let's check out the final outcome.
Amazing isn’t it? Turn all those monotonous videos into interesting and eye-catchy ones. And with SP Page Builder, slide through those tough works smoothly and save up time too!
Ending Thoughts
Hope this tutorial was helpful to you and answers any questions you may have had regarding video overlays or masking. SP Page Builder makes sure to do all the heavy lifting for you so that all you need to do is focus on crafting your site with engaging and interactive content. Bag your SP Page Builder Pro today and dive in to enjoy the finest website development experience. Happy developing!

Sreema


There are no comments posted here yet