

Joomla Basics: How to install a Quickstart package of a Joomla template


Joomla can be quite tricky while installing a new template manually as there are lots of settings and options that you have to configure. To save you from the hassles, thankfully there is a quickstart package that comes along with the template. It’s the total package of all the necessary ingredients to let your site off the ground faster than ever before.
What is a Quickstart pack?
A Quickstart pack is actually a complete demo website and an entire Joomla package containing the CMS, components, modules, template, other necessary data, and configurations. In case of Quickstart, you don’t have to manually create or suit modules, component data or configure the CMS. Quickstarts also can be used to restore or recreate the demo site appearance. Quickstart packs contain demo layouts, demo contents and placeholder images. You can retain the demo layouts, but the demo texts and any demo images are not licensed for using on live sites.
You may get the readymade demo layouts by installing Quickstart packs. It's up to you whether you'll install a Quickstart pack on your local host or on a live server. Just keep in mind that, you are not allowed to use demo images or demo texts on live sites. So replace the demo texts and images with your own contents.
Downloading the Quickstart package
Assuming that you have a JoomShaper template club membership, you can download a template's Quickstart pack from the template download section of the JoomShaper website. Click the download button to download the file.
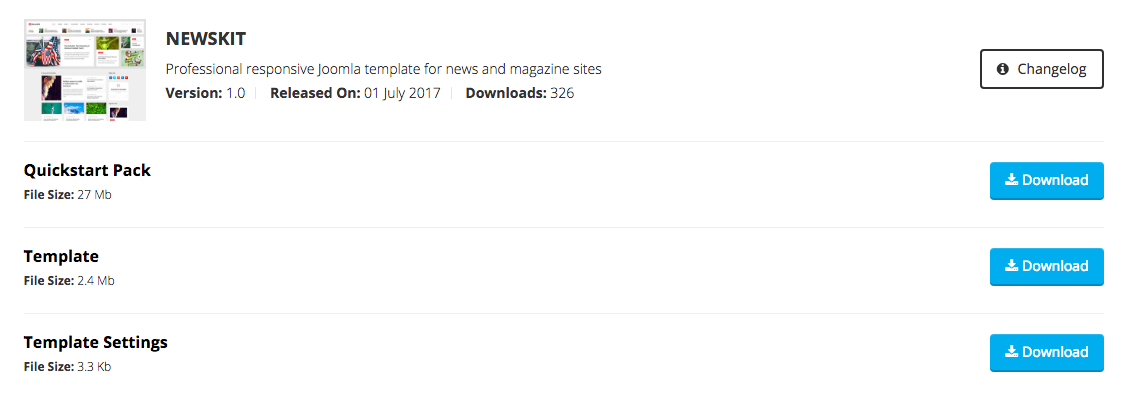
Figure: Download Quickstart
Quickstart installation
We are going to see the Quickstart installation methods both on the server and the localhost. So, let's get started.
Quickstart installation on a localhost
For localhost quickstart installation, first you need to create a local web server environment. You can use any local server software you want like MAMP, WAMP, XAMPP or others. Start the localhost software with the web (e.g. Apache/NGINX) and database (MySQL) servers inside it. The initial work is done. You can also check our video tutorial on installing a Quickstart pack on a localhost.
Step 1: Copy the Quickstart pack to the localhost
First copy the Quickstart zip file to the htdocs folder of the local server. Extract the Quickstart zip file there.
Step 2: Start the installation by visiting the localhost address
Now visit your localhost URL (address) on a browser. Ex: Localhost/YourFileName. A Joomla installation window tabbed as Configuration will appear.
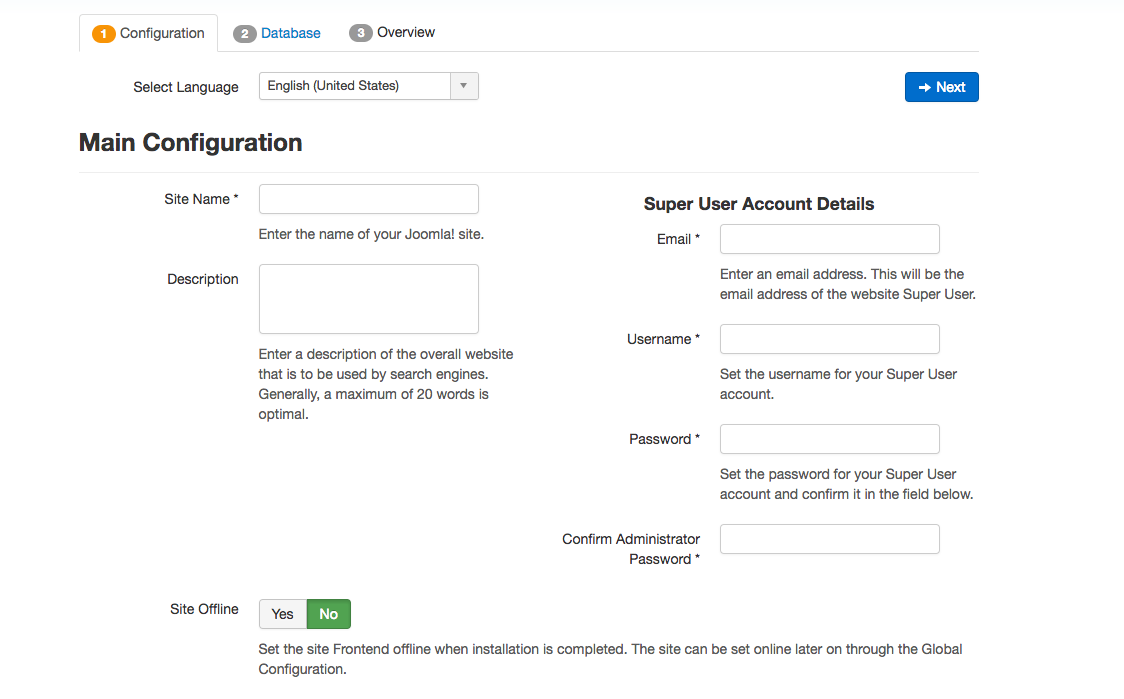
Figure: Initial step of Quickstart installation
Enter your site name, email and most importantly, enter username and password. After that, click next. Now the Database Configuration section will be opened. Enter the username and password of the database as “root”. (Default for localhost software like MAMP. Check for your localhost software). Now set a database name and click next.
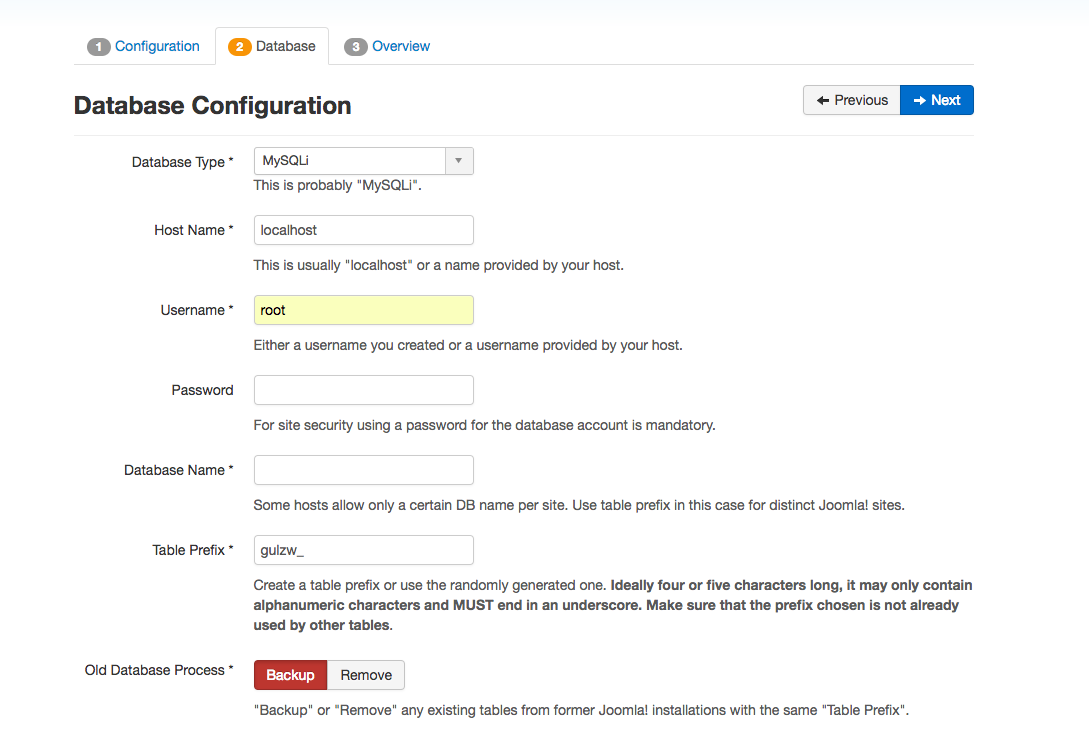
Figure: Database configuration step of Quickstart installation
Click Install in the Overview section and the installation will start. After the installation is finished, click “Remove installation folder” to remove the installation folder.

Figure: Final step of Quickstart installation
Step 3: Done!
Now go to localhost/YourFileName/administrator to access Joomla and your installed template. Or you can click the administrator button to directly access it.
Quickstart installation on a web server (cPanel)
To install the Quickstart pack on a web server, you need to upload the the package/extracted files to the server. In order to transfer files to the web server from your computer, you can use an FTP client for example: Filezilla. Now unzip the Quickstart pack. You will get several files and folders.
Step 1: Upload the Quickstart pack to the server
If you use cPanel, you can directly upload the Quickstart zip file to the server. Then you can unzip it there. In other cases, you can unzip the Quickstart pack locally, then upload the unzipped files and folders to the public_html directory of your web server. Make sure these are located directly on the public_html folder.
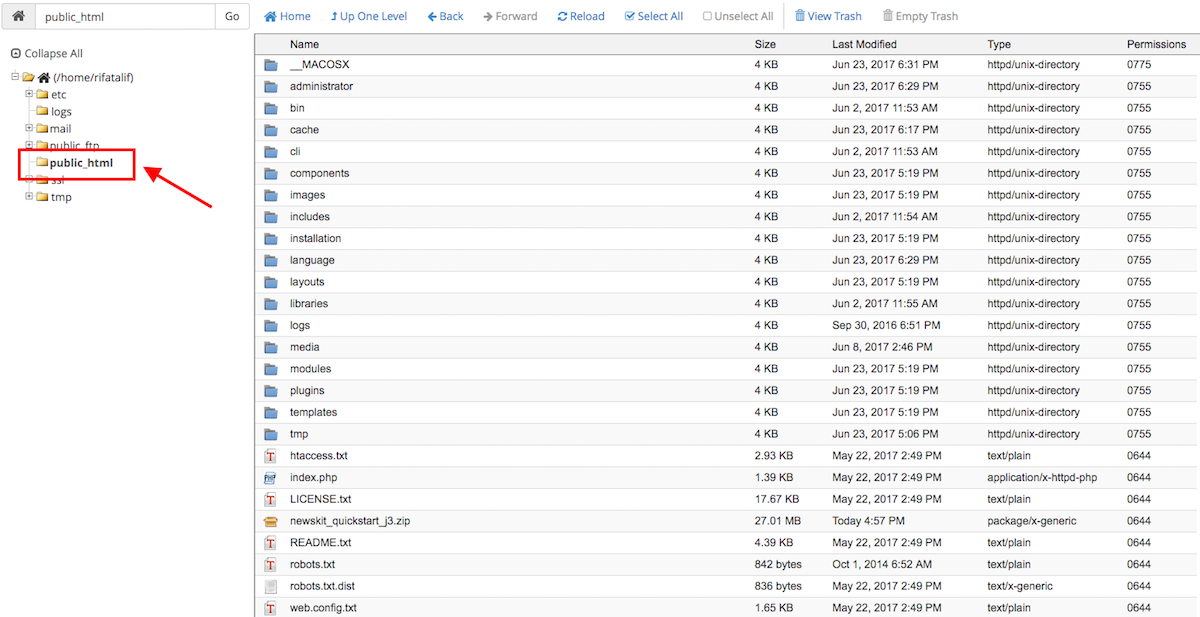
Figure: Uploaded files and folders in the root directory
Step 2: Create a new database and a database user
Create a MySQL database user and a database on your web server. You will need to enter these in the ‘Database Configuration’ step while installing the Quickstart pack.
Create a database
Visit the MySQL Database Wizard on the cPanel and create a database first. If you don't have cPanel, contact your hosting service provider to learn how to find the database credentials.
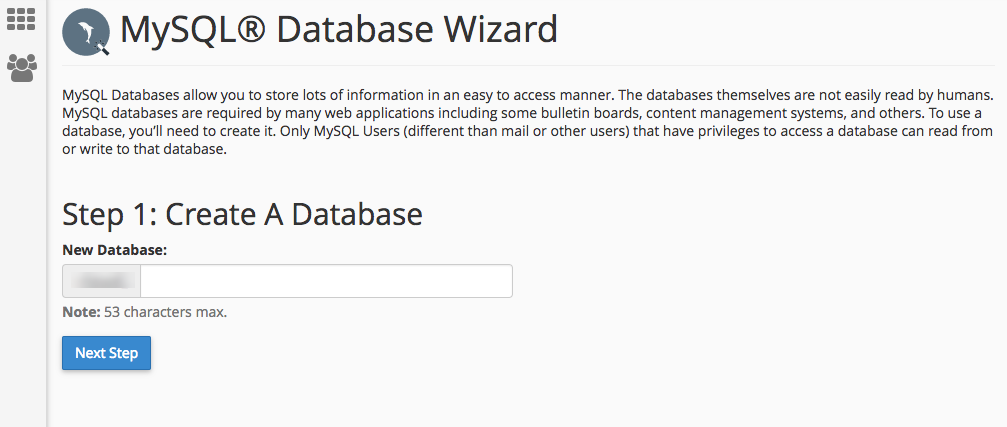
Figure: Database creation in the server
Create a database user
After creating the database itself, create a database user on the same environment of the cPanel MySQL Database Wizard.
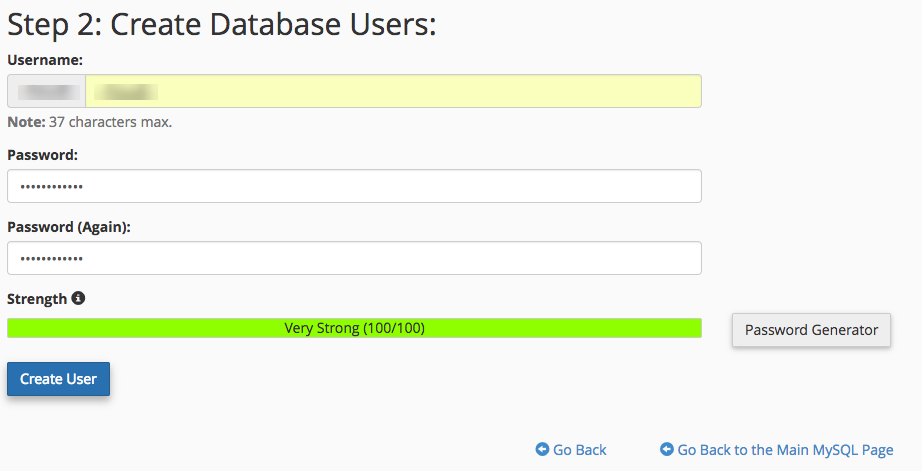
Figure: MySQL user creation in the server
Assign all the privileges to the MySQL user
Now that, you have a database user and a database. It's time to assign all the privileges to the database user regarding the newly created database.
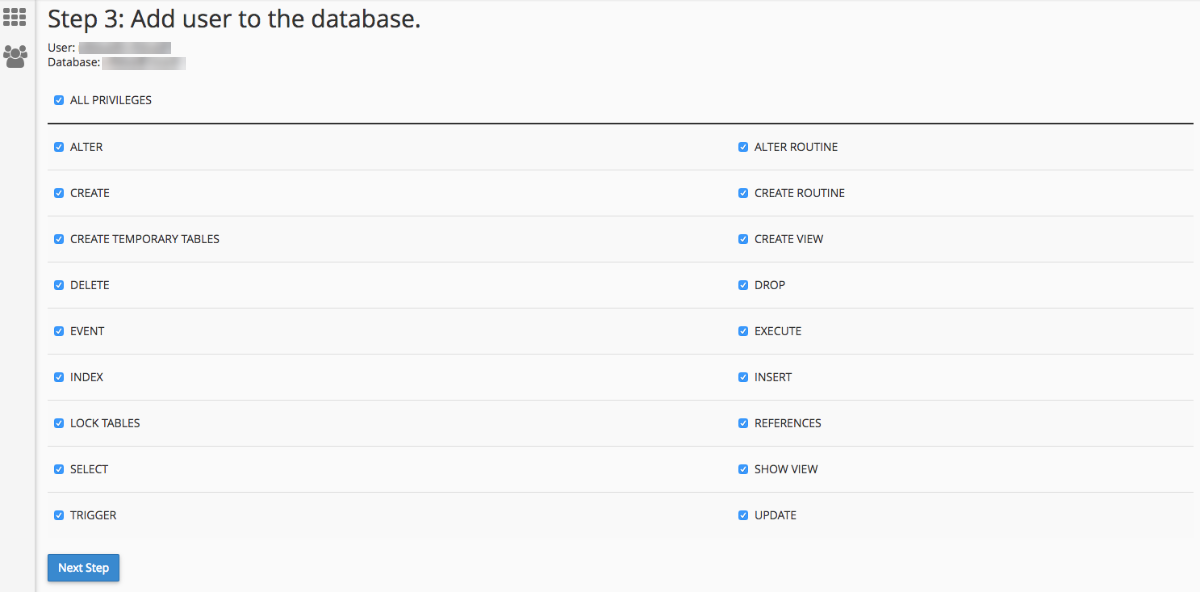
Figure: User accesses in the database
Step 3: Start the installation by visiting your website address/IP
Open your browser and navigate to your main domain (i.e. http://mydomain.com), or to the appropriate subdomain (i.e http://new.mydomain.com/), depending on where you have uploaded the Joomla installation package. You will see the initial installation page (the Configuration tab). Now follow the installation process you have just experienced for localhost we’ve explained above. In case of the username and password of the super admin, avoid using “admin” and “demo”.
Next, in the Database Configuration tab, use the database username and and password of the user you have just created along with the newly created database name.
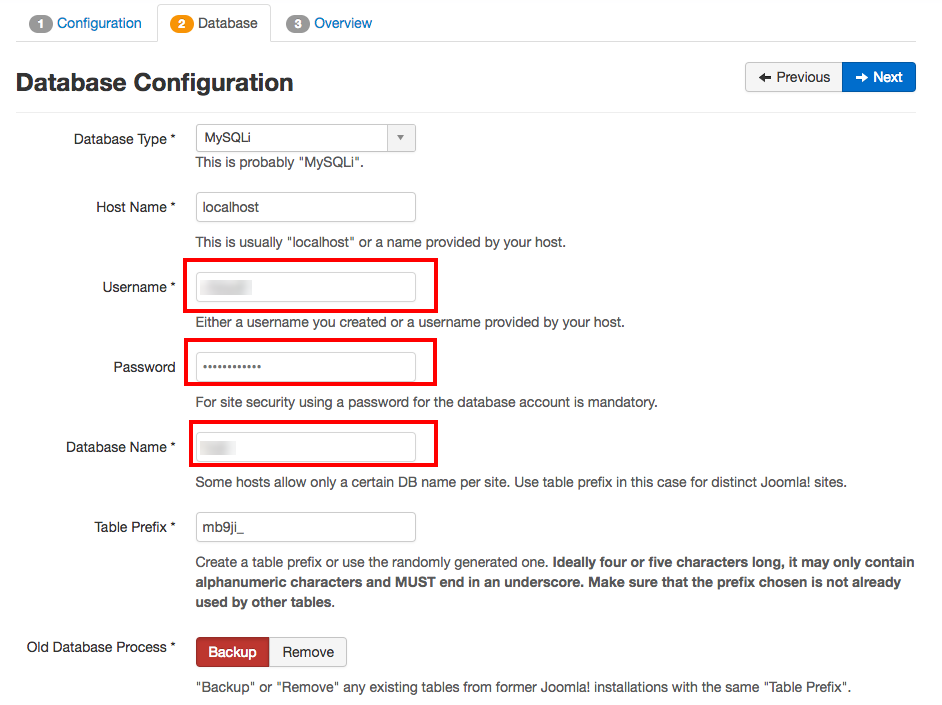
Figure: Database configuration during the Quickstart installation
After the database configuration stage, go to the Overview tab by clicking the Next button. All other tasks are similar to the localhost method.
Step 4: Done!
Once the installation is complete, a success message will show up. Now remove the installation folder by clicking the “remove installation folder” button. Login to the admin area. It should be www.YourDomainName.com/administrator.
Installation problem tips and tricks
In localhost, the installation sometimes freezes and could not load. In that case you have to do some customizations. Open the unzipped file list. Go to installation > sql > mysql > joomla.sql. Open the “joomla.sql” file with an editor to edit. Find InnoDB in the text and replace it with MyISAM. As MyISAM is more compatible in the local server.

Figure: Replace InnoDB with MyISAM
Cloaking up
This is the total process of installing a Quickstart pack on both the localhost and a live web server. We hope you will be benefited from this tutorial. We will bring more of such Joomla basic tutorials in the coming blog posts. Meanwhile please don't forget to share your opinions and thoughts with us in the comment section below.


need a advice.
thanks
could you help me?
regards
Marcello
BUT I cannot choose a header of eg 1280 x 80 - it just says "predefined header" but there is nothing
and
I can see the menu-items - but I cannot make it show a menu horisontal???
thank you in advance
<a href="https://www.thetechchips.com/5-best-video-editing-app-for-android/">video editing app</a> |
<a href="https://www.thetechchips.com/5-best-video-editing-app-for-android/">video editing app for android</a> |
<a href="https://www.thetechchips.com/5-best-video-editing-app-for-android/">video editing app download for android</a> |
<a href="https://www.thetechchips.com/5-best-video-editing-app-for-android/">video editor app android free</a> |
<a href="https://www.thetechchips.com/best-free-instagram-downloader-for-pc-2018/">free instagram downloader</a> |
<a href="https://www.thetechchips.com/best-free-instagram-downloader-for-pc-2018/">best free instagram downloader</a> |
<a href="https://www.thetechchips.com/best-free-instagram-downloader-for-pc-2018/">instagram downloader</a> |
<a href="https://www.thetechchips.com/best-free-instagram-downloader-for-pc-2018/">online free instagram downloader</a> |
<a href="https://www.thetechchips.com/best-free-instagram-downloader-for-pc-2018/">Instagram Downloader for PC</a> |
<a href="https://www.thetechchips.com/best-free-instagram-downloader-for-pc-2018/">instagram video downloader </a> |
<a href="https://www.thetechchips.com/best-free-instagram-downloader-for-pc-2018/">free instagram downloader for pc</a> |
<a href="https://www.thetechchips.com/free-sublime-text-3-license-key/">sublime text license</a> |
<a href="https://www.thetechchips.com/free-sublime-text-3-license-key/">sublime text license key</a> |
<a href="https://www.thetechchips.com/free-sublime-text-3-license-key/">sublime text 3 license key free</a> |
<a href="https://www.thetechchips.com/gaana-music-mod-apk-unlimited-free/">gaana mod apk</a> |
<a href="https://www.thetechchips.com/gaana-music-mod-apk-unlimited-free/">gaana premium apk</a> |
<a href="https://www.thetechchips.com/gaana-music-mod-apk-unlimited-free/">gaana apk cracked</a> |
<a href="https://www.thetechchips.com/gaana-music-mod-apk-unlimited-free/">gaana apk</a> |
<a href="https://www.thetechchips.com/kickass-torrents-proxy-kat-unblocked/">kickass proxy</a>
<a href="https://www.thetechchips.com/kickass-torrents-proxy-kat-unblocked/">katproxy</a>
<a href="https://www.thetechchips.com/kickass-torrents-proxy-kat-unblocked/">kat unblocked</a>
<a href="https://www.thetechchips.com/kickass-torrents-proxy-kat-unblocked/">kick ass proxy</a>
<a href="https://www.thetechchips.com/kickass-torrents-proxy-kat-unblocked/">kickassproxy</a>
<a href="https://www.thetechchips.com/kickass-torrents-proxy-kat-unblocked/">kat proxy</a>
<a href="https://www.thetechchips.com/kickass-torrents-proxy-kat-unblocked/">kickass proxies</a>
<a href="https://www.thetechchips.com/kickass-torrents-proxy-kat-unblocked/">kickass proxy unblocked</a>
<a href="https://www.thetechchips.com/kickass-torrents-proxy-kat-unblocked/">kickass mirror</a>
<a href="https://www.thetechchips.com/kickass-torrents-proxy-kat-unblocked/">kickasstorrent proxy</a>
<a href="https://www.thetechchips.com/kickass-torrents-proxy-kat-unblocked/">kickass unblock</a>
<a href="https://www.thetechchips.com/kickass-torrents-proxy-kat-unblocked/">kickass proxy list</a>
<a href="https://www.thetechchips.com/free-download-ridge-racer-unbounded-for-pc-ocean-of-games/">ridge racer unbounded</a>
<a href="https://www.thetechchips.com/free-download-ridge-racer-unbounded-for-pc-ocean-of-games/">ridge racer unbounded download</a>
<a href="https://www.thetechchips.com/free-download-ridge-racer-unbounded-for-pc-ocean-of-games/">ocian of games</a>
<a href="https://www.thetechchips.com/free-download-ridge-racer-unbounded-for-pc-ocean-of-games/">ocean of games</a>[/code]
When I install the "Quickstart of Helix Ultimate", he asks me what kind of site I want, but whatever the choice, once installed, the template "helix" does not appear and I have the basic interface of joomla.
This comes from the choice of site type during installation?
Thank you for your answers.
[img]https://imgur.com/a/5y09YsE[/img]
Je viens d'installer helix3_quickstart_j3_v2.5.6 sans problèmes
Sans faire quoique ce soit, a partir du Panneau de Contrôle ,en cliquant sur "Voir le site" j'ai cette erreur qui s'affiche : Fatal error: Can't use function return value in write context in /htdocs/public/www/joom/components/com_sppagebuilder/helpers/helper.php on line 34
De quoi s'agit-il et que faire ???
Merci pour votre aide
when I install QuickStart package from I am getting http 500 error. If I install Joomla and same template only not 500 error. Any solution?
I have managed to do it from the first time.
Just unpack it to your htdocs folder in xammp if you use it and then access localhost/yoursitename
and start installation just like standard joomla package!
And as for the documentation, we really appreciate the constructive criticism and we'll definitely look into this. We take documentation very seriously and we'll do everything it takes to bring it up to JoomShaper levels. In the meantime, it'll be a huge help to us if you could point us to a specific area in our documentation where they lack depth and detail.
Thank you! :D