- TemplatesTemplates
- Page BuilderPage Builder
- OverviewOverview
- FeaturesFeatures
- Dynamic ContentDynamic Content
- Popup BuilderPopup Builder
- InteractionsInteractions
- Layout BundlesLayout Bundles
- Pre-made BlocksPre-made Blocks
- DocumentationDocumentation
- EasyStoreEasyStore
- ResourcesResources
- DocumentationDocumentation
- ForumsForums
- Live ChatLive Chat
- Ask a QuestionAsk a QuestionGet fast & extensive assistance from our expert support engineers. Ask a question on our Forums, and we will get back to you.
- BlogBlog
- PricingPricing
A Complete Guide to Building an eLearning Platform in Joomla
If you’re planning to create your educational site, whether for an institution or a visionary eLearning academy, having a solid Learning Management System (LMS) is the cornerstone of success. But let’s face it—getting started can feel overwhelming, with so many moving parts to consider.
That’s where this guide comes in. We’ll walk you through the process of building an engaging educational site with Joomla, covering everything from functional quizzes and lessons to course pages and instructor management without confusing tech jargon! So, let's dive in.
Key Resources to Get Started With Your Joomla LMS Site
Creating a Joomla LMS site is easier than you might think, but having a clear roadmap is crucial to ensure a smooth and efficient process. Whether you’re building a platform for professional training, academic courses, or hobby classes, the right preparation will save time and avoid unnecessary hurdles.
Let’s explore the necessary steps or requirements to get started with your LMS platform:
- Install Joomla CMS: Begin by installing Joomla CMS, a robust platform that offers flexibility for creating websites. It provides a solid foundation for building your LMS site, allowing you to manage content and users with ease.
- Choose a Template to Fast-Track Development: Select a Joomla template designed for e-learning or one that integrates well with your chosen Joomla extension. A good template will save time by providing pre-designed layouts and responsive features, allowing you to focus on content creation.
- Install a Joomla LMS Extension: Choose a Joomla extension tailored for creating and managing online courses. This extension will handle course creation, quizzes, student tracking, and other essential e-learning features, making it the backbone of your LMS site. Once installed, configure the extension to suit your specific educational goals.
Build an Engaging LMS Site in a Few Easy Steps
Now, you might be looking for a functional Joomla LMS extension to save time and focus on creating an engaging learning experience. This is where SP LMS comes in. SP LMS is a powerful Joomla extension designed to simplify course creation, management, and more giving you everything you need to build an engaging e-learning platform.
Here is a step-by-step guide to building a simple LMS site on Joomla using SP LMS:
Step 1: Download and Install SP LMS
Start by downloading SP LMS and installing it just like any other Joomla extension. You can utilize SP LMS to build your LMS website from the ground up using Joomla. However, to speed up the process, you can opt for using a responsive Joomla LMS template tailored for educational or e-learning platforms.
For this tutorial, we will use our Educon II Joomla template. However, you can use any of the other educational Joomla templates available on the JoomShaper site.
Step 2: Create a Proper Course Structure
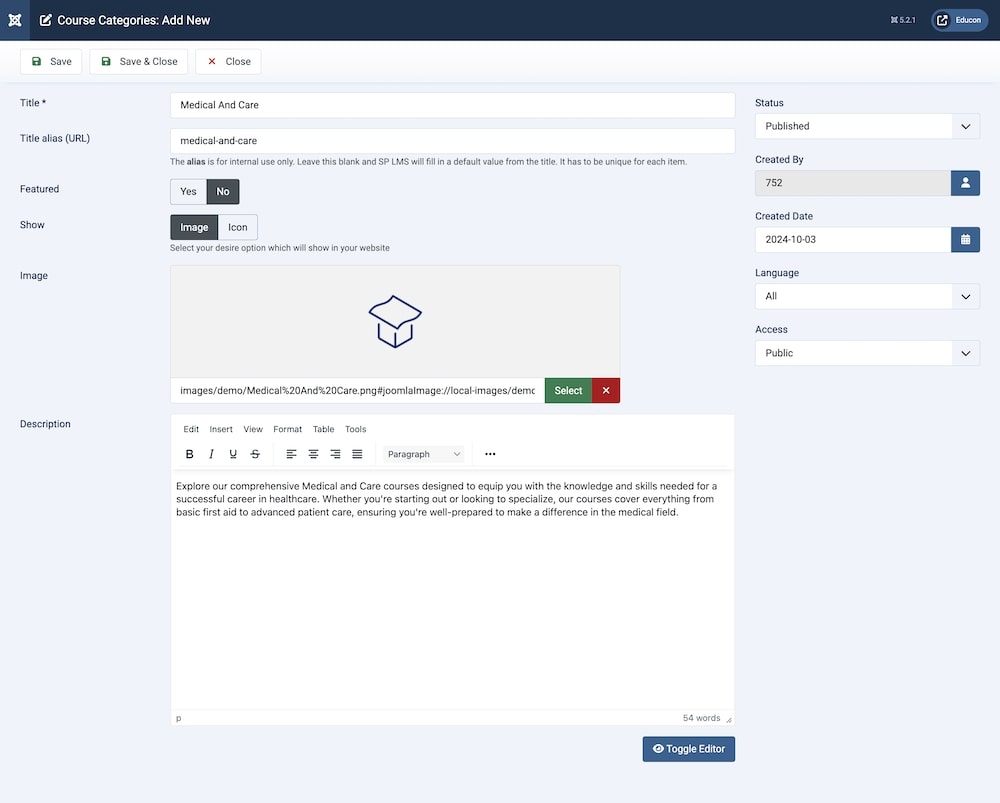
After setting up the template, start creating your online courses and course categories. From your Joomla dashboard, under Components > SP LMS, you will find all the features you need to set up your online courses, including Course Categories and Courses.
To create a Course Category, go to Components > SP LMS > Course Categories. After clicking on the “+New” icon, you need to:
- Add a title and title alias.
- Toggle the featured option to set whether this particular category will be featured prominently on the course category page.
- Add an image to give visual flair to your course category. You can upload an image or add an icon from the Font Awesome library.
- Finally, add a description to your course category.
Once you are done with that, set the status to published and hit “Save”. Repeat the similar process to create the rest of your categories.
Create Courses:
The next logical step is to create a Course. Go to Components > SP LMS > Courses. After clicking on the “+New” icon, you need to:
- Add course name and title alias.
- Select the category you created earlier that this course belongs to.
- Provide a short and detailed description of the course.
- Add an image that suits your course’s content to be used as a banner.
- If you have a promotional video for this course, insert the URL in the given field.
- Customize the schedule for the course.
- Set the difficulty level and prices for this course.
- Add the admission deadline and duration for the course.
Once you are done with everything, set the status to published and hit “Save”. You can also add your metadata for better SEO practices.
Step 3: Add Lessons and Lesson Topics
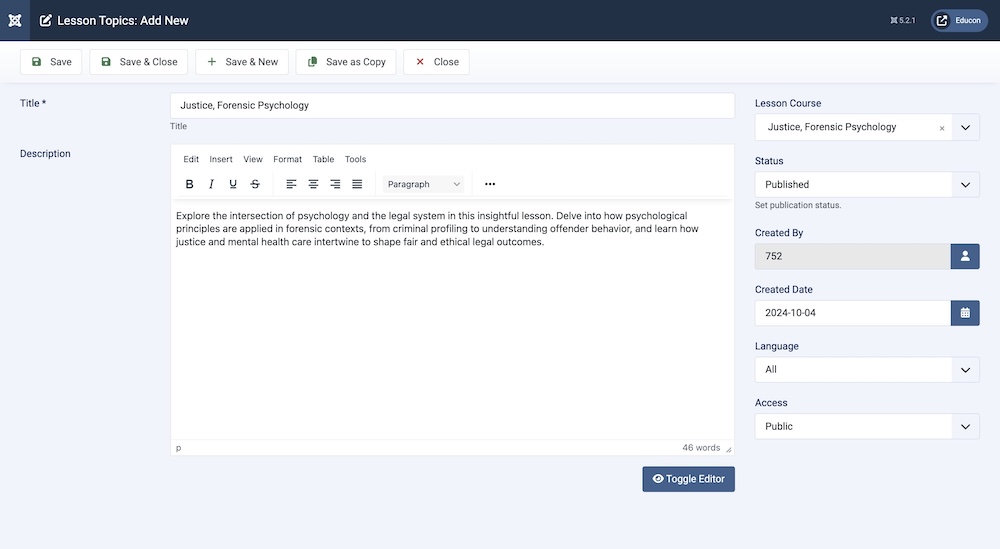
Adding Lessons and Lesson Topics to your LMS site helps organize content effectively, making it easier for learners to follow along and stay engaged throughout the course. Effortlessly create your lesson topics by navigating to your Joomla dashboard and choosing Components > SP LMS > Lesson Topic. Click on “+New” and then enter the title and description for the topic. Select which course this lesson belongs to, then hit “Save”.
Afterward, go to Components > SP LMS > Lessons to fully create and customize lessons.
- Add a lesson name and title alias.
- Provide a short description as well as a detailed description of the lesson.
- Add an image that suits your course’s content to be used as a banner.
- Insert a URL that will fetch the lecture video for this lesson. You can also upload a thumbnail to accompany the video, as well as set the video’s duration.
- Include supplementary material for this lesson, such as lecture slides or PDF via the Attachment option.
- You also have the option to choose whether this lesson is paid or free for students.
- Finally, select the lesson course, lesson topic, and the teacher for this lesson.
- Once everything is completed, save and publish the lesson.
Step 3: Assign and Manage Instructors for Effective Course Delivery
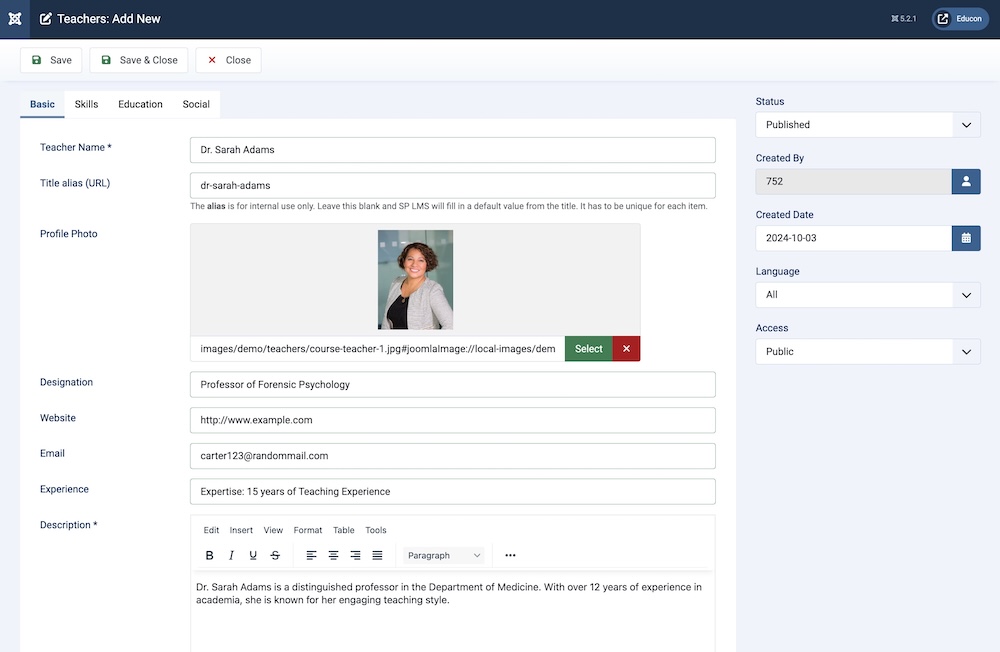
Speaking of setting instructors, with SP LMS, you can easily add and manage instructor profiles, including their bios, qualifications, and areas of expertise. You can also add social links to your instructors, increasing the credibility of your platform and allowing students to connect with their instructors directly.
Accessing this setting is the same as before, simply go to Components > SP LMS > Teachers. Click on the “+New” icon to add an instructor’s information.
- From the Basic tab, first, you need to add the instructor’s name and title alias.
- Then, you need to add the teacher’s profile photo.
- Subsequently, enter the instructor’s designation, website (if applicable), email address, and experience.
- Afterward, add a detailed description of the teacher. This can serve as a bio for the instructor.
- Click on the Skills tab to add the instructors’ area of expertise as well as their expertise level (in percentage).
- From the Education tab, you can insert the teachers’ education qualifications, such as their Institute’s name, logo, location, and session period which the teacher attended.
- The final step is customizing the Social tab, where you can add all required social links the instructor may have (such as Facebook, Linkedin, Instagram, etc.)
- Once you are happy with the settings, click on “Save” after ensuring the status is set to published.
Step 4: Set Up Interactive Quizzes and Assignments to Test Knowledge
Next, add some quizzes and assignments. Access the quiz option from Components > SP LMS > Quiz Questions. There, you will find a plethora of options to customize and add media to your question sets.
- The first option enables you to add the title and title alias for the quiz.
- You can add an image to add visual flair to your quiz.
- Afterward, you must set the quiz duration time.
- Next, select the course to which this quiz belongs via the dropdown menu.
- You can provide a detailed description of the quiz in the following text field.
- You can select whether the quiz is a free quiz or a paid one.
- Finally, you can add the questions for the quiz. You can add the question title accompanied by four possible answers, and set which answer is correct.
- To finish creating the quiz, set the status to published and click on “Save”.
Make sure to include feedback and explanations for correct answers, as this helps students learn and engage more deeply with the material. You can easily do this by heading to Quiz Result under SP LMS.
Once you are in the Quiz Result tab, simply add a new result and select the student, the quiz, the points achieved, and the marks.
Step 5: Make Courses Available As a Menu Item
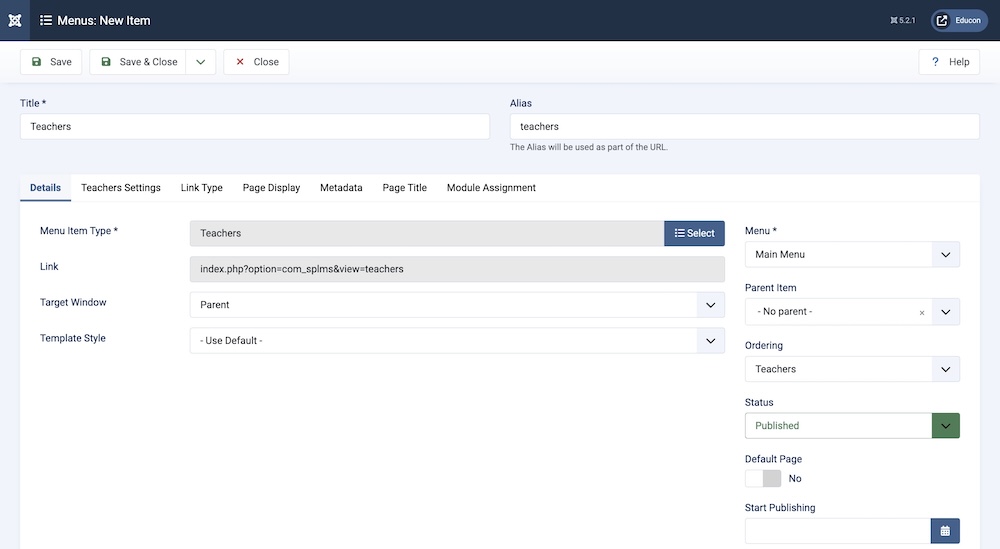
After you finish setting up your courses and lessons, one important thing you need to do on the backend is to add these options as a menu item so that they display on the top of your website and are easily accessible by users.
To do this, from the Joomla dashboard go to Menus > All Menu Items and click on “+New”.
- Give your new menu item a title (such as Courses or Lessons). Next, select the Main Menu or any other menu where you would like this item to be displayed.
- Choose SP LMS as your Menu Item Type.
- Once you select SP LMS, you'll see options like 'Cart,' 'Categories,' 'Courses,' 'Questions,' and 'Certificate.' Simply choose the one that matches the content you want to display, such as 'Courses' to showcase all available offerings.
- Finally, save your menu item.
Step 6: Set Up Payment Options if You Wish to Sell Your Courses
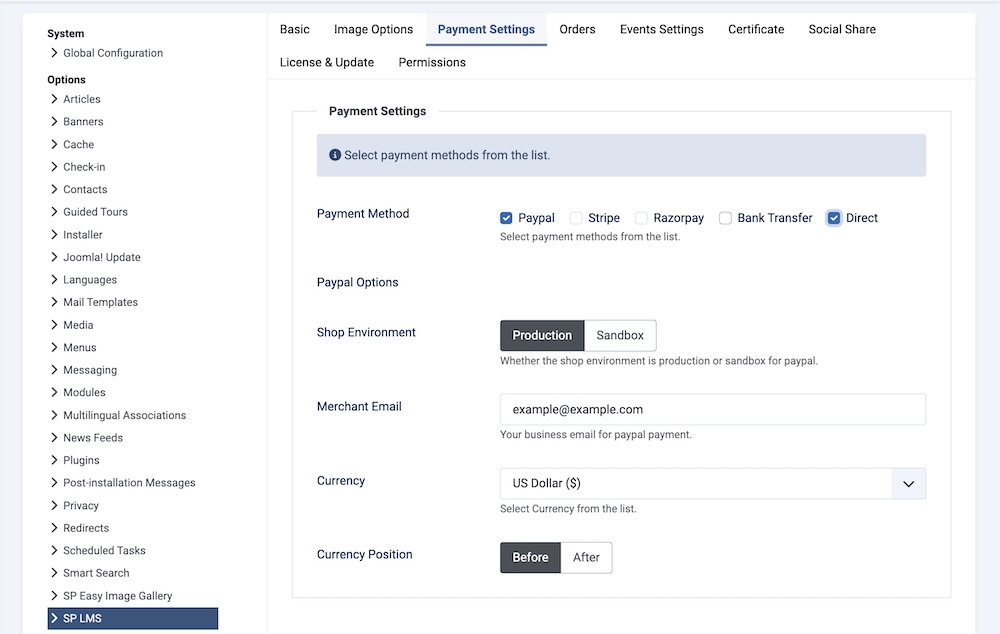
Now, you want to sell your courses to potential customers with ease. With SP LMS, you do not require any external eCommerce extension to sell your courses.
To set up, from the Joomla dashboard go to Global Configuration and navigate to “SP LMS”.
- While on Global Configuration, you will see several tabs. Click on Payment Settings.
- Set the payment methods you want to apply. Currently, the available methods include PayPal, Stripe, Razorpay, Bank Transfer, and Direct Payment.
- Select the currency of your choice.
- Finally, you can customize whether the position of the currency sign will be before or after the amount.
Final Results
With your Joomla education website set up, it’s time to see your hard work in action!
Preview your site to view all your updates seamlessly integrated and displayed dynamically.
To learn about all the aforementioned features as well as other additional functionalities of SP LMS in further detail, be sure to check out our detailed documentation.
Explore More Features of SP LMS to Elevate Your Joomla e-Learning Site
Now that your LMS site is ready to shine, don’t forget there’s so much more you can achieve beyond creating courses and managing lessons. Let’s explore what else SP LMS offers:
- Boost Engagement by Hosting Live Events and Webinars: Hosting live events and webinars is a fantastic way to build community and keep your students engaged. Using SP LMS, you can set up Events, Event Categories, and Speakers for the events.
- Award Custom Certificates for Successful Course Completion: Certificates add a layer of recognition and achievement for your students. SP LMS lets you personalize and create certificates with the student’s name, course title, and completion date.
- Include SP LMS Modules for Enhanced Experience: Enhance your site with modules like the SP LMS Cart to enable users to proceed from course selection to checkout effortlessly, or the Upcoming Events module to highlight key events. These additions create a more comprehensive and engaging user experience.
- Add and Customize Orders for Seamless Management: Easily add and customize orders for seamless management with SP LMS. This feature allows you to handle offline payments effortlessly, ensuring a smooth and transparent process for both administrators and learners.
- Enable and Manage Course Reviews for Enhanced Credibility: With SP LMS, users can leave ratings and detailed feedback for completed courses. You can easily oversee these reviews from the backend by navigating to Components > SP LMS > Reviews.
Wrapping Up!
We hope you’ve found the steps easy to follow and learned how simple it can be to implement your courses and other LMS elements with SP LMS. Whether you're building a website for schools, universities, an online academy, or any educational platform, SP LMS offers the most affordable Joomla LMS solution for educators.
Don't forget to share your thoughts on SP LMS and how it’s helped your educational site in the comments below!


Glad we can use integrated payment methods for monetisation, helpful.