- TemplatesTemplates
- Page BuilderPage Builder
- OverviewOverview
- FeaturesFeatures
- Dynamic ContentDynamic Content
- Popup BuilderPopup Builder
- InteractionsInteractions
- Layout BundlesLayout Bundles
- Pre-made BlocksPre-made Blocks
- DocumentationDocumentation
- EasyStoreEasyStore
- ResourcesResources
- DocumentationDocumentation
- ForumsForums
- Live ChatLive Chat
- Ask a QuestionAsk a QuestionGet fast & extensive assistance from our expert support engineers. Ask a question on our Forums, and we will get back to you.
- BlogBlog
- PricingPricing
How to Create a Dynamic Portfolio Website in Joomla
Showcasing your creative work online shouldn’t be a chore.
With a dynamic portfolio site, there’s no need to manually update layouts or reformat pages. Just add your projects, and your site stays clean, consistent, and ready to impress—no matter how much it grows.
In this guide, we’ll walk you through creating a modern, dynamic portfolio using Joomla—no coding required.
Save Time and Stay Consistent with a Dynamic Portfolio Setup
Managing your portfolio by manually duplicating layouts or updating individual pages is time-consuming. A dynamic setup streamlines the process.
Here’s why building a dynamic portfolio is a game-changer:
- Centralized project management saves time and effort
- New project pages are generated automatically
- Content is managed independently from design
- Layout updates apply across all project pages
- Scales easily as your portfolio grows
In other words, a dynamic portfolio gives you more freedom, better control, and a professional edge—all without the maintenance headaches.
Which Joomla Page Builder Is Best for Dynamic Portfolios?
To build a portfolio website that’s both easy to manage and visually impressive, you need a Joomla page builder that supports dynamic content. SP Page Builder makes it easy to build a flexible, professional portfolio site—without coding or design headaches.
Here are the key reasons to use SP Page Builder for creating your portfolio site:
- Drag-and-drop interface simplifies layout design
- Built-in Dynamic Content automates project updates
- Responsive layouts ensure mobile-friendly viewing
- SEO-ready structure improves online visibility
- Integrated media manager streamlines image and video uploads
- Pre-designed templates help you launch faster
How to Build a Dynamic Portfolio in Joomla in 5 Steps
After you have installed SP Page Builder and set up your site, the next step is structuring your content. This involves creating structured collections to dynamically store and manage your portfolio data.
Whether you are editing a template or starting from scratch, the following steps will help you make your Joomla site dynamic. Let’s get started:
Step 1: Set Up a Portfolio Collection Using Dynamic Content
The very first thing you need to do is head over to your Joomla Dashboard and go to Components > SP Page Builder Pro > Dynamic Content. Then, click Add New Collection or choose from handy presets like Projects, Services, or Profiles, which come with pre-built fields you can customize later.
Let’s say you want to build a Projects collection from scratch. After adding and naming your collection, populate it with fields such as Image, Gallery, Video, Text, Rich Text, Date/Time, Option, and Link. These fields offer enough flexibility to organize your content efficiently, and you can always update or add more later.
Once you’ve added your fields, hit Create Collection.
Now, you’re ready to start adding projects. To do this, you have to:
- Select the Projects collection and click the Add New Item button.
- Fill up all the fields. Upload project images, write descriptions, and so on.
- Click Save.
Simply follow the same steps to create other necessary collections, such as your list of clients, profiles for you and other artists in your team, tools used, project categories, etc.
Step 2: Connecting Collections with References
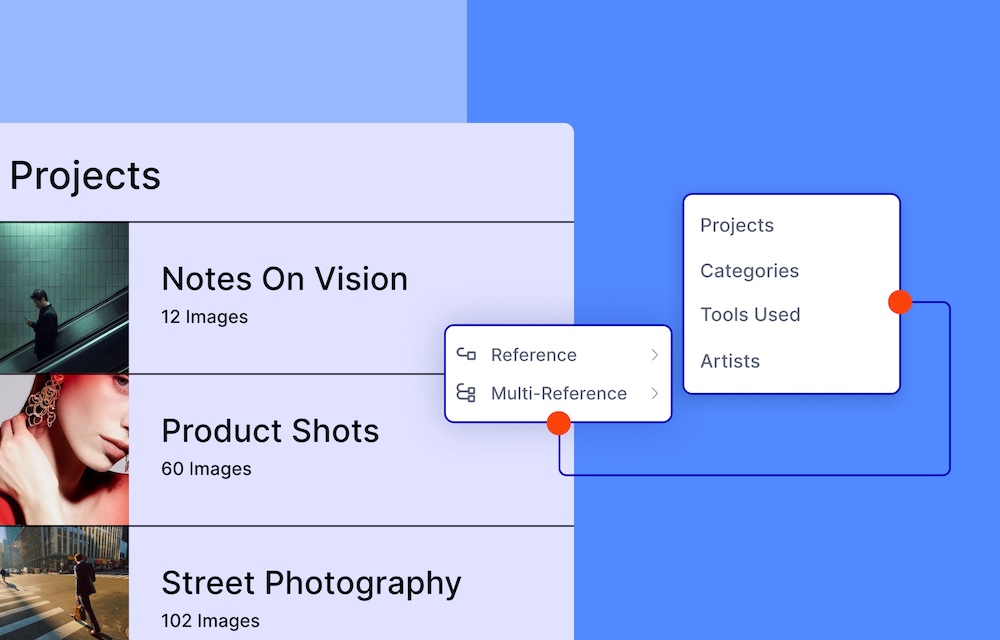
If you’ve followed through so far, you have successfully created a basic “Projects” collection.
Let’s assume you want to build a more diverse website for a Creative Firm with multiple artists. Each project should have an artist, and each artist can use multiple tools for the project.
For these kinds of scenarios, it is optimal to use References and Multi-References to link collections together.
How to add and use a Reference Field:
To add a Reference Field, first create an Artists collection and fill it with artist details.
Then go to Projects collection > Custom Fields > +Custom Field > Reference, and set it to reference the Artists collection.
After saving, you can select an artist from a dropdown when editing any project.
How to add and use a Multi-Reference Field:
Similarly, you can link multiple items using a Multi-Reference Field.
Create a Tools Used collection first, then go to Projects > Custom Fields > +Custom Field > Multi-Reference and connect it to the Tools Used collection.
By connecting collections with Reference and Multi-Reference fields, you build a flexible content architecture that’s not only easier to manage but also more engaging and accessible for your site visitors.
Step 3: Design an Index Page to Showcase Projects
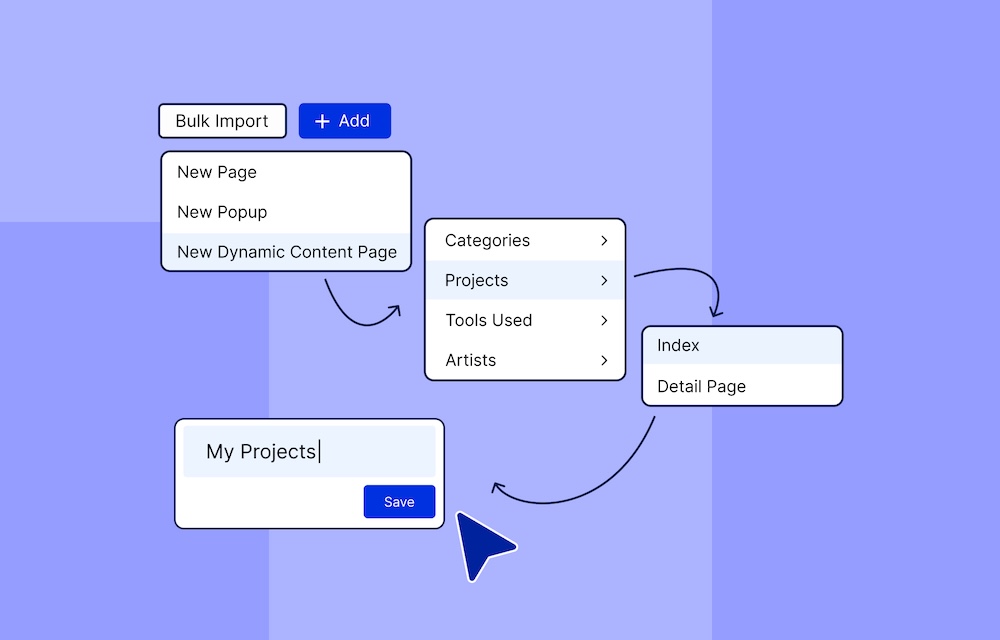
Now that your collections are ready, it's time to bring them to life on your website.
First, you’ll need to create a main showcase page where all your projects are listed for visitors to explore.
Navigate to Pages in SP Page Builder and click + Add > New Dynamic Content Page > Project > Index. After entering a suitable name for your page, you’ll be redirected to the backend editor.
Just like designing any other page in SP Page Builder, you can create a custom layout for your Index page using drag-and-drop elements. Use the Dynamic Addons to pull in content from your collections.
-
Use the Collection addon to list items from your Projects collection by setting the Field Source accordingly.
-
Within the Collection addon, add Dynamic Media for images or videos and Dynamic Text for titles, descriptions, and other text-based fields.
Note: You can only use the Dynamic Media and Dynamic Text addons as long as they are placed within the collection addon.
Step 4: Create and Customize Dynamic Project Detail Pages
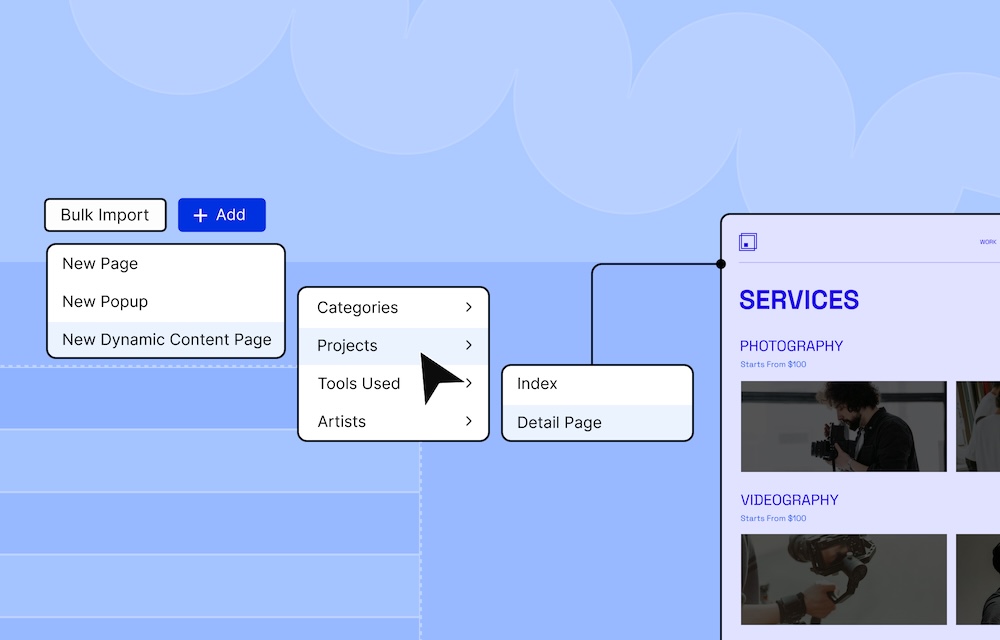
Next, you’ll need to set up individual pages that highlight the full details of each project so users can dive deeper into the work that interests them.
Similar to creating an index page, head over to SP Page Builder and open the Pages tab from the dashboard once again.
This time, click + Add > New Dynamic Content Page > Project > Detail Page.
Unlike the Index Page, you can freely place the dynamic addons here to map fields like title, description, or images without the need for the Collection addon. However, for Reference or Multi-Reference fields (like Artists or Tools Used), you’ll need to use a Collection addon to display linked content.
Once set, each new project entry generates its own page automatically using this layout.
Note: SP Page Builder automatically generates a slug (URL) for each dynamic page, making navigation seamless.
Using the Gallery Field for Project Showcases
When adding or editing a project, use the Gallery field to upload multiple images through the Media Manager.
These images can be easily displayed using the Dynamic Media addon in SP Page Builder—just set the Field Source to your gallery field and customize the layout to fit your design.
A Gallery field is particularly useful for showcasing multiple visuals per project without needing to use separate images manually.
Step 5: Set Up Dynamic SEO Tags for Portfolio
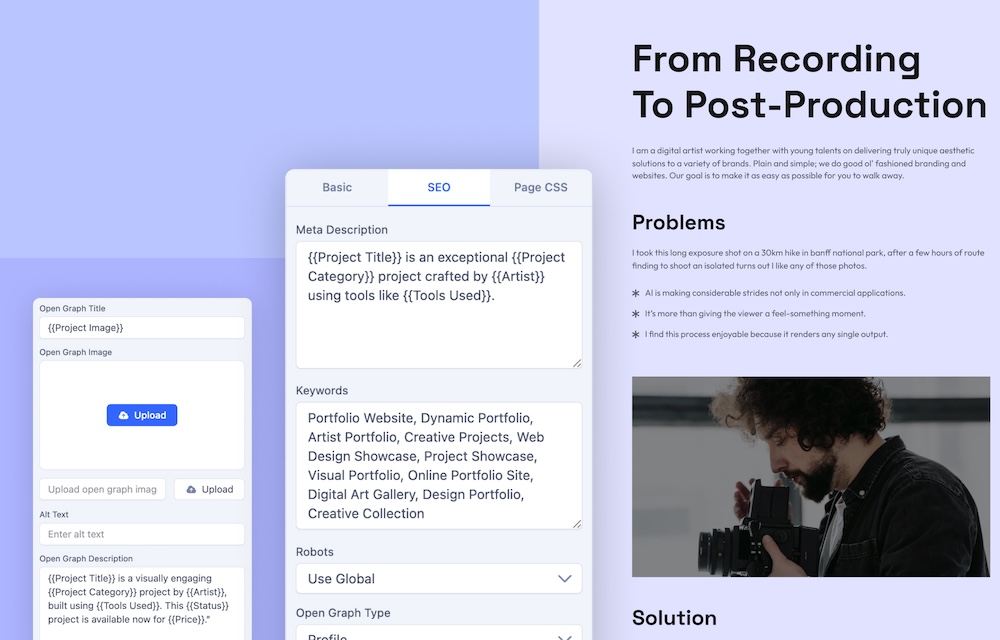
SP Page Builder includes built-in SEO tools for setting meta descriptions, Open Graph data, keywords, and image alt text—all in one place. Just head over to Page Settings > SEO tab.
You can customize SEO settings by using dynamic variables that pull directly from your Project collection. Here is an example on how you can set up each of the SEO fields:
-
Title: “Explore {{Project Title}} – A Standout {{Project Category}} project by {{Artist}}”
-
Meta Description: “{{Project Title}} is an exceptional {{Project Category}} project crafted by {{Artist}} using tools like {{Tools Used}}. The {{Status}} project is currently available for purchase for a price of {{Price}}.”
-
Open Graph Image: Use {{Image}} from the project’s media to generate a striking thumbnail for social sharing.
Final Result
If you have followed all of the above-mentioned steps, your site should look something like this:
If you would prefer a more detailed visual walkthrough, be sure to check out our video tutorial and follow along to create a stunning and dynamic portfolio website.
Additional Tip
You can use the Dynamic Filter addon to let visitors instantly sort and explore your projects based on projects, categories, status, tools used, or any other collection.
Simply select your desired collection as the source and choose filter layouts like accordion, dropdown, or flat.
The addon supports various filter types, such as checkboxes, sliders, search bars, and more, allowing a fully customizable and interactive filtering experience that updates results in real time.
For specific instructions on using this addon, please refer to the official documentation.
Wrapping Up
Building a dynamic portfolio website in Joomla is now easier than ever with SP Page Builder’s no-code tools and dynamic content capabilities.
Have you explored the potential of dynamic content in any of your projects yet? Share your thoughts or suggestions in the comments—we’d love to hear from you!



Thanks in advance for your answer.