Even if designing your site’s footer doesn't always gain the best attention, you can’t deny the importance that it holds for certain visitors. And one of the essential parts of your site’s footer is the footer menu. While some of you might find it tricky to place your menu at the footer, Helix Ultimate will only make the job amazingly simple for you.
So in today’s article, we will explain you through some simple steps on how you can create a footer menu for your site simply and without a single line of code! Without any further ado, let's head over to the start.
Why Do You Need a Footer Menu?
To be precise, there aren’t any specific recipes for designing or implementing a footer menu. Your users who cannot find specific information within the main menu are most likely to scroll down to the bottom to find out more. Hence it's only wise to display the info that your main menu doesn't offer at your site's footer. Displaying different menu items at the footer also means that you don't have to make the main menu crammed with excess contents that will only make navigation for your users difficult. That's why your footer makes the perfect section to set out those extra menu items.
Let’s Build a Horizontal Footer Menu Easily
Once you have decided on what items should sit on your site’s footer, it's time to implement your plans! Let's get straight to the easy and simple steps to create an easy, clean, and simple horizontal footer.
Step 1: Get Helix Ultimate
Make sure to get your Helix Ultimate pack ready. Visit the JoomShaper website and get your Helix Ultimate template framework. In case you are wondering how to install the quickstart pack, here is the complete tutorial for you.
Step 2: Create Your Footer Menu
Login to your Joomla dashboard. From the dashboard navigate to the Menus > Manage. Create a new menu and insert the Title and the Unique name.

Step 3: Add Menu Items to the Newly Created Menu
At this point, we need to add the menu items to the newly created menu. To do that click on the + sign beside your created menu from your Joomla dashboard.

This will land you on the Menu Items page from where you can create a menu item.

From this page carefully fill in all the information that is required to create your menu items. In our case, we named the menu item Contact Us and fill in all the required information like below:
- Menu Item Type: System Links > URL
- Link: #
- Menu: Footer Menu
Hit Save & Close and repeat the process to create multiple menu items.

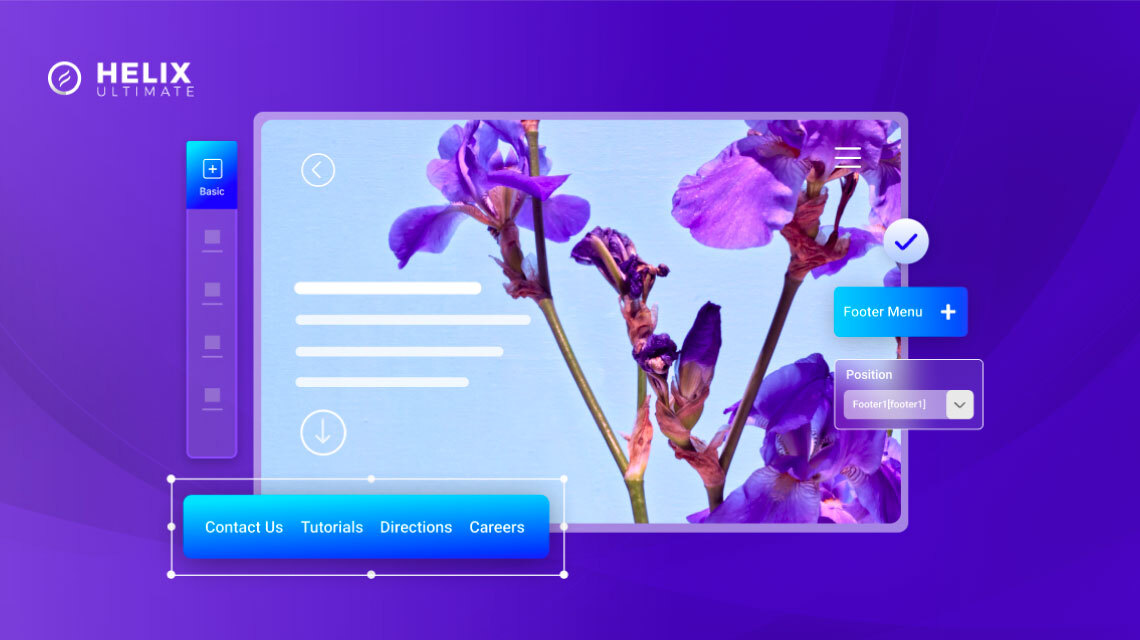
Step 4: Assign Module to the Menu
Once you are done creating the menu items for your footer menu it's time to add a suitable module for your menu. From your dashboard go to Menus > Manage. Here you should find the Linked Modules column from where you can add your module to the menu.

Hit ‘Add a module for this menu.' Then go ahead and add a title and choose a position for your module. For this demonstration, we have set the Position to Footer 1 [footer1]. Disable the Title button to hide the module title.
Also note that, while choosing the position from the dropdown list, make sure to choose the menu position from the Shaper-helixultimate list as we are using Helix Ultimate as our template framework.

Step 5: Switch to Helix Ultimate Frontend Editor
Hopefully, you can follow the steps so far. Now switch to the Helix Ultimate Frontend Editor. To do so navigate to the System from your dashboard. Choose Site Template > shaper_helixultimate - Default > Template Options. This will land you to the Helix Ultimate front-end editor.

Step 6: Final Outcome
From your Helix Ultimate frontend editor scroll down to the bottom of the page to find the footer. Bingo! Your horizontal footer menu has been created and displayed exactly how you wanted!

You can also experiment with your footer position by repositioning your modules. For example, in order to set the entire menu to the right-hand side of the footer, simply change the position of your module to Footer 2.
Wrapping Up
We hope you could follow through with the steps demonstrated above and could come up with a footer menu for your site. By creating a footer menu for your site you will be much more helpful to every site visitor who scrolls to the bottom of your page. And when Helix Ultimate lets you accomplish your work in a snap, why not give it a try today?
Don't forget to share your experience and feedback with us in the comments sections below. Happy developing!