Your favorite SP Page Builder 4 marked its first step a few days ago with a vision to transform your web building experience into a far more convenient one. With this brand-new version of Page Builder 4 comes a number of new features to help make your life easier. And what else could be better than being able to manage your workflow just the way you like!
In this article, we will be shedding some extra light on SP Page Builder 4’s brand new feature - Layers. Much like Photoshop or Sketch Layers, it turns your builder into a layered interface and lets you customize everything at any stage.
So let’s jump right in without further ado!
What are Layers in SP Page Builder 4?
Using Layers in SP Page Builder 4 actually allows you to keep your sections organized to manage your workflow without a hitch. While using different elements of SP Page Builder, the Layers stack all your used elements on top of one another, which helps you craft your site with more proficiency.

How to Use Layers?
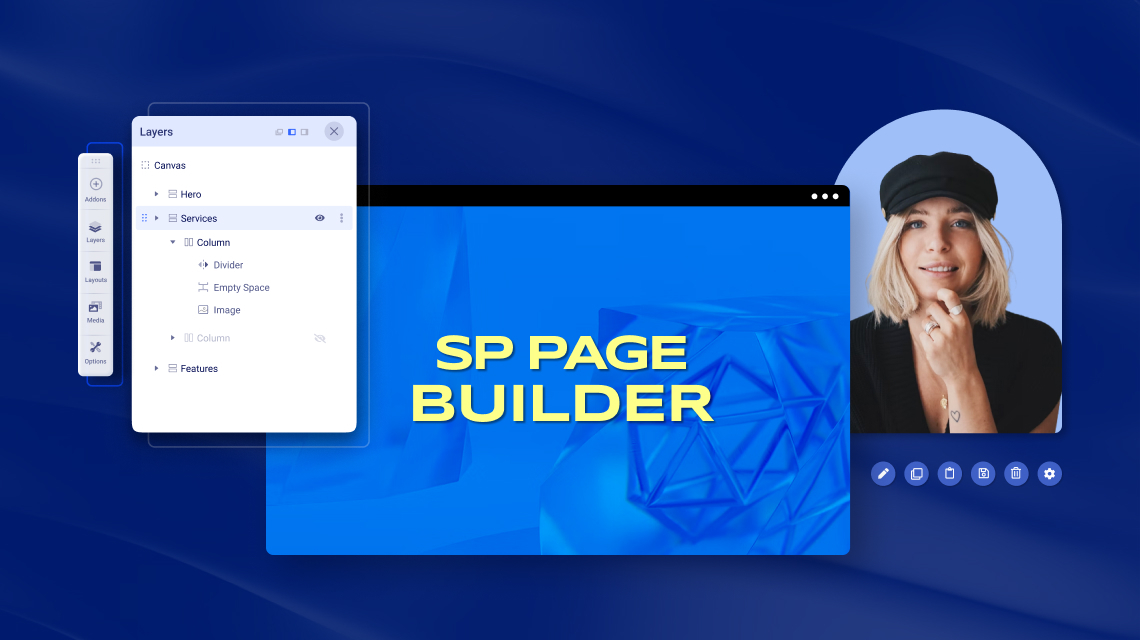
SP Page Builder 4 is all about frontend editing now. So to be able to use Layers simply go to the Dashboard and select the desired page. From the frontend sidebar editor, you can find the Layers tab just below the Addons.

Once you click on the Layers you can see that all the sections you have used on your page are organized separately. Click on each section to view the columns associated with each section. What’s more, you can also drag a section up or down to change the layout of your page.
As you go on adding different sections to your site, the layers panel will keep updating itself accordingly.
How Layers Can Make Life Easy!
Now that Layers have already come into action, let's shed some light on the brighter sides that come along with them.
Previously in SP Page Builder 3.x, making changes to your page layout was all about going back to your backend and coming back to the frontend again to view the change.
Now, with Layers at your rescue, you can visually and instantly see the layout changes that you have made and customize your page with minimal effort. Simply make the necessary changes and drag and drop the section wherever you think is suitable. Also, instantly make changes to your choice from the settings option available for each section.
Efficiently Customize and Manage Your Columns and Addons
Speed up your edits with Layers as it allows you to have a layered interface making it fun and easy for you to customize your sections in any way you want. Move and adjust the individual column as well as the addons you have used to change the position. Also, rename each section, column, and addon for better convenience and to recognize each layer in your layout.
Give the New Duplicate Option a Whirl!
The sections in your layer come with a fascinating option “Duplicate” that lets you instantly duplicate any section that you like. You can make changes to the duplicated one without the need to change the original one! Plus, duplicating a section means that you don't have to start creating a similar section again from the scratch and boost up your speed.
Toggle Section Visibility to Decide on the Best One
With SP Page Builder 4 Layers, you can also hide or display a section according to your preference. Toggle the visibility of an addon or a column in a section individually. Plus, you can also turn the visibility of an entire section on or off. The disabled elements will still exist, but users will not see them on the live site.
A Detailed Look Into the Layers

When you access the Layers tab from the SP Page Builder 4 sidebar, you’ll see how the existing sections and their content are organized on the current page.
The Canvas contains all the sections of your page that you are currently working on. When you click on the three vertical dots beside the Canvas, it should expand the available options. These options will let you expand or collapse all the sections and the associated columns and addons, clear the page canvas, or export & import any of your previously saved page layouts.

When you hover over each section, click on the three vertical dots to expand the related options. These options will let you save the individual sections, duplicate sections, copy, edit the section row, delete or rename the section, and also expand the detailed settings to edit your section.
Similarly, you can expand the options related to your individual columns and the used addons.
Access Nested Row Settings

In case you want to access the nested row settings, simply navigate to the Layers tab and Expand the Section associated with the nested rows. Expand the Columns and now you should be able to see your nested row. Click on the three vertical dots to access all the options related to the nested row. From here you can easily access your nested row Settings.
Please note that you can only access the nested row settings from the Layers.
The Convenience of Importing and Exporting Your Page
If you already have a page built with SP Page Builder Pro you can always save it for later use. This time SP Page Builder Pro makes exporting and importing your custom-designed page easier than ever!
With SP Page Builder Pro 4, you can export any page and import them for later use on other pages. Page structure is saved as a .json file.

To export/import a page:
- Click on ‘Layers’
- Click on the three dots you see in the Canvas section. These should open up extra options.
- From the list choose Export/Import.
Notice! The import process will override current page content if you don’t import the file on a new page. For more info on export and import, check out the documentation here.
Ending Thoughts
SP Page Builder 4 has been designed keeping user convenience at the core. And in this whole process of simplifying the user experience, Layers have added a new dimension. This new addition to the Page Builder family not just allows you to create a hassle-free workflow but also saves your valuable time by letting you see the changes instantly.
So go ahead and dive into a smoother, organized, and far more efficient web-building journey with the all-new SP Page Builder 4.