

How to create a real estate website with Joomla?

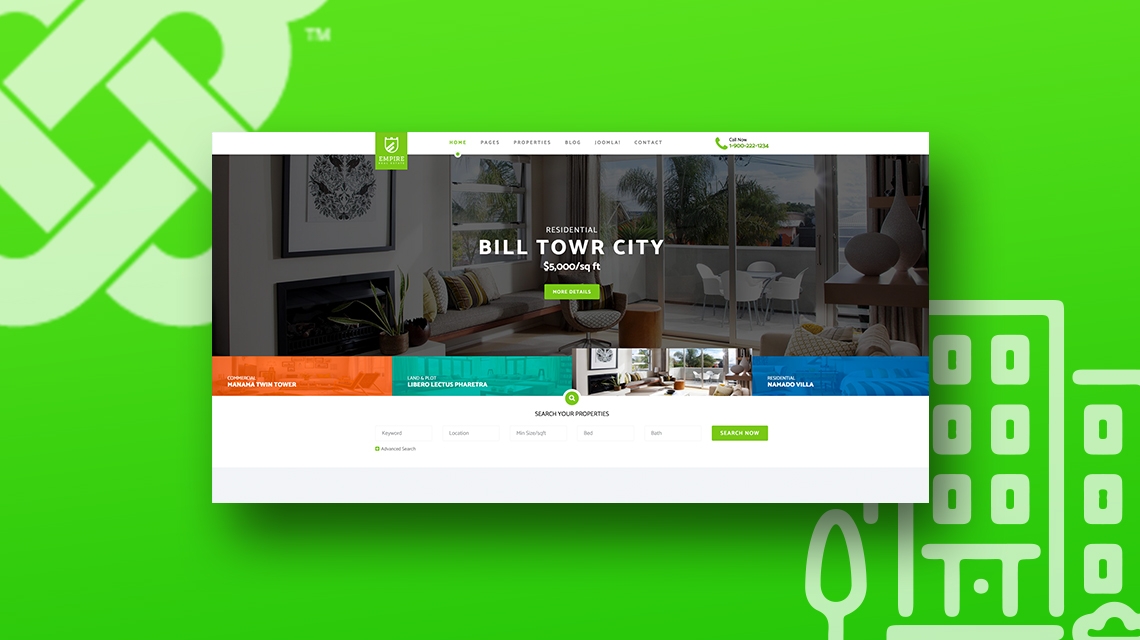
There are thousands of real estate websites in Joomla and the number is growing by the time. You are in need of developing a real estate website with Joomla but don’t know where to start, how to start and what to start with? Today we are going to show how easily you can develop and maintain a real estate website with JoomShaper SP Property extension and we have used our real estate template Empire to enlighten you with the extension functionality and visualization. And yes, our drag and drop Joomla page builder is also being utilized to compose these pages.
SP Property is a dedicated extension for real estate, construction and all other related websites that require a system to maintain the property list, property features, property display contents, agents, visit request of the property and all other data. SP Property lets you manage all those stuff with ease and gives a hassle-free development experience. You can use SP Property component on any Joomla 3+ site and it fits anywhere. The component’s nicely crafted features and clean functionalities could be a standalone frontier for your real estate business.
Now let's go through the in depth process of developing your real estate site with SP Property component. The extension was originally developed as a companion of our Empire template. So if you use both the item together, you will get the best output.
Download SP Property
You can download the SP Property extension from here. In your JoomShaper account's extension download section, you will see SP Property download button. So, download the extension from there.
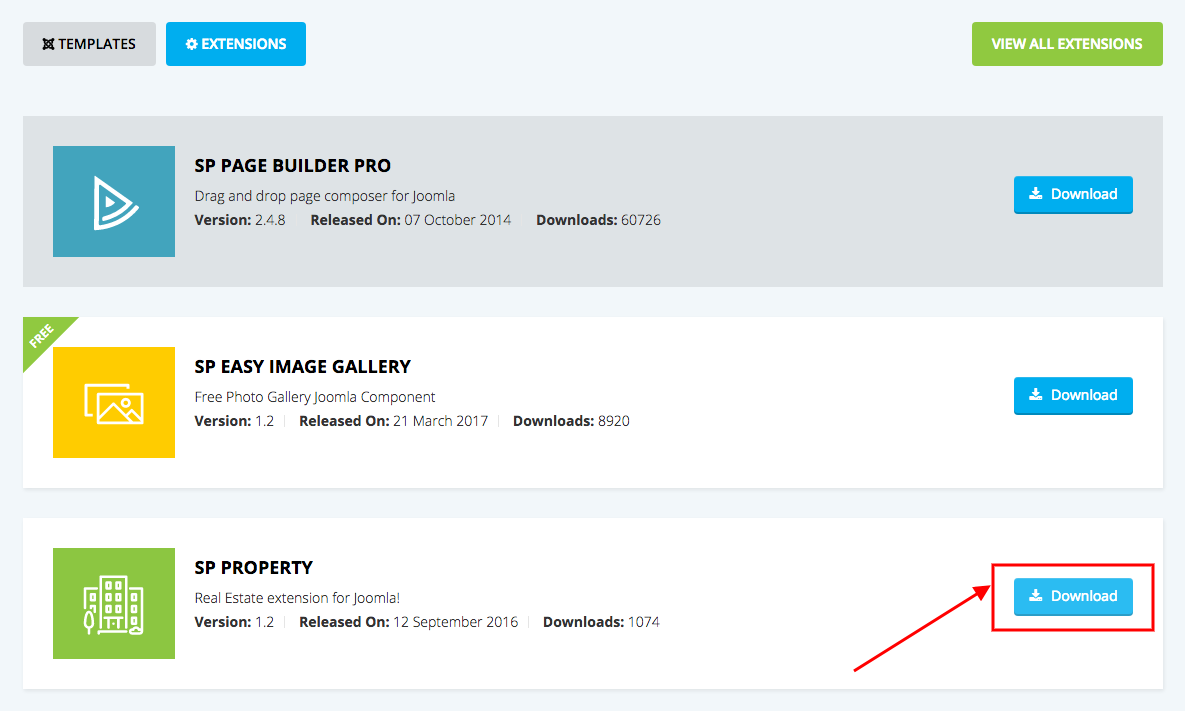
Figure: Downloading SP Property component
Install SP Property
In Empire, the SP Property extension comes along with the Quickstart pack of the template. So you don’t need to install it separately. But in case it is needed, you can install SP Property by following the usual Joomla extension installation process.
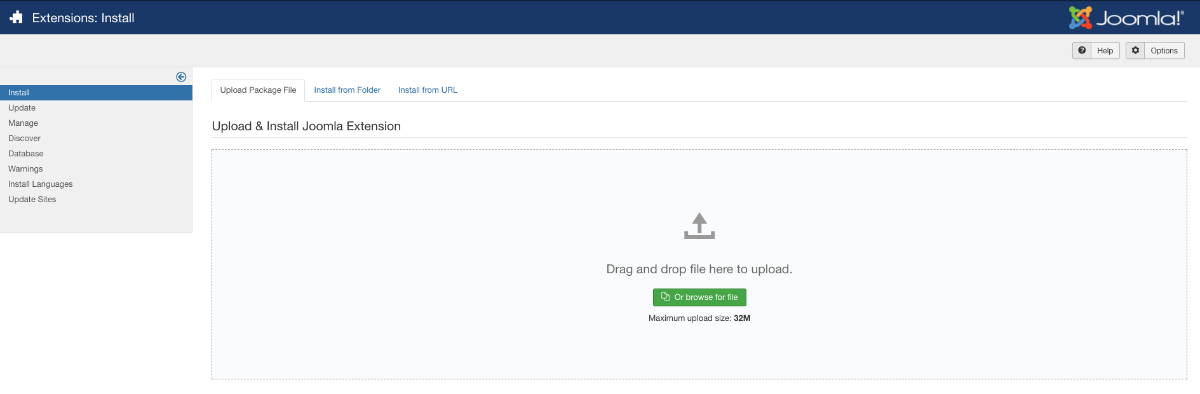
Figure: SP Property installation
SP Property at a glance
Here is the dashboard or the control panel of the SP Property component. You can add agents, properties, property features, property categories, visit request forms and such other important contents related to your assets to your site using the extension.
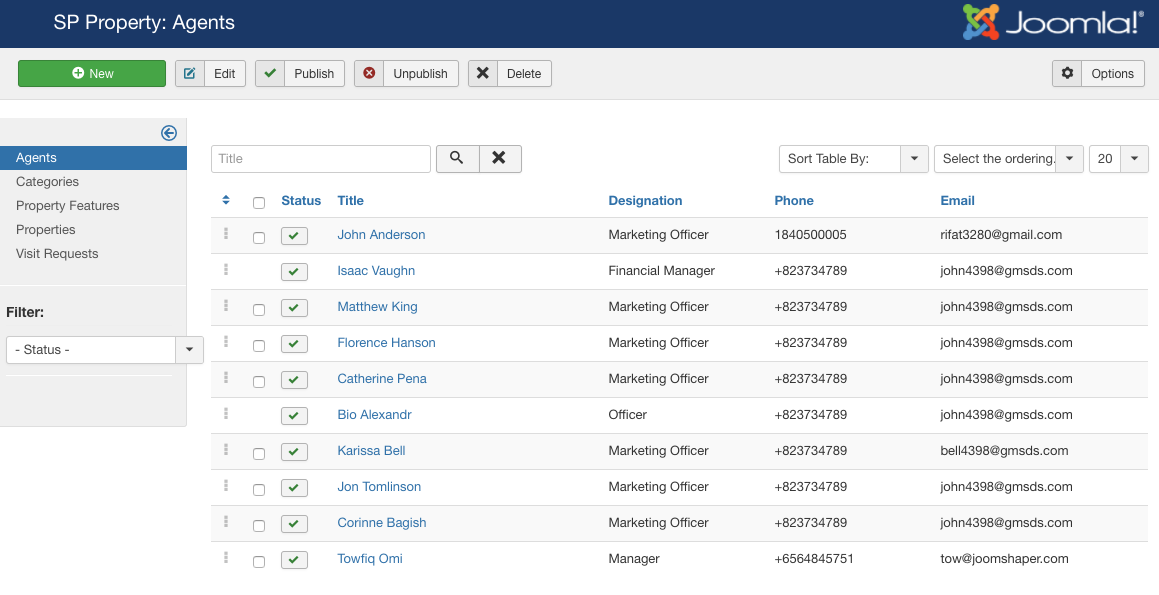
Figure: SP Property at a glance
Add an agent
On the left side of the component, there are options that you can add and customize. The first option is agent. Using this option you can add property agents to your site.
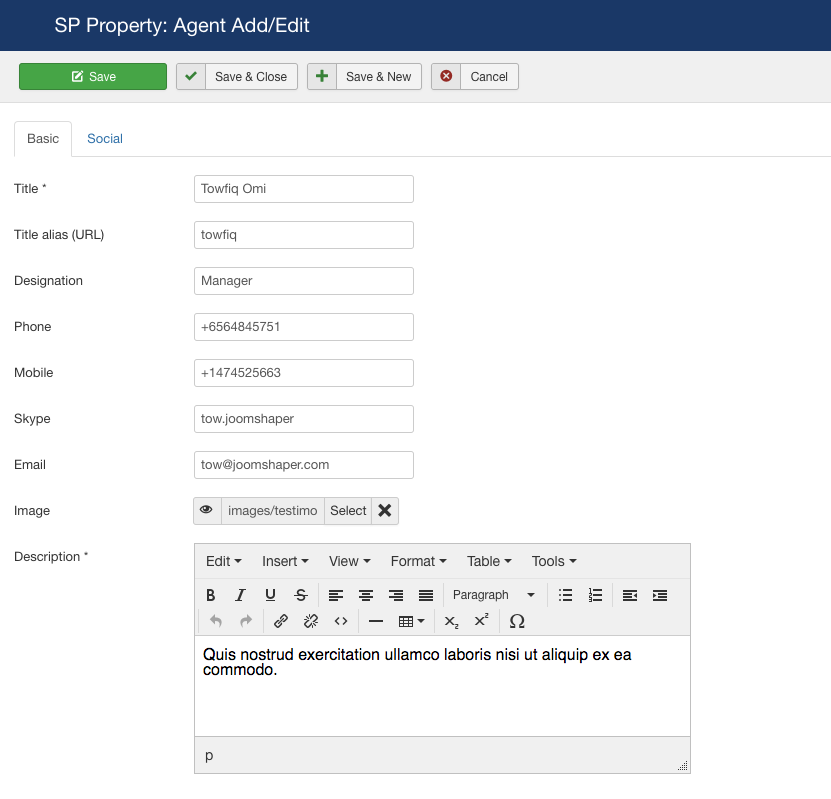
Figure: Adding a property agent
Title: In this field you have to add the name of the agent.
Title alias (URL): You can add title alias, the URL of an agent using this field. If you leave this blank, it will be auto generated.
Designation: In this field, you have to add the role of the agent, the position s/he is holding in the company.
Phone: Add the phone number of the agent here.
Mobile: Add the mobile number of the agent here.
Skype: Add the Skype contact details of the agent here.
Email: Add the email contact details of the agent here.
Image: Add the image of the agent using the field.
Description: In this field, you have to add the detailed description of the agent, where he is good, his experiences, his visions and services etc.
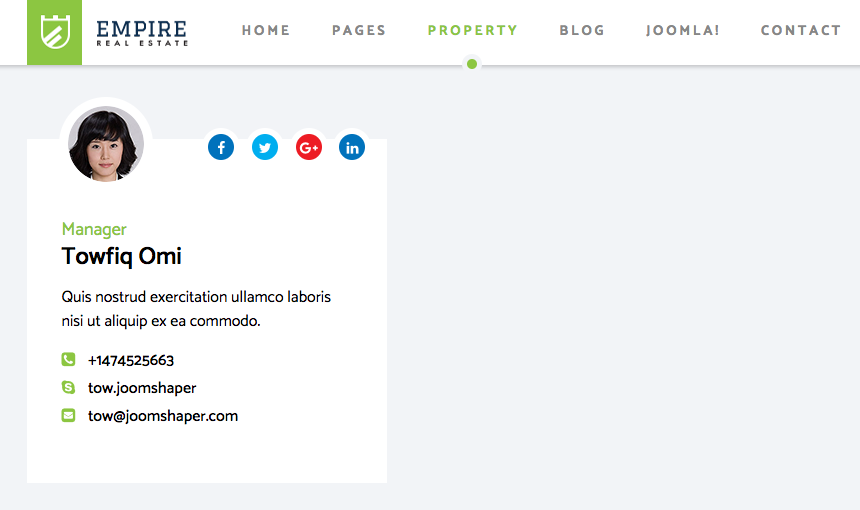
Figure: Added property agents
Create a category
The second option in SP Property is the category adding option. Here you can add categories of the properties you are going to display on your site. Example: apartment, flat etc.
Title: Add the name of the property category using this field.
Title alias (URL): You can add title alias, the URL of the category using this field. If you leave this blank, it will be auto generated.
Show icon/image: There are two options. Select whether you want to show icon or image with this category.
Image: Upload the image of the category using this field.
Icon class: Add the font awesome icon class of the icon.
Description: Add the detailed description about the category’s nature, it's about and everything.
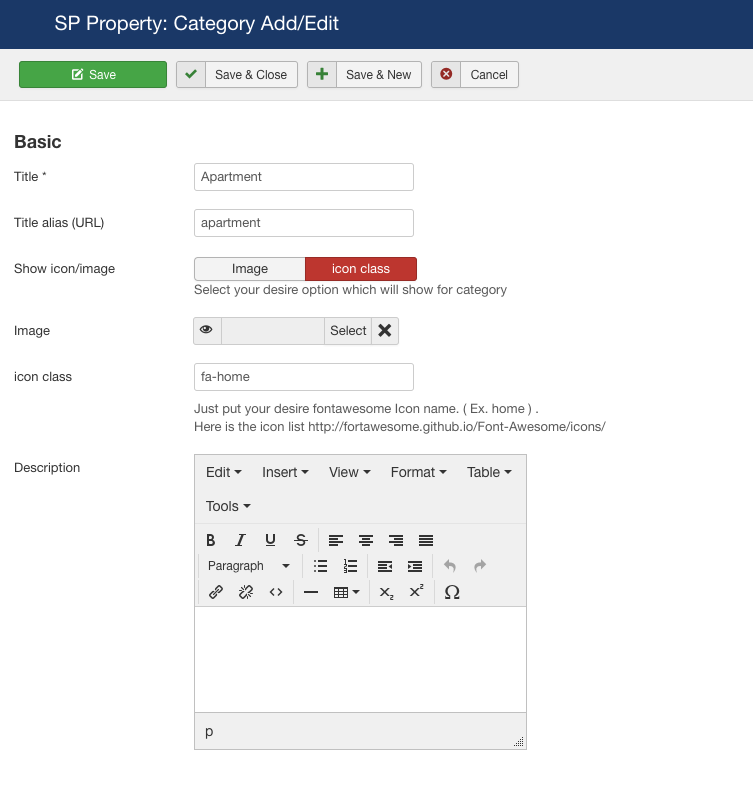
Figure: Adding a property category
Add property features
In the third option of the SP Property plugin we are going to add property features that we will assign later to the properties. You just have to add the name of the feature, language and accesses to create a feature. Click new to add the new feature.
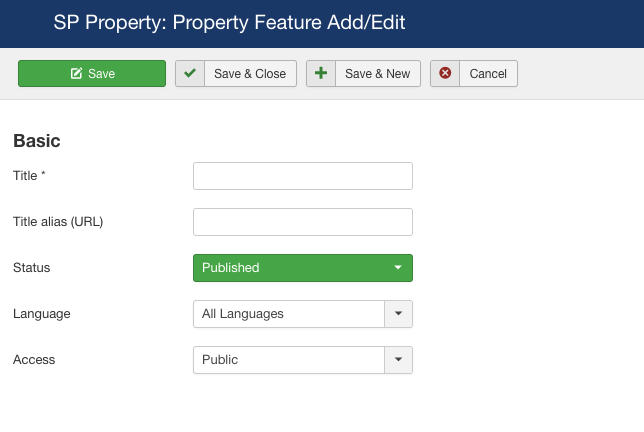
Figure: Adding property features
Create a property
In this option, we will do the most front-facing work. Here we will add our property(s). Click new to add a new property. Now you need to do some customizations.
Property basic
Title: Here give the name of the property.
Title alias (URL): Add the title alias which will work as the URL of the property item.
Category: Add the category of the property. You have created the categories few minutes ago. Add which one this property goes to.
Featured: Select this option if the property is highlighted as a featured item. If featured, it will be displayed in the home page of the Empire template.
Price: Add the price of the property. Ex: 500000. If the property is for rent, then add the per month rent rate here. You can select the currency from Components > SP Property > Options (displayed on the top right corner).
Agent: We have added the agents earlier. Add which agent this property belongs to.
Full description: Now let's add the full description of the property. You should prioritize it as the buyers will look into it. So a well-planned description is expected.

Figure: Adding property details
Image: Add the feature image of the property using this field. This image will work as the thumbnail of the property.
Gallery: Now you can add the photo gallery of the property. You can add as many as gallery images you want. To insert a gallery image, just click the green plus marked button on top and two options will emerge.
Image: Add the gallery image of the property using this field.
Image ALT text: Add the image ALT text in this field.
Property Status: You have to add a property status. There are some options to choose from. Ex: Rent, Sell etc.
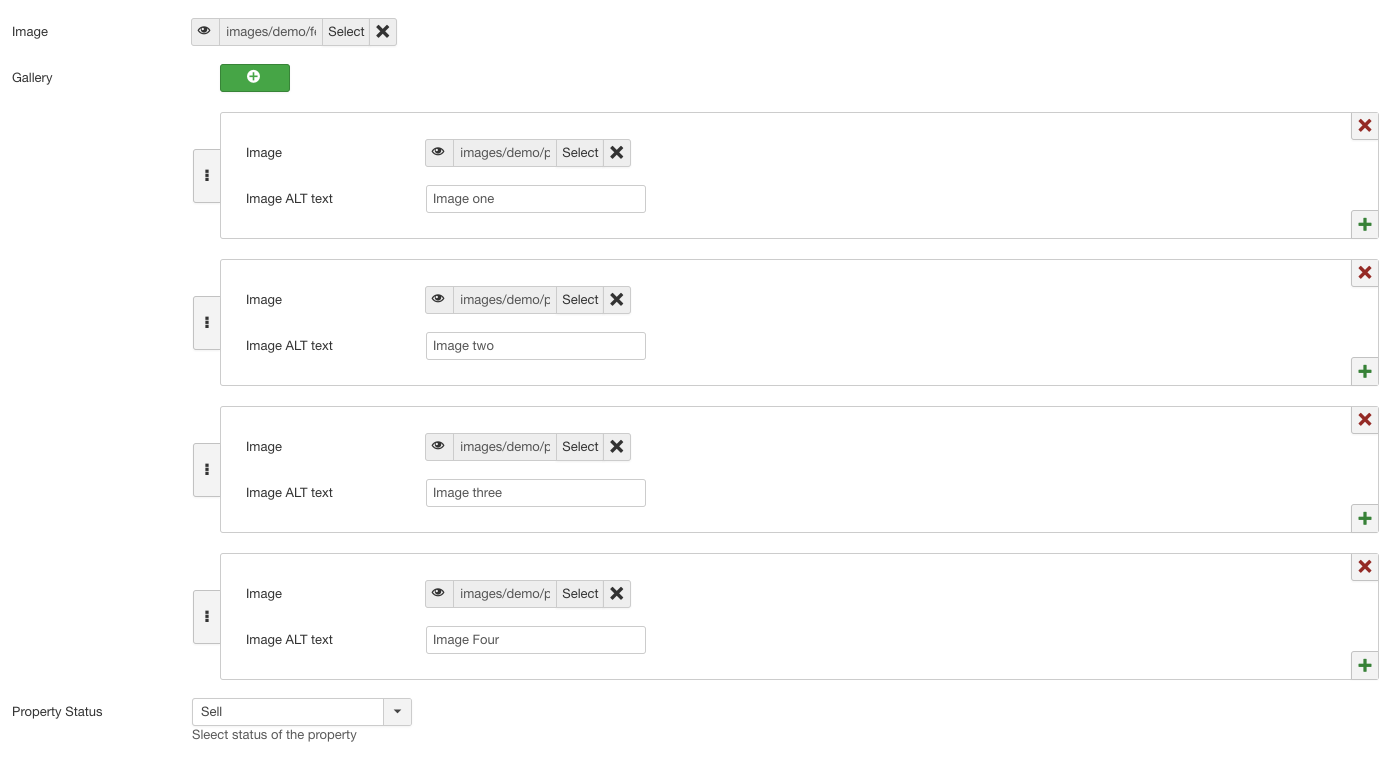
Figure: Adding a property gallery
Property location
Country: Using the drop down list, add the country where the property is located.
City: In this field, add in which city the property is situated. Ex.California.
Address: Add the full address of the property. Ex: 555 California Street. Suite 4700. San Francisco, CA 94104.
Address map: Use the address map section to display the location of the property in Google Maps. Ex:555 California St, San Francisco, CA 94104, USA.
Zip code: Add the area zip code of the property. Ex: 1204.
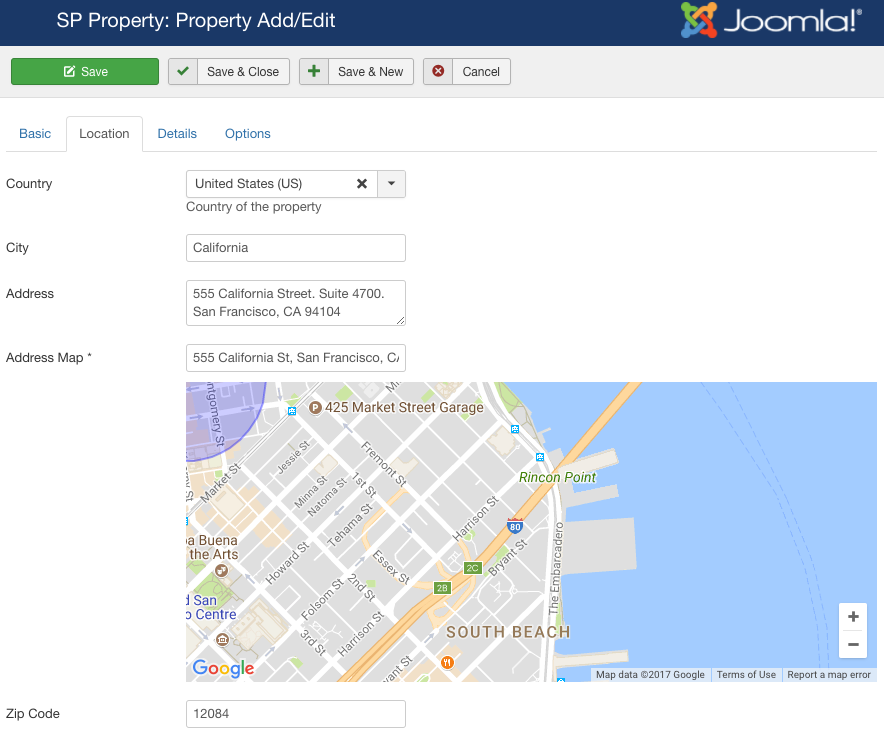
Figure: Adding property location
Property details
Property size (SFT): Add the property size in number (in square feet).
Beds: Add the number of beds the property has. Example: 3.
Baths: Add the number of baths the property has using this field.
Garages: Use this field to add the number of garages the property possesses.
Floor & flat no: Add the floor and flat number that is up for rent and sell. Example: 3C, Level 8.
Building year: Add the year that the property was built. Example: 2005.
Feature text: Add the feature text of the property. Also, select the features from the bullet list of the features.
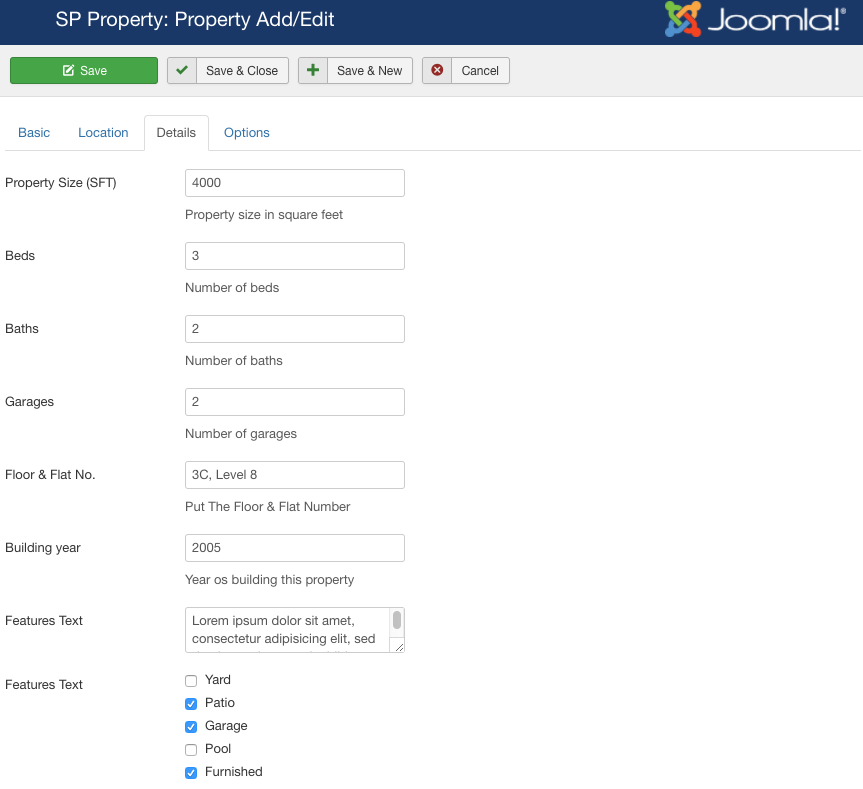
Figure: Adding new property details
Video description: You can add a video of the property. Add the description of the video here.
Video URL: Add the URL of the property video here.
Floor plan short description: This field is there to add the short description of the floor plan of the property. Use this field to add the specific information that the buyer will expect to be added.
Floor plans: You can add floor plans using this option. Add as many as floor plans you want. Just click the green plus sign to add plans.
Floor image: Add the layout image using this option.
Layout name: Add the layout name of the floor plan.
Floor plan text: Use this field to add the details of the floor plan.
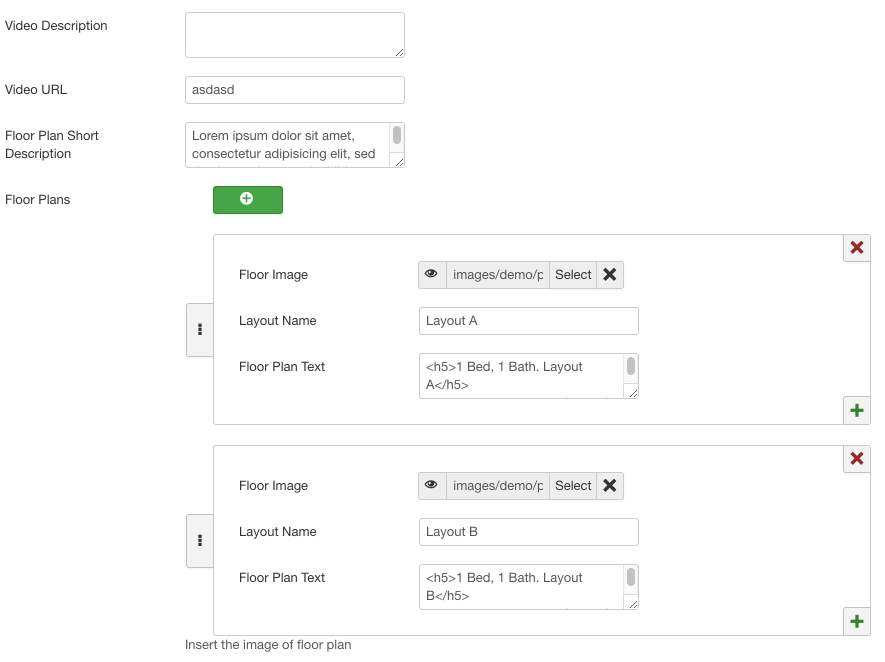
Figure: Adding a new property
Property output on the web page
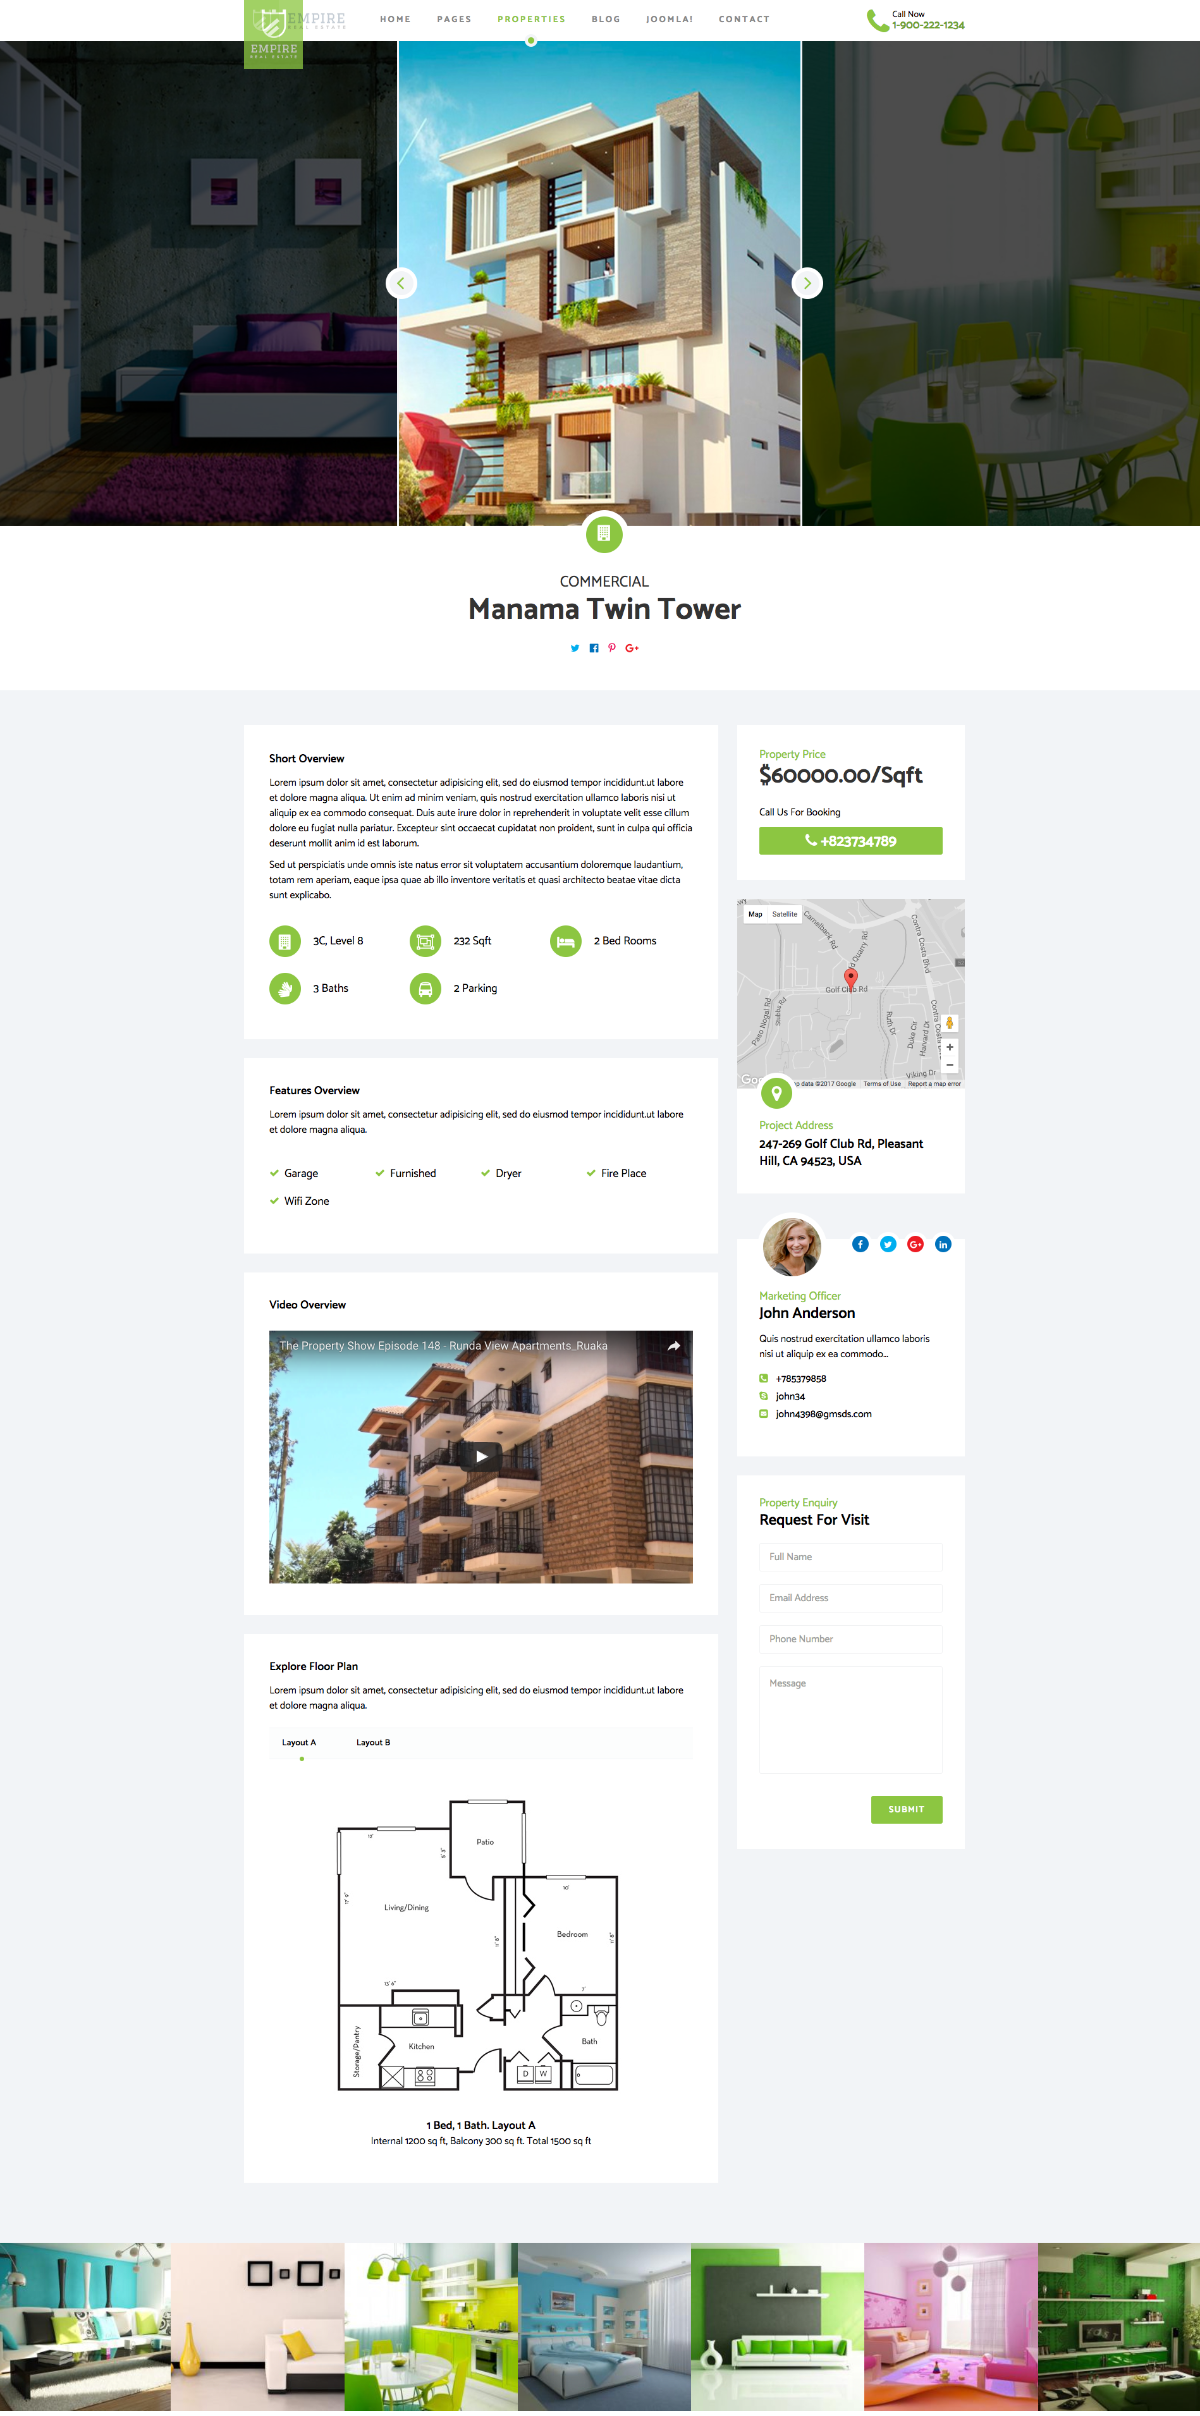
Figure: Property output on a web page
Visit request
Here in this option, you can see who made the request to visit the property. You can see the property name, visitor details, visitor's comment to take necessary step as per the requirements of the visitor.
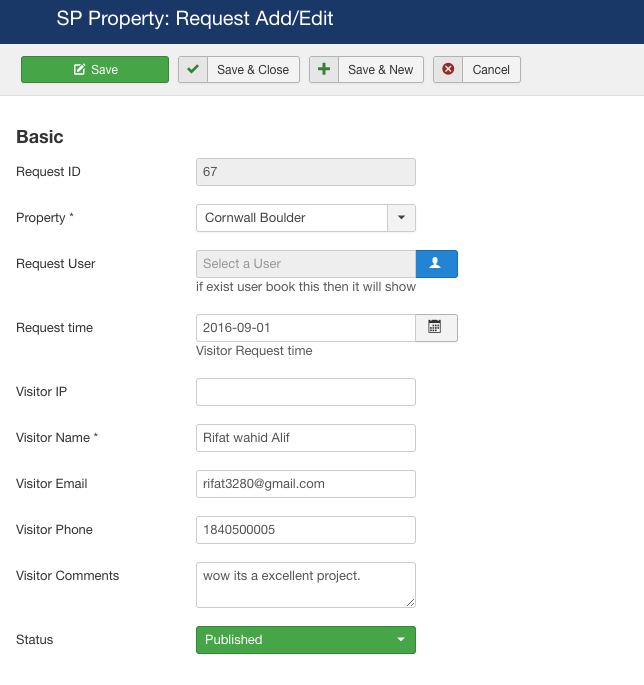
Figure: Property visit request
Cloaking up
With SP Property, you can smartly ease up your effort and manage your real estate business website in quickest of time. The functionalities and accesses will keep your flying jet always filled up. So, start building your real estate website with the Empire template and the SP Property along with the SP Page Builder. Meanwhile, please don't forget to share your thoughts and opinions with us regarding improving the product and services.


I wonder if your template Empire also work with other Joomla estate components as UPL (
Would be nice to have this combination of SP Pagebuilder UPL Helix III and Empire working with Pagebuilder features like WP
Is it possible to use Empire with UPL also?