

EU AI Act Labelling – A Messy CSS Workaround (looking For Something Cleaner)
AM
Andreas Mendel
I’m trying to comply with the transparency rules in Article 50 of the EU AI Act. Since 2 August 2026, certain AI-generated or heavily AI-manipulated images, audio and video have to be labelled so a person can see it without extra tools. On paper that sounds simple. In practice it is hard to do properly if you are not a lawyer and not running an enterprise stack. Not every image on a site is AI-generated. Some are real photos, some are fully generated, some are only retouched. The grey area is the problem: where does normal editing stop and a label become mandatory? The Act talks about deepfakes – content that resembles real people, places or events and could pass as authentic. Deciding that image by image across a whole website is almost impossible for a layperson. My compromise is: better one label too many than one too few. A badge therefore does not always mean “this image is fully synthetic”. It means “I would rather disclose than pretend”. Technically the mark does not live inside the image file. Open the same picture in a lightbox and you get a new <img> with no label. Dynamic content in SP Page Builder often has no CSS class field. And img::after does not work, because images are replaced elements. So the labels sit on the wrappers around the images. What follows is custom CSS for the Mednic template (Helix Ultimate / SP Page Builder). It is not elegant and it is not complete. The homepage slider and inner-page heroes get a text badge plus a watermark. Service cards and the lightbox get text only. The team page uses the wording “AI edited”. If anyone has a nicer approach – baked into the file, metadata, a plugin – I would like to see it.
/* =========================================================
   AI disclosure labels (EU AI Act, Art. 50)
   Text badge and optional watermark
   Template: Mednic
   ========================================================= */


/* ---------------------------------------------------------
   1) Homepage hero slider
   Target: .hero-slider .sp-item
   Badge bottom-left, watermark top-right
   --------------------------------------------------------- */

.hero-slider .sp-item::after {
    content: "" !important;
    display: block !important;
    position: absolute !important;
    top: 25px !important;
    right: 0 !important;
    bottom: auto !important;
    left: auto !important;
    width: 900px !important;
    height: 300px !important;
    background-image: url('/images/wasserzeichen_weiss.png') !important;
    background-repeat: no-repeat !important;
    background-position: right center !important;
    background-size: contain !important;
    opacity: 0.75 !important;
    z-index: 999999 !important;
    pointer-events: none !important;
}

.hero-slider .sp-item::before {
    content: "AI generated" !important;
    display: block !important;
    position: absolute !important;
    left: 16px !important;
    bottom: 24px !important;
    top: auto !important;
    right: auto !important;
    z-index: 1000000 !important;
    padding: 4px 10px !important;
    font-size: 12px !important;
    line-height: 1.2 !important;
    color: #fff !important;
    background: rgba(0, 0, 0, 0.72) !important;
    border-radius: 3px !important;
    pointer-events: none !important;
}


/* ---------------------------------------------------------
   2) Inner pages – Helix page title / hero
   Target: .sp-page-title
   Does not apply to the homepage slider
   --------------------------------------------------------- */

.sp-page-title {
    position: relative;
}

.sp-page-title::before {
    content: "AI generated";
    position: absolute;
    left: 16px;
    bottom: 16px;
    z-index: 20;
    padding: 4px 10px;
    font-size: 12px;
    line-height: 1.2;
    color: #fff;
    background: rgba(0, 0, 0, 0.72);
    border-radius: 3px;
    pointer-events: none;
}

.sp-page-title::after {
    content: "";
    position: absolute;
    top: 16px;
    right: 16px;
    z-index: 20;
    width: 38%;
    max-width: 320px;
    height: 42%;
    background-image: url('/images/wasserzeichen_weiss.png');
    background-repeat: no-repeat;
    background-position: right top;
    background-size: contain;
    opacity: 0.75;
    pointer-events: none;
}


/* ---------------------------------------------------------
   3) Hide decorative border pseudo-elements
   --------------------------------------------------------- */

.border-test-left::before,
.border-center::before,
.border-top::before {
    display: none !important;
    content: none !important;
}


/* ---------------------------------------------------------
   4) Dynamic content – service cards
   Target: .service-img inside .services-list
   Uses ::before because the template already uses ::after
   for the hover gradient. Image size is unchanged.
   --------------------------------------------------------- */

.services-list .sppb-dynamic-content-collection__item .service-img::before {
    content: "AI generated";
    position: absolute;
    left: 8px;
    bottom: 8px;
    z-index: 30;
    padding: 3px 8px;
    font-size: 11px;
    line-height: 1.2;
    color: #fff;
    background: rgba(0, 0, 0, 0.72);
    border-radius: 3px;
    pointer-events: none;
}


/* ---------------------------------------------------------
   5) Lightbox (Magnific Popup)
   Target: .mfp-figure around the enlarged image
   Text badge only. ::after does not work on the <img> itself.
   --------------------------------------------------------- */

.mfp-figure {
    position: relative;
}

.mfp-figure::before {
    content: "AI generated";
    position: absolute;
    left: 16px;
    bottom: 16px;
    z-index: 20;
    padding: 4px 10px;
    font-size: 12px;
    line-height: 1.2;
    color: #fff;
    background: rgba(0, 0, 0, 0.72);
    border-radius: 3px;
    pointer-events: none;
}


/* ---------------------------------------------------------
   6) Team page (menu item 359)
   List view and single-item / large view
   Wording: “AI edited”
   Scoped to body.itemid-359 so other pages stay unchanged
   --------------------------------------------------------- */

.itemid-359 .sppb-dynamic-content-image-wrapper {
    position: relative;
}

.itemid-359 .sppb-dynamic-content-image-wrapper::before {
    content: "AI edited";
    position: absolute;
    left: 8px;
    bottom: 8px;
    z-index: 30;
    padding: 3px 8px;
    font-size: 11px;
    line-height: 1.2;
    color: #fff;
    background: rgba(0, 0, 0, 0.72);
    border-radius: 3px;
    pointer-events: none;
}

.itemid-359 .mfp-figure::before {
    content: "AI edited";
}
You will need to change the watermark path and the team page itemid. This is not legal advice – just a practical attempt to make the obligation visible. On the live German site the badges still say „KI generiert“ / „KI bearbeitet“. The strings above are only for the English post.
2 Answers
Order by
Oldest

Paul Frankowski
Accepted AnswerHi Andreas,
Labeling AI-generated or AI-modified images in a CMS environment (especially Joomla with SP Page Builder and Helix Ultimate) poses a significant technical challenge. The problem with applying CSS overlays is that they are vulnerable to changes in the HTML structure and unstable when loading into lightboxes or sliders.
Example Frontend Solution: Lightweight JavaScript Script / MutationObserver
Instead of writing dozens of CSS rules for every container, you can use a JS script to dynamically find images and wrap them in a container or add attributes.
- data- Attributes: When uploading a photo (or directly in the file name, e.g., photo-ai.jpg), add a tag in the CMS panel or a class in the builder.
- MutationObserver: Listens for DOM changes. When a lightbox opens or a dynamic slider loads, JS will automatically detect the new <img> element and append a badge to it:
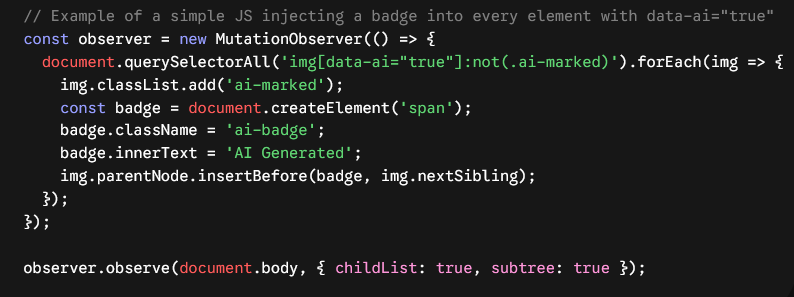
Code (Gemini generated) gemini-code-1790497673079.zip
Paul Frankowski
Accepted AnswerThe key premise is that the website editor or webmaster knows which graphic content has been significantly modified using AI. And indeed, in that case, the new law applies. No labeling required if it was: Ordinary photos with simple technical retouching (color correction, cropping, removal of a small spot, etc.) and purely abstract illustrative graphics.
The law does not apply retroactively; therefore, content created before a legal act took effect does not need to be labeled. It means it's only for "new" created content, August and following months.
If you've used AI to create an icon or a set of icons, you can rest easy—it's mainly about photos and videos.
Tomorrow, I will talk with our developer how to can solve it.