- TemplatesTemplates
- Page BuilderPage Builder
- OverviewOverview
- FeaturesFeatures
- Dynamic ContentDynamic Content
- Popup BuilderPopup Builder
- InteractionsInteractions
- Layout BundlesLayout Bundles
- Pre-made BlocksPre-made Blocks
- DocumentationDocumentation
- EasyStoreEasyStore
- ResourcesResources
- DocumentationDocumentation
- ForumsForums
- Live ChatLive Chat
- Ask a QuestionAsk a QuestionGet fast & extensive assistance from our expert support engineers. Ask a question on our Forums, and we will get back to you.
- BlogBlog
- PricingPricing
Items

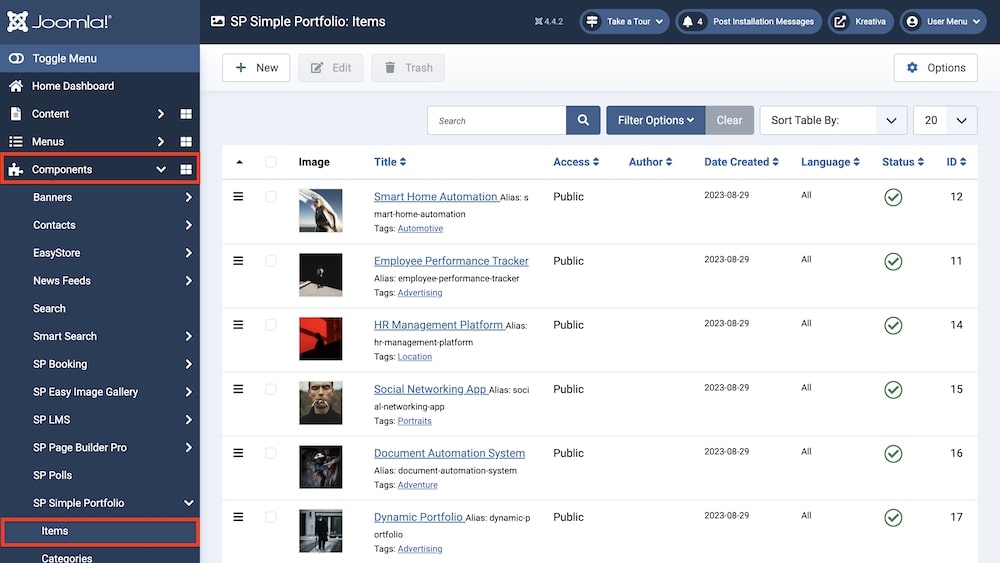
You can access the Items from Joomla backend > Components > SP Simple Portfolio > Items. To create a new item, click on “+New”. You can also edit pre-existing items by simply clicking on them.
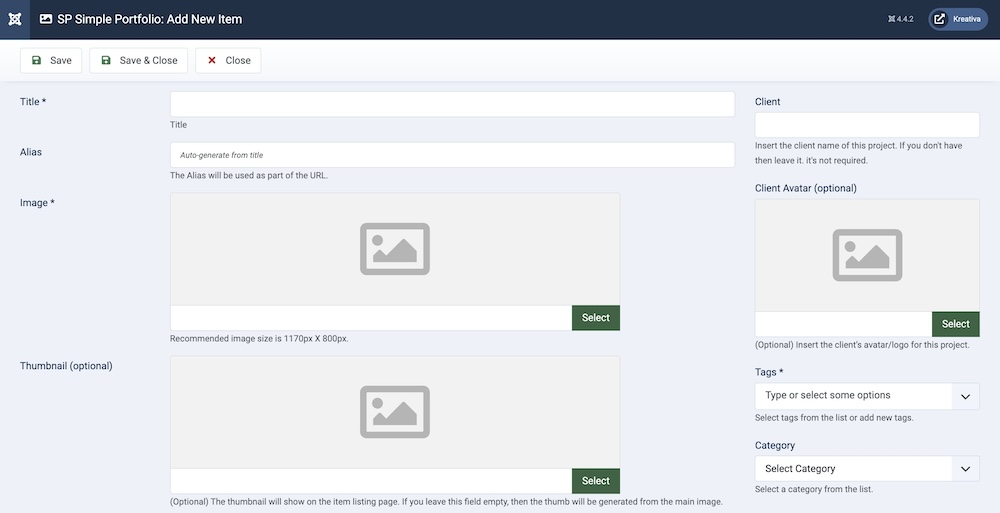
Whether adding a new item or editing an existing item, you will be presented with the following options:

Title: Give a name to the item.
Alias: The alias is used in creating the URL (website address) for the detail page. By default, the component will use the Title to create the alias (with modifications) unless you type an Alias in yourself. Joomla will make the alias all lowercase, replace spaces with dashes, and remove any characters that can not be accepted.
Image: For choosing an image for an item, you can use existing images or upload a new one. The recommended image size: is 1170px X 800px. However, if you have only smaller you can also use them.
Thumbnail: You can choose a thumbnail image instead of using an automatically generated thumbnail. This is an optional field.

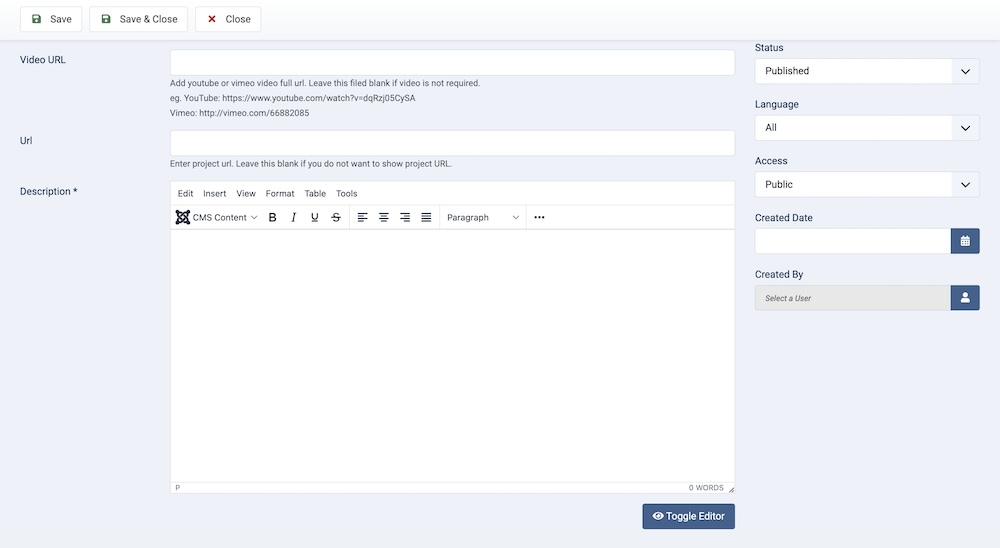
Video URL: Portfolio items can contain images and YouTube or Vimeo video clips. Simply insert your video URL in this field. Leave this field blank if the video is not required.
URL: Each item can include its own link. Leave this blank if you do not want to show the project URL.
Description: In this field, you can add a description or even additional images that will be displayed on the item detail page under the main image.
Client: This field allows you to insert the client name for your project. If you don't have a client, then you can leave the field blank as it's optional.
Client Avatar: You can select an image or logo for your client. This is also an optional field.
Tags: All items can be arranged with Tags. Once you get to three letters you will start to see suggested tags that already exist. The advantage of this solution is that each item can be assigned to multiple tags. The same tag can be applied to many different content items across a portfolio. Tags will be used to filter portfolio items.
Category: Similar to Tags, you can also set the category for the item.
Status: You can show/hide the speaker by changing its status from Published/Unpublished.
Language: Specifies the language for this category. If your site is multilingual, you can assign the category to a specific language. If it's meant to be available in all languages, you can set it to "All".
Access: Controls which user groups can view this category. You can restrict access to certain categories based on user permissions. You can choose between
- Public
- Guest
- Registered
- Special
- Super Users
Created Date: Clicking on the calendar icon will enable you to set a different date for the creation date but if left blank, it will automatically take the current date when the lesson is created.
Created By: The person who creates the item will be automatically assigned to this field once the lesson is created, but an admin (Super User) can change the user at any time.

