

Customising Header and Menu
The Header is a collection of a few things, like a module, a menu, a logo, and other info. You can enable/disable each individual item on the header. You can even create a new header of your own if you ever need. We'll come to that later. But first, let's see how the header was created and which item comes from where. Please refer to the following image:
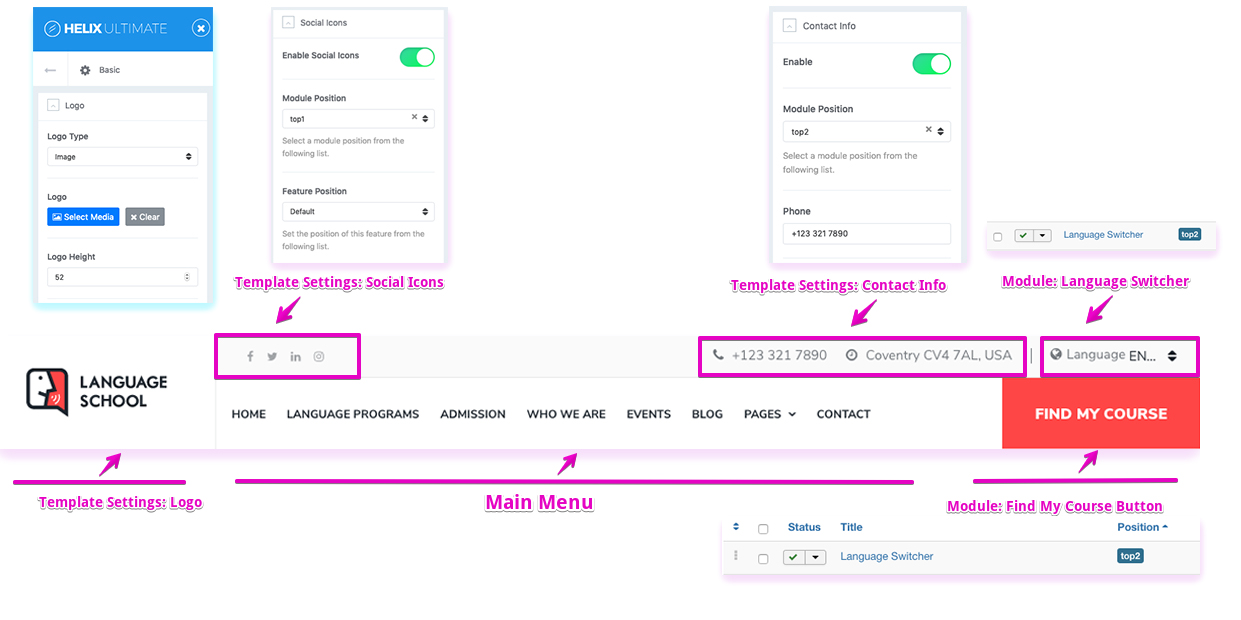
Logo: The logo comes from the Helix Ultimate template settings. To change your logo, navigate to Joomla Dashboard > Extensions > Site Template Styles > shaper_languageschool - Default > Template Options > Basic > Logo.
The rest of the header consists of three positions: top1, top2, and menu.
Social Icons: You can enable/disable the social links (or change their links) from Joomla Dashboard > Extensions > Site Template Styles > shaper_languageschool - Default > Template Options > Basics > Social Icons.
Contact Info: You can control if you want to show your contact information on the header or not (and you may need to update the address), to do that, go to Joomla Dashboard > Extensions > Site Template Styles > shaper_languageschool - Default > Template Options > Basics > Contact Info.
Language Control: At the top right corner, there's a language switcher. Your website might have only one language or you may not need a language switcher. To disable this feature. Unpublish the Language Switcher module from Joomla Dashboard > Extensions > Modules > Language Switcher.
Note: If you do not want to have multi-language at all or want to remove the default "en" from the URLs, then disable all the language plugins on your site. To do so, go to Joomla Dashboard > Extensions > Plugins. From there, find all the language plugins and then disable them. That should work. If that doesn't help, you can contact the support forum.
Menu: The menu is a fundamental part of the header. You can set up the menu from your Joomla Backend. Whatever changes you made to the Main Menu will appear here.
Find My Course: The last item on the header comes from another module called "Find My Course Button". This module was created using SP Page Builder. The provides the course searching feature to the menu. The searching only indexes the titles of the courses, not their contents. You can disable the module from Joomla Dashboard > Extensions > Modules > Find My Course Button.
Menu Design
The menu bar (as well as the Header) design comes from the template settings. There is three predesigned Menu (header) layouts. You can choose one of them for your website. If the predesigned menus do not serve your purpose, you can create your own Menu (Header) layout. To do so, you need to go to the template settings, Joomla Dashboard > Extensions > Site Template Styles > shaper_languageschool - Default > Template Options > Layout Builder. Once you're there, follow the video tutorial to create your own Header layout.
Creating a custom header
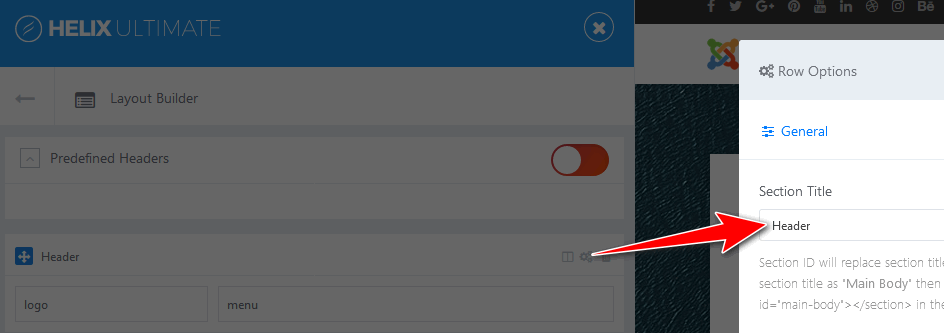
By default, there are three predefined Headers. But you can disable this option and create your own custom header variation at any time. Watch the video tutorial or follow the text guide (step by step) to create your header variation.
- Turn OFF the Predefined Headers.
- Click the (+) icon that appears underneath the first row to create a new row.
- Grab the new Row and move it to the top.
- Click the gear icon to get into the row options.
- In the "Section Title" field, type in: header
- Now you need to click on column icon to set up the column layout. Choose one from the predefined layouts or set your own. The popular basic settings are usually 4+8 or 3+9.
- Then for each column, choose module position from the list, for example, logo and menu*
- Remember to save changes to see the result.
- Later, you can set the responsive grid for each column.
There are five grid breakpoints, one for each responsive breakpoint.
Note: The Logo would be coming from the Template Options and Menu from the template's Main Menu.
The Sticky Header feature can also be used for a custom header. But remember to use "header" name for "logo+menu" row.
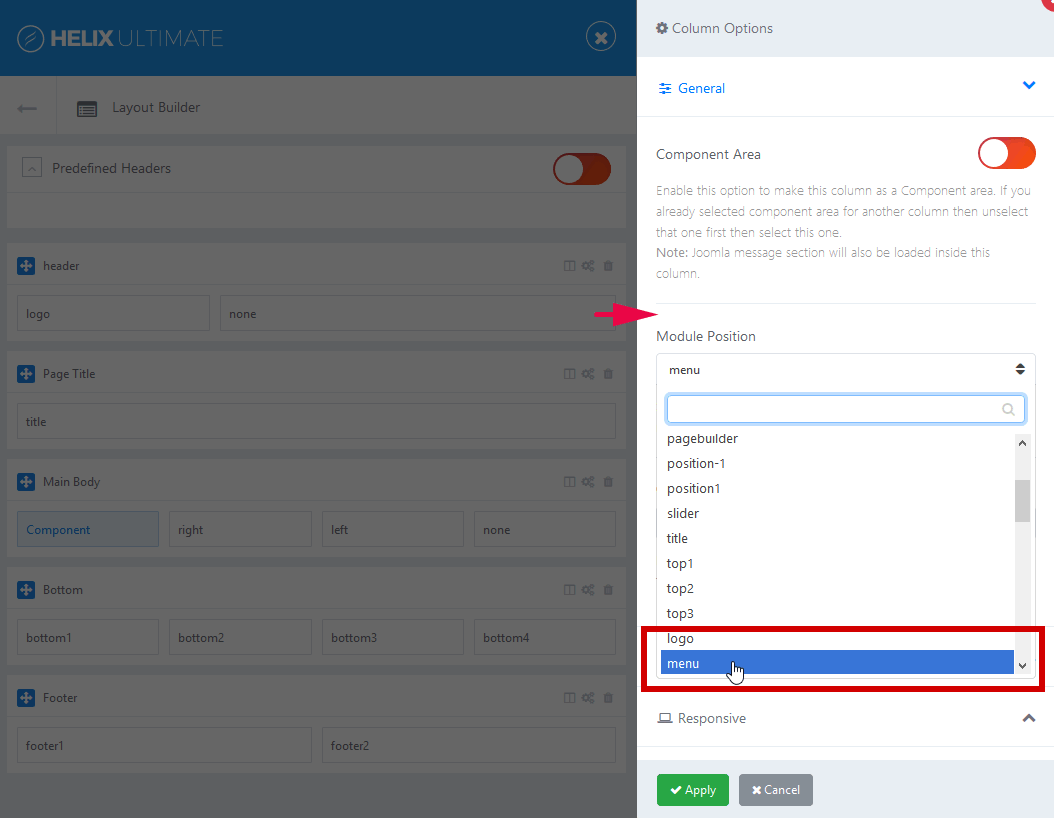
* If you want to use your own menu module (other than the template's one), you need to choose a different module position name, do not use "menu". For example, you can use the name: "position2" or "feature" - where you can publish your additional (mega) menu module.
The Header is a core template feature and it inherits all the functionalities from Helix Ultimate framework. You can make the customizations in your way by understanding the framework better. You can head over to Helix Ultimate Documentation for further reference.