

Custom CSS & Header Code
You can easily customize Helix3 Framework built for Joomla 3 with your own custom code, for example: CSS, JavaScript, Metatags, links and verification code by using the custom fields in that section of settings.
Before < / Head >
Any code you place here will appear in the head section of every page of your site. This is useful when you need to add verification code, javascript or css links to all pages. Check following example how you can use it.

Final result on front-end HTML5 code generated by browser engine. That line you can see on image below was put by Helix3 engine before ending </head> section and before <body> will start, it means it's fully W3C correctly solution.

You can use there any kinds of meta tags you want, also the refresh meta tag to redirect a page to a specific destination. Where is the best place to put JavaScript? If you want a script to execute early, before the page is displayed, then the HEAD section is a good place (it means use that field). Putting scripts into HEAD is a common and easy practice, but highly optimized sites use another method.
But remember all code you put here may harm your code quality or/and W3C verification tests, especially if it's not HTML5 compatible. You can also use this solution to add addcional js libraries. By the way, CSS styles must be declared in the HEAD according to the HTML standard. Only JavaScripts are allowed to be placed anywhere (in Head or before end of Body).
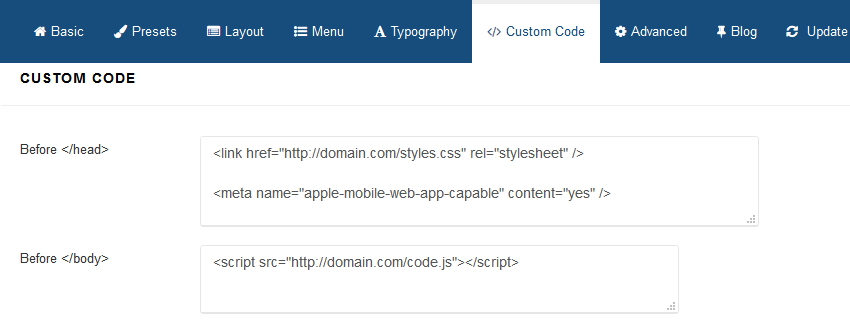
Code before < / body >
Any code you place here will appear in bottom of body section of all pages of your site. For example javascript code can also be at the bottom of page body. In this case it executes after the page is shown.
This is useful if you need to input a tracking code for a statistics counter (such as Google Analytics(GA), Piwik, Woopra or Clicky. This tracking code will be available on every page of your Joomla 3 web site.
How to use Custom CSS
You can use the CSS to customize the appearance of any template based on Helix3. It works by allowing you to add your own CSS styles, which allows you to override the default styles of your template. Helix3 allows you to add custom CSS code using 2 methods:
Method #1:
Directly into template code without using any external file link. Just paste your styles for classes or ID's or HTML tags to override default template styles. It's good solution for small amount of CSS code.
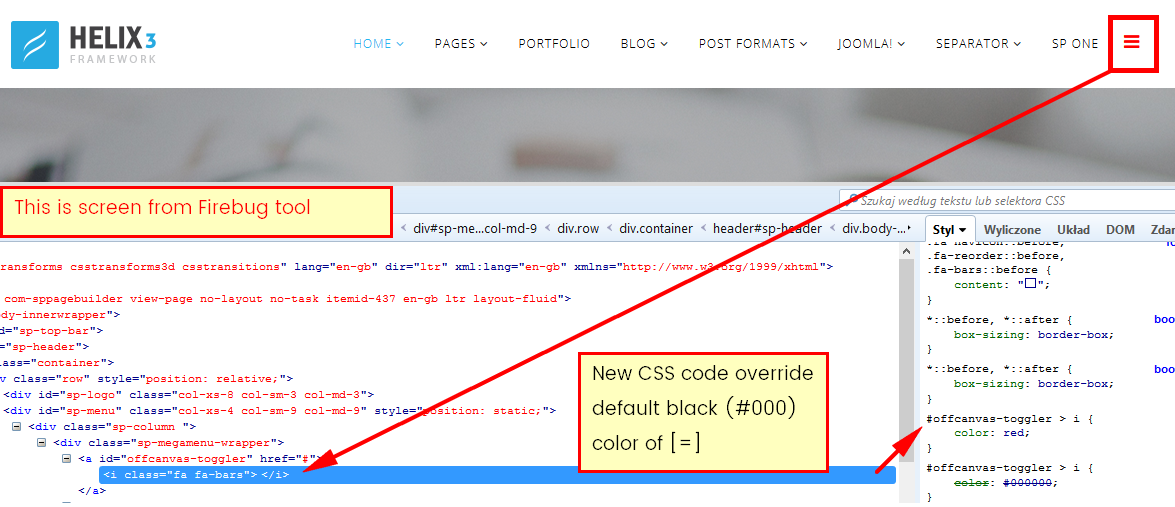
We always recommend inspecting a web page with the code inspector built into Chrome/IE/Firefox browser when looking to customize CSS. When you inspect the code output directly with one of this tools it will show you exactly what CSS is affecting the HTML element you want to change. You can also test out what CSS changes will affect the element as well live in the browser.
As you can seen CSS code was added in header section of front-end code and what is more important is works smoothly.
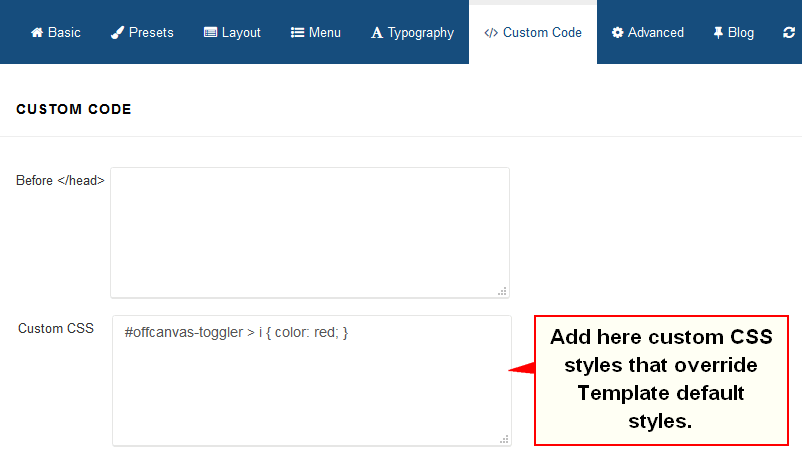
Using Custom CSS gives you the power to create your unique design and allow you customize the appearance of selected elements (colors, size etc.). If this field is too small for your advanced changes you can use "hidden" feature.
Note! Please do not edit the template.css, legacy.css any other css file from the Helix3 template framework. The reason being that all of your changes will be overwritten by template engine. Instead, we suggest to use custom.css file where you can override the default CSS code created by the our team.
Method #2:
So if you need more custom CSS code please create a new custom.css file in insert inside css folder of your current active Helix3 template.
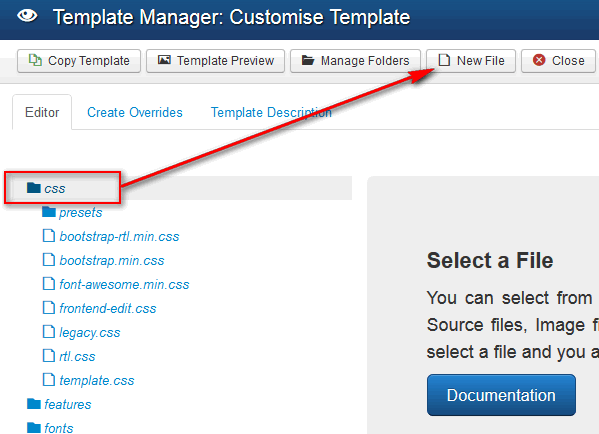
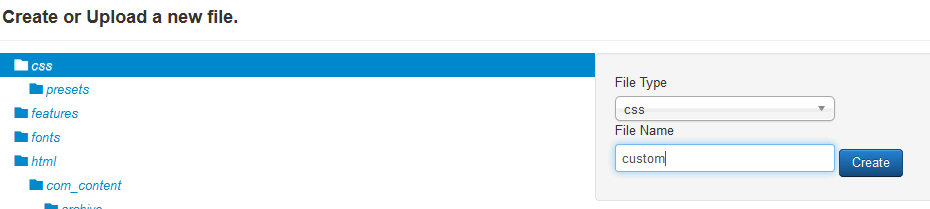
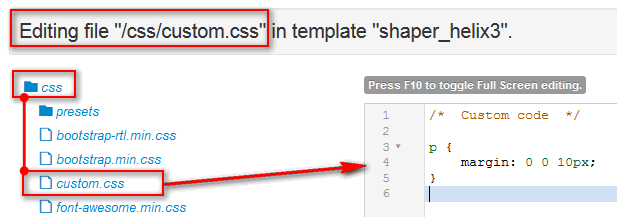
An alternative solution is putting custom.css into the helix3 directory: templates/shaper_TemplateName/css/
If the custom file will be found in the above directory then it will be loaded and applied.
Note! custom.css file is loaded before custom css code from template settings, it means that second one may override everything, also that file with styles.
!Important rule in CSS code
Normally in CSS the rules work from top to bottom, so if you assigned a new style to an element further down the style sheet or in a secondary style sheet then the later rule would take precedence. !important ensures that this rule has precedence. The !important rule overrides that particular property. This declaration should not be used unless they are absolutely necessary after all other avenues have been exhausted. The !important keyword must be placed at the end of the line, immediately before the semicolon, otherwise it will have no effect.
Example of use:
.button {
   background: red !important;
   color: white !important; }
Video Tutorials how to use Firebug
Firebug is a web development tools - a addon for your Firefox browser (getfirebug.com). You can edit, debug, and monitor CSS, HTML, and JavaScript live in any web page. Firebug makes it simple to find HTML elements buried deep in the page. Once you've found what you're looking for, Firebug gives you a wealth of information, and lets you edit the HTML live. Firebug's CSS tabs tell you everything you need to know about the styles in your web pages, and if you don't like what it's telling you, you can make changes and see them take effect instantly.