

Helix3 Installation and System Requirements
How to download Helix3
In this tutorial, we will teach you how to install a Helix3 template and set it as the default for your website. But before, be sure that you want to use the old Helix3, not the current Helix Ultimate template.
- Download the latest Helix3 template from that URL: http://www.joomshaper.com/joomla-templates/helix3 - to your local disc.
- If your Joomla site has content already, you can install the template and modules only. Quickstart is good only for new websites because it contains the Joomla package itself.
- Before installation, check the compatibility of the downloaded version of the template is compatible with your version of Joomla. Must be Joomla 3.4+.
- Once you have your Joomla template downloaded on your computer, login to the administrative area of your Joomla website and upload the template through the Extension Manager (Extensions -> Extension Manager).
- Click on Browse button and select the template bundle archive you downloaded earlier. Finally, click on upload & install.

- After installing the template, you should receive a message "Installing template was successful!". At this point, you have successfully installed a Helix3 template. Please note that this has not activated your new template, you still need to do this if you want to use this design.

- Once the template is installed in your Joomla 3 system, you need to make it default for your website so your pages get the new design. First, you need to go to Extensions -> Template Manager. Now select the template checkbox near its name and click on Make Default.
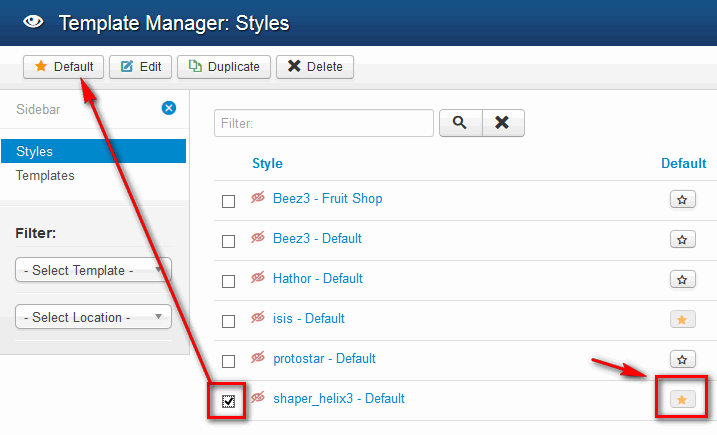
- Make sure that only "shaper_helix3" is assigned to all menu items if you want to use them fully as a default template in your next project.
- That's all Helix3 should be now your main and default template in Joomla 3.4+ system.
Installation: Helix3 QuickStart
The Helix3 Quickstart package is a complete demo website. It's basically a fully functional and the entire Joomla! 3.7+ package containing the CMS itself, components, modules, chosen template, Helix3 framework plugin with all the configurations and data that we used on the demo site. You can use it to recreate/restore demo site appearance.
Unfortunately, it is not possible to install the Helix3 Quickstart package inside an existing Joomla installation via the Extension Manager. You may ask why? Because the Quickstart also includes the Joomla! CMS itself. This QS package is strictly for use with a new Joomla! installation only to provide you with a duplicate of our Helix3 template demo site.
How to install Helix3 QuickStart
You can install Quickstart just like a typical Joomla 3.x installation process:
- Download helix3_quickstart_j3_v2.x.zip package.
- Unzip locally and copy all files to server OR unzip directly on server.
- Create a new database.
- Run installer and go step by step.
Please read related blog posts:
- Getting started with a brand new Joomla website
- The top 4 Joomla hosting providers to run your sites in 2017
- How to install a Quickstart package of a Joomla template
- How to install a Joomla template
- You’ve installed Quickstart, So what’s next?
Beside, each JoomShaper template has it's own guide how to install QuickStart and how manage problems which may occur.