How To Tips (Helix3)
This section contains answers from some popular "How to create/use/hide/override/translate ..." questions about the Helix3 framework. HowTos' are short, highly-targeted tips for accomplishing a specific task. They are intended to help you learn our framework so that you can get the best experience with your projects. If you have more questions or suggestions feel free to write on the support forum.
How to update Helix3
There are two methods to update the Helix3 framework:
Method #1
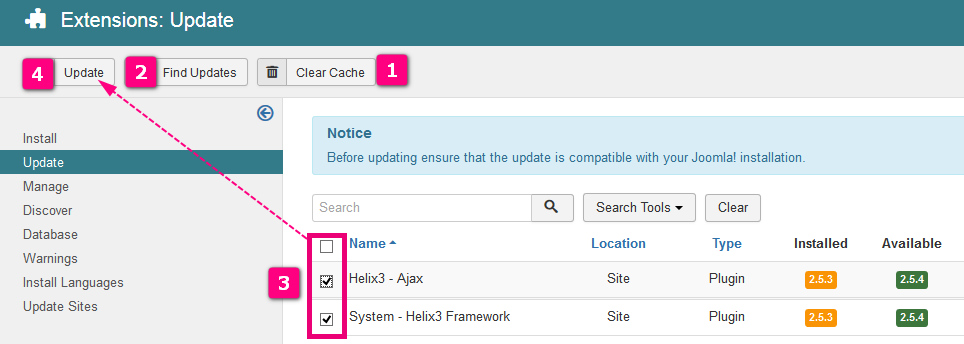
- Extensions: Update > click "Clear cache" button (top left)
- Click "Find updates" button
- Mark all plugins with "helix3" name
- Click "Update" to install new versions
Method #2
Download and install the Helix3 template, it will update the framework too.
Google Font API insertion in Helix3 v2.5.6
The users of Helix3 v2.5.5 have been facing difficulties with Google Font API key insertion after updating to v2.5.6. Here's the solution on how to fix this issue. The following solution was shown using the HOPE template. Please be informed that the fix is exactly the same for all Helix3 based templates.
After updating Helix3 from v2.5.5 to Helix3 v2.5.6 (it is done usually by downloading the Helix3 template and installing), you need to do the followings.
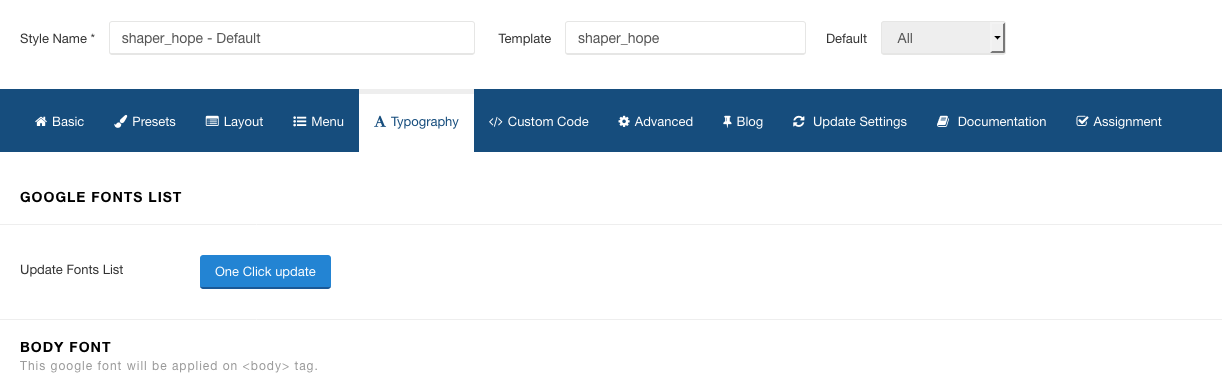
Now before we begin, our Helix3 Typography section looks like this one:
Step 1: Replacing the font section of our template (in this case Hope)
First, we need to copy the font section of the Helix3 template i.e. the templateDetails.xml file found in root folder > templates > shaper_helix3 > templateDetails.xml
Once you've opened up the file using a text editor you need to copy the font section. You can find it easily, the section starts from <!--Start Font Tab--> and ends at <!--End Font Tab-->. Now you need to copy the section.
Or, you can just copy the following code snippet.
<!--Start Font Tab-->
 <fieldset name="typography" addfieldpath="/plugins/system/helix3/fields">
 <field type="group" title="HELIX_GOOGLE_FONTS_LIST" subtitle="HELIX_GOOGLE_FONTS_LIST_DESC"/>
 <field name="gfont_api" type="text" class="parent" label="HELIX_GFONT_API" description="HELIX_GFONT_API_DESC" />
 <field name="update_fonts" type="button" url="#" text="HELIX_UPDATE_FONTS_CLICK" label="HELIX_UPDATE_FONTS_LIST" description="HELIX_UPDATE_FONTS_LIST_DESC" class="btn-primary btn-update-fonts-list" />

 <field type="group" title="HELIX_BODY_FONT" subtitle="HELIX_BODY_FONT_DESC" />
 <field name="enable_body_font" class="parent body_font" type="radio" default="1" label="HELIX_ENABLE_FONT" description="HELIX_ENABLE_FONT_DESC">
 <option value="1">HELIX_YES</option>
 <option value="0">HELIX_NO</option>
 </field>
 <field name="body_font" type="typography" class="child body_font body_font_1" default='{"fontFamily":"Open Sans","fontWeight":"300","fontSubset":"latin","fontSize":""}' label="HELIX_SELECT_FONT" description="HELIX_SELECT_FONT_DESC" />

 <field type="group" title="HEADING1_FONT" subtitle="HEADING1_FONT_DESC" />
 <field name="enable_h1_font" class="parent h1_font" type="radio" default="1" label="HELIX_ENABLE_FONT" description="HELIX_ENABLE_FONT_DESC">
 <option value="1">HELIX_YES</option>
 <option value="0">HELIX_NO</option>
 </field>
 <field name="h1_font" type="typography" class="child h1_font h1_font_1" default='{"fontFamily":"Open Sans","fontWeight":"800","fontSubset":"latin","fontSize":""}' label="HELIX_SELECT_FONT" description="HELIX_SELECT_FONT_DESC" />

 <field type="group" title="HEADING2_FONT" subtitle="HEADING2_FONT_DESC" />
 <field name="enable_h2_font" class="parent h2_font" type="radio" default="1" label="HELIX_ENABLE_FONT" description="HELIX_ENABLE_FONT_DESC">
 <option value="1">HELIX_YES</option>
 <option value="0">HELIX_NO</option>
 </field>
 <field name="h2_font" type="typography" class="child h2_font h2_font_1" default='{"fontFamily":"Open Sans","fontWeight":"600","fontSubset":"latin","fontSize":""}' label="HELIX_SELECT_FONT" description="HELIX_SELECT_FONT_DESC" />

 <field type="group" title="HEADING3_FONT" subtitle="HEADING3_FONT_DESC" />
 <field name="enable_h3_font" class="parent h3_font" type="radio" default="1" label="HELIX_ENABLE_FONT" description="HELIX_ENABLE_FONT_DESC">
 <option value="1">HELIX_YES</option>
 <option value="0">HELIX_NO</option>
 </field>
 <field name="h3_font" type="typography" class="child h3_font h3_font_1" default='{"fontFamily":"Open Sans","fontWeight":"regular","fontSubset":"latin","fontSize":""}' label="HELIX_SELECT_FONT" description="HELIX_SELECT_FONT_DESC" />

 <field type="group" title="HEADING4_FONT" subtitle="HEADING4_FONT_DESC" />
 <field name="enable_h4_font" class="parent h4_font" type="radio" default="1" label="HELIX_ENABLE_FONT" description="HELIX_ENABLE_FONT_DESC">
 <option value="1">HELIX_YES</option>
 <option value="0">HELIX_NO</option>
 </field>
 <field name="h4_font" type="typography" class="child h4_font h4_font_1" default='{"fontFamily":"Open Sans","fontWeight":"regular","fontSubset":"latin","fontSize":""}' label="HELIX_SELECT_FONT" description="HELIX_SELECT_FONT_DESC" />

 <field type="group" title="HEADING5_FONT" subtitle="HEADING5_FONT_DESC" />
 <field name="enable_h5_font" class="parent h5_font" type="radio" default="1" label="HELIX_ENABLE_FONT" description="HELIX_ENABLE_FONT_DESC">
 <option value="1">HELIX_YES</option>
 <option value="0">HELIX_NO</option>
 </field>
 <field name="h5_font" type="typography" class="child h5_font h5_font_1" default='{"fontFamily":"Open Sans","fontWeight":"600","fontSubset":"latin","fontSize":""}' label="HELIX_SELECT_FONT" description="HELIX_SELECT_FONT_DESC" />

 <field type="group" title="HEADING6_FONT" subtitle="HEADING6_FONT_DESC" />
 <field name="enable_h6_font" class="parent h6_font" type="radio" default="1" label="HELIX_ENABLE_FONT" description="HELIX_ENABLE_FONT_DESC">
 <option value="1">HELIX_YES</option>
 <option value="0">HELIX_NO</option>
 </field>
 <field name="h6_font" type="typography" class="child h6_font h6_font_1" default='{"fontFamily":"Open Sans","fontWeight":"600","fontSubset":"latin","fontSize":""}' label="HELIX_SELECT_FONT" description="HELIX_SELECT_FONT_DESC" />

 <field type="group" title="NAVIGATION_FONT" subtitle="NAVIGATION_FONT_DESC" />
 <field name="enable_navigation_font" class="parent navigation_font" type="radio" default="0" label="HELIX_ENABLE_FONT" description="HELIX_ENABLE_FONT_DESC">
 <option value="1">HELIX_YES</option>
 <option value="0">HELIX_NO</option>
 </field>
 <field name="navigation_font" type="typography" class="child navigation_font navigation_font_1" label="HELIX_SELECT_FONT" description="HELIX_SELECT_FONT_DESC" />

 <field type="group" title="CUSTOM_FONT" subtitle="CUSTOM_FONT_DESC" />
 <field name="enable_custom_font" class="parent custom_font" type="radio" default="0" label="HELIX_ENABLE_FONT" description="HELIX_ENABLE_FONT_DESC">
 <option value="1">HELIX_YES</option>
 <option value="0">HELIX_NO</option>
 </field>
 <field name="custom_font" type="typography" class="child custom_font custom_font_1" label="HELIX_SELECT_FONT" description="HELIX_SELECT_FONT_DESC" />
 <field name="custom_font_selectors" type="textarea" class="child custom_font custom_font_1" label="HELIX_FONT_CUSTOM_SELECTORS" description="HELIX_FONT_CUSTOM_SELECTORS_DESC" />

 </fieldset>
 <!--End Font Tab-->
Now you need to replace the font section of your template (Hope in this case) with the code you just copied. To do so, open the templateDetails.xml file, which is found in root folder > templates > shaper_hope (if you're using a different template it will be under the name of that template) > templateDetails.xml
Select the code from <!--Start Font Tab--> to <!--End Font Tab--> and replace it with the code you just copied (the above code snippet) then save the file.
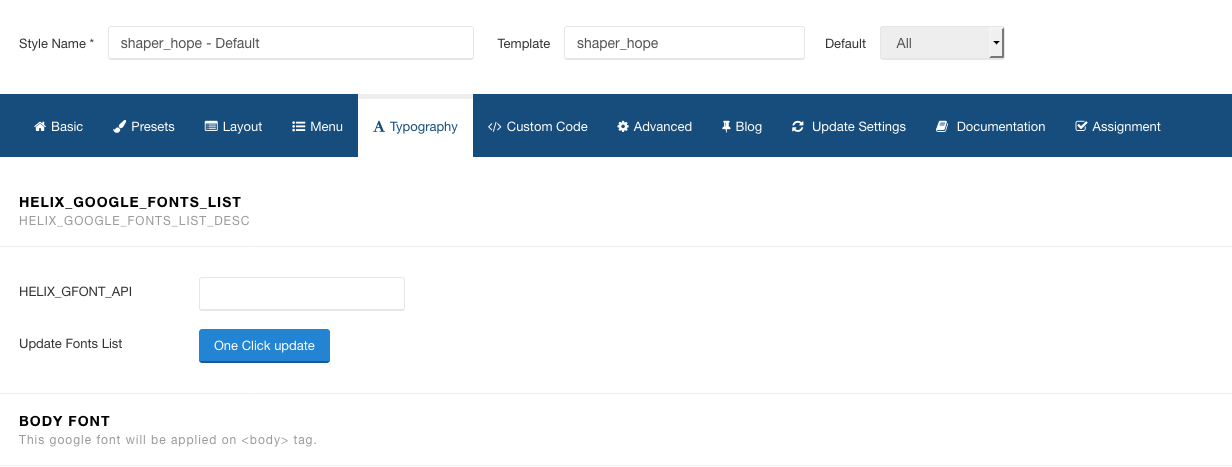
At this stage, our Helix3 Typography section looks like this one:
Step 2: Fixing the language file
To fix the language file, we need to copy the typography code section from the en-GB.tpl_shaper_helix3.ini file and replace it in the en-GB.tpl_shaper_hope.ini file (if you're using a different template it will be under the name of that template). The files are located in the root > language > en-GB folder.
Once you've opened up the en-GB.tpl_shaper_helix3.ini file, copy the codes under #Typography#
Or, you can just copy the following code snippet.
#Typography#
COM_TEMPLATES_TYPOGRAPHY_FIELDSET_LABEL="<i class='fa fa-font'></i>Typography"
HELIX_FONT_FAMILY="Font Family"
HELIX_FONT_WEIGHT_STYLE="Font Weight & Style"
HELIX_FONT_SUBSET="Font Subset"
HELIX_FONT_SIZE="Font Size"
HELIX_GFONT_API="Google Font API"
HELIX_GFONT_API_DESC="Get your API key from the link given above and click the <strong>Save</strong> button after inserting the API Key."
HELIX_GOOGLE_FONTS_LIST="Google Fonts List"
HELIX_GOOGLE_FONTS_LIST_DESC="You may require <strong>Google Fonts API Key</strong> to update the font list. Get your API Key from here: <a href='https://developers.google.com/fonts/docs/developer_api' target='_blank'>https://developers.google.com/fonts/docs/developer_api</a>"
HELIX_UPDATE_FONTS_LIST="Update Fonts List"
HELIX_UPDATE_FONTS_LIST_DESC="It allows you to refresh the list of available Google fonts. If there are any new ones, this button allows you to quickly update fonts with just one click, and they will be automatically added in to Helix 3 Framework."
HELIX_UPDATE_FONTS_CLICK="One Click update"
HELIX_BODY_FONT="Body Font"
HELIX_BODY_FONT_DESC="This google font will be applied on <body> tag."
HELIX_ENABLE_FONT="Enable"
HELIX_ENABLE_FONT_DESC="Enable google for this CSS Selector."
HELIX_SELECT_FONT="Select Font"
HELIX_SELECT_FONT_DESC="Set the default font."
HEADING1_FONT="Heading1 Font"
HEADING1_FONT_DESC="This google font will be applied on <h1> tag."
HEADING2_FONT="Heading2 Font"
HEADING2_FONT_DESC="This google font will be applied on <h2> tag."
HEADING3_FONT="Heading3 Font"
HEADING3_FONT_DESC="This google font will be applied on <h3> tag."
HEADING4_FONT="Heading4 Font"
HEADING4_FONT_DESC="This google font will be applied on <h4> tag."
HEADING5_FONT="Heading5 Font"
HEADING5_FONT_DESC="This google font will be applied on <h5> tag."
HEADING6_FONT="Heading6 Font"
HEADING6_FONT_DESC="This google font will be applied on <h6> tag."
NAVIGATION_FONT="Navigation Font"
NAVIGATION_FONT_DESC="This google font will be applied on main navigation."
CUSTOM_FONT="Custom Font"
CUSTOM_FONT_DESC="Apply this google font to any custom CSS selector."
HELIX_FONT_CUSTOM_SELECTORS="CSS Selectors"
HELIX_FONT_CUSTOM_SELECTORS_DESC="Add custom CSS selectors. Separated by comma."Now, we need to replace the #Typography# code of en-GB.tpl_shaper_hope.ini file with the one we just copied (the above code snippet).
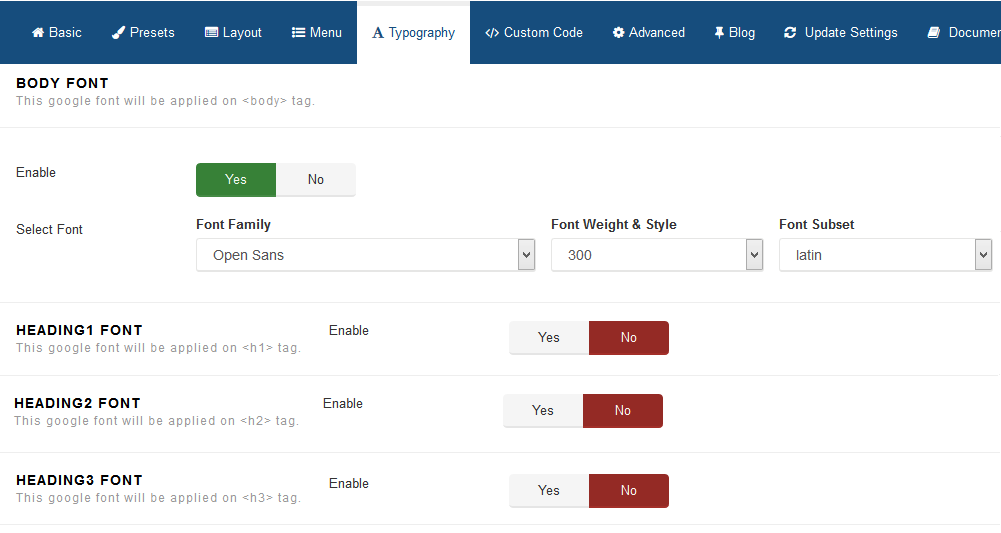
After doing so, we need to save and close the file. Now if we go to the Helix3 template styling > typography section, we'll see the following.
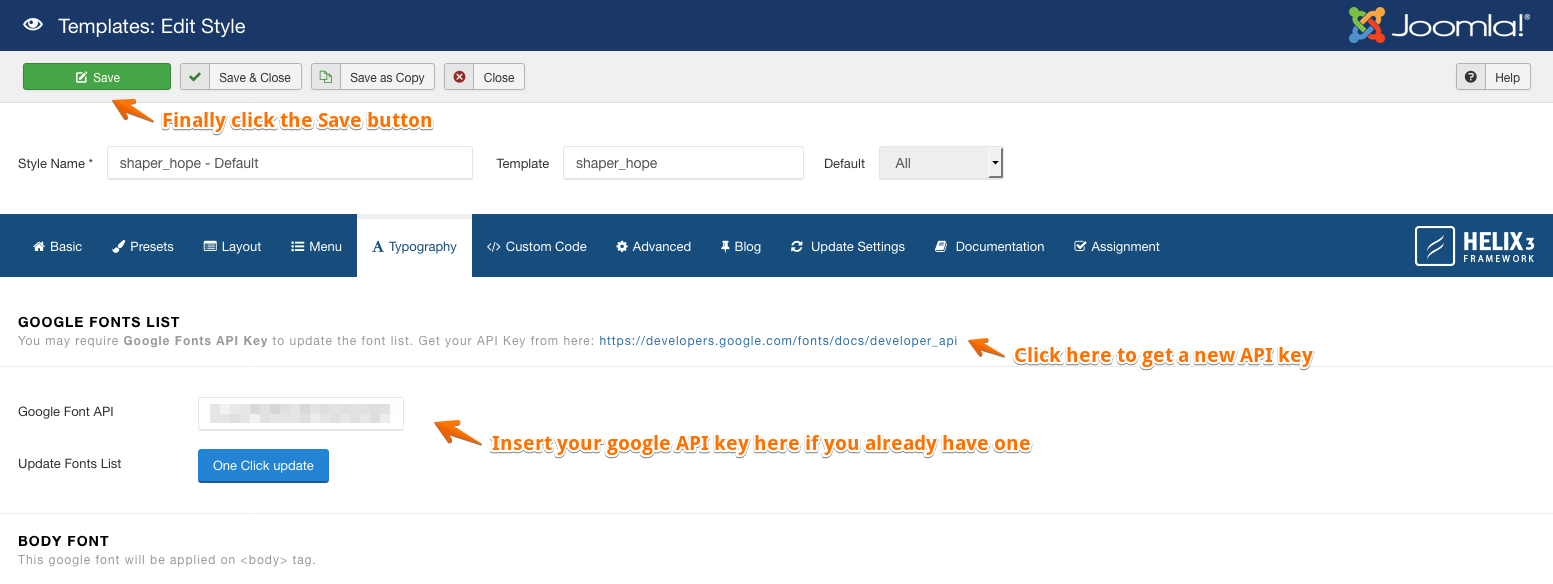
The above screenshot confirms that we have successfully solved our issue. Now to get the Google Font working we need to insert the API key and click on "Save" button to make changes.
Lastly, we'll click on "One Click Update" button to load Google Fonts. This completes the process.
How to customize the Header
To reduce the height of a header from the Helix3 template you need to use custom CSS code. The default value is 90px, but you can always change the value. For example: 60px.
Customization by CSS code:
#sp-header, #sp-header .logo { height: 60px; }
.sp-megamenu-parent > li > a, #offcanvas-toggler { line-height: 60px; }
How to reduce the Header height on (or after) scrolling
If you want to reduce the header height only after scroll down, you can use the following custom CSS code:
header.menu-fixed, header.menu-fixed .logo { height: 60px !important }

header.menu-fixed .sp-megamenu-parent > li > a,

header.menu-fixed #offcanvas-toggler { line-height:60px; }

How to use a different font instead of Google Fonts
By default, in almost all of our JoomShaper (template) QuickStarts, we have used Google Fonts for template typography, but you do not need to stick with the fonts we have chosen. You can select different ones or just use the classic font sets. In the current version of Helix3, it requires only one line of custom CSS.
Basic CSS knowledge
The font-family CSS property lets you specify a prioritized list of font family names and/or generic family names for the selected element. Values are separated by a comma to indicate that they are alternatives. The font-family property specifies a list of fonts, from highest priority to lowest. Traditionally only "websafe" fonts could be used on web pages. These fonts are standard fonts installed in both Windows and Mac computers. You will find the full list here: http://www.cssfontstack.com
How to use Arial, Verdana, Sans-serif etc.
- In template settings - in "Typography" Tab, please turn off Google fonts for body, probably all Headers and Menu as well.
- In "Custom code" tab inside the Custom CSS field please add the following code or any other "websafe" font collection:
body, p, h1, h2, h3, h4, h5, h6, a, li, span {font-family: Arial, Helvetica, sans-serif;}Other examples:
body, p, h1, h2, h3, h4, h5, h6, a, li {font-family: Times, "Times New Roman", Georgia, serif; }
body, p, h1, h2, h3, h4, h5, h6, a, li {font-family: Verdana, Arial, Helvetica, sans-serif; }
body, p, h1, h2, h3, h4, h5, h6, a, li {font-family: "Lucida Console", Courier, monospace; }
You are advised to use only those HTML tags that you need to change.
Note: Some popular fonts, for example, Tahoma belongs to the Microsoft Corporation, so they are installed by default only in Windows, not in Mac OS X, Linux or Ubuntu!
How to use custom CSS
Useful tip on how to use custom CSS in Helix3 bases templates can be found here: https://www.joomshaper.com/documentation/helix-framework/helix3#custom-css-header-code
How to add a new font to Helix3 Template
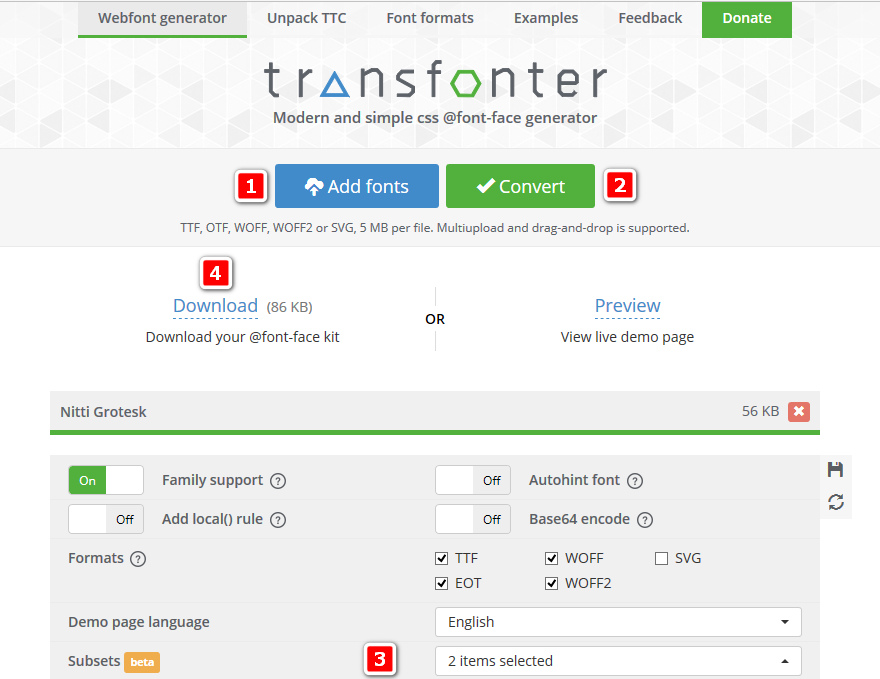
If you don't want to use Google Font in Typography section nor the default Helvetica Neue, Helvetica or Arial you can load your own font. For example, you can integrate a custom font from MyFonts.com, fontspring.com, transfonter.org or fontsquirrel.com or use WebFonts Generator from it (suggested method). Please ensure to download the @font-face Kit.
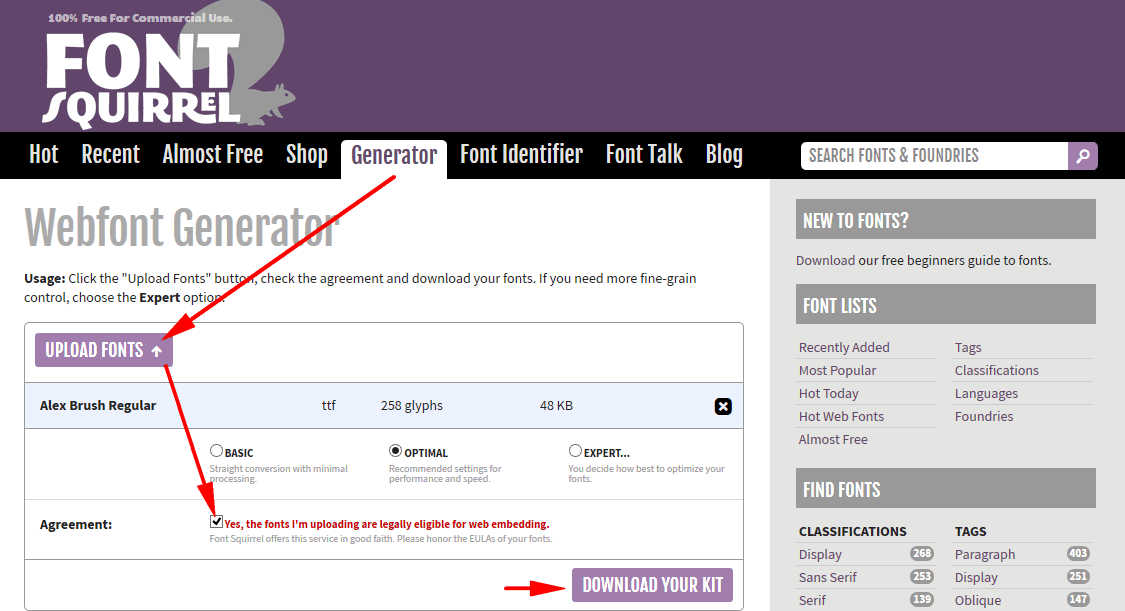
All you need to do is copy and paste the font files, and make some edits to your custom.css file. In this example, we will explain how you can add the custom free font AlexBrush to your JoomShaper template. This method can be used with any template based on Helix3 framework.
- Please unzip all font files (.eot, .woff, .ttf, .svg) from template package to this same template folder where the template keeps other fonts, for example here: templates\shaper_helix3\fonts
Use FTP tool for this purpose.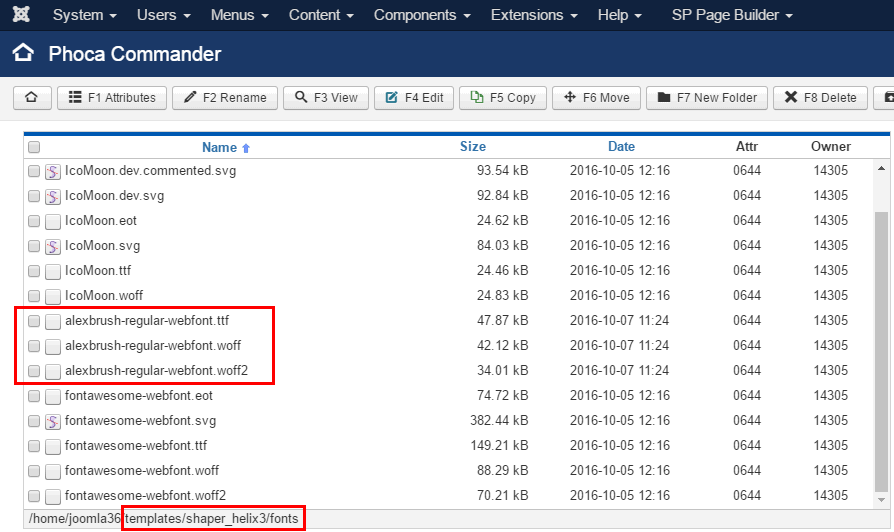
- Now open
stylesheet.csswhich should be in generated font package, in my PC it looks like this:@font-face {
font-family: 'alex_brushregular';
src: url('alexbrush-regular-webfont.woff2') format('woff2'),
url('alexbrush-regular-webfont.woff') format('woff'),
url('alexbrush-regular-webfont.ttf') format('truetype');
font-weight: normal;
font-style: normal;
} - But we need to change the paths for the files, it's advised to use following change (../fonts/):
 @font-face {
    font-family: 'alex_brushregular';
    src: url('../fonts/alexbrush-regular-webfont.woff2') format('woff2'),
         url('../fonts/alexbrush-regular-webfont.woff') format('woff'),
         url('../fonts/alexbrush-regular-webfont.ttf') format('truetype');
    font-weight: normal;
    font-style: normal;
} - Now open or create a
custom.cssfile inside /css folder (in JoomShaper template) and copy the updated code there. - Once you have added the font to your template's font directory, you can apply it to your site. Now you need to choose this new font for selected CSS selectors or HTML tags, also inside
custom.cssfile, for example:h1, h2, h3 { font-family: 'alex_brushregular', Arial; }Here is the content from my example file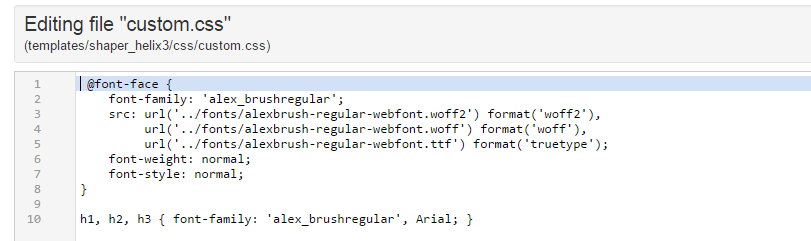
- Remember to disable Google Fonts from Typography tab (helix3) for those chosen HTML tags where you want to use the custom font instead.
- You can also replace the default font color and font size with your preferred font color and size, using the basic CSS rules.
- If you want to use custom fonts for HTML tags or menu items etc. please turn off (disable) Google Fonts for them in the Typography tab.
Final result on front-end

How to change the direction to RTL
By default all new templates based Helix3 template framework have built-in separate CSS styles for Right-To-Left (RTL) direction in languages like Hebrew, Persian and Arabic. In template folder /css - you will find : bootstrap-rtl.min.css, rtl.css and rtl.less file. We use this function, so if your Joomla website is set to a RTL language the Enfold RTL stylesheet will be included automatically. Of course you can build multilingual site on Joomla, with language switcher.
- Default Layout Builder in JoomShaper Templates doesn't have separate RTL layout. It means that you have to create your own. First use a Duplicate feature in Templates: Styles section to create template clone of Default Template style, for example "shaper_revibe - Default".

- Second, inside Layout tab replace positions of logo and menu.
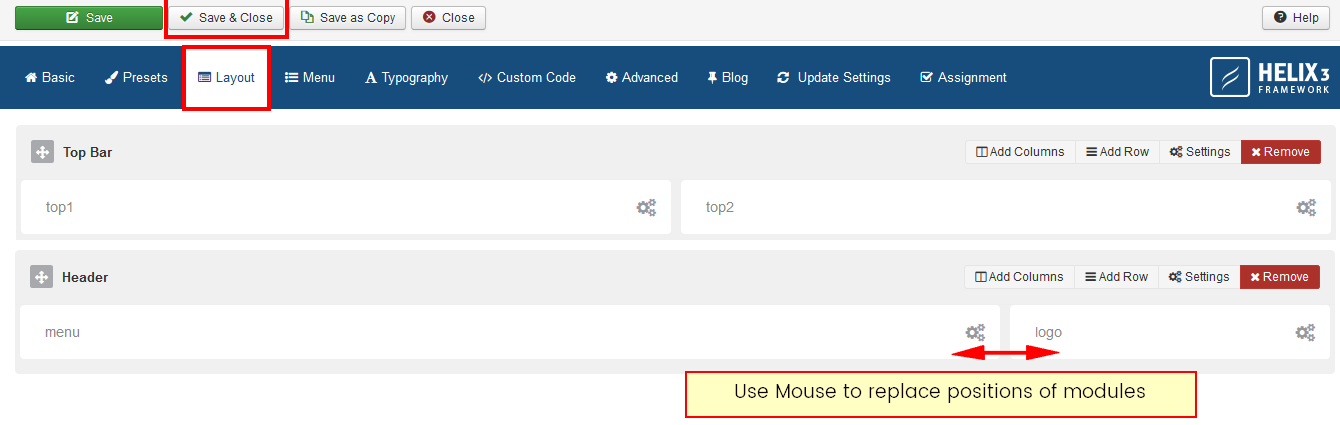
- Then choose different menu for RTL language in Menu tab. Don't forget to Save settings.
Of course, order of menu items you can change in Menu Manager (Joomla Core Feature). So it shouldn't be a problem to set Home as a last item in the menu row. If this should be your default template set it as a default one. - If this RTL template must be for selected language(s) only - please assign this "new" template to those menu items which are used for RTL language.
- In Custom Code tab you can use separate css styles to fix small issues with other components or module which do not support RTL.
- If you want to align menu more to right side, not left side as it's by default, please use following CSS code:
body.rtl .sp-megamenu-parent { float: right !important; }

SP Tabs Module
If you're using SP Tabs module and you need to have RTL direction style please use extra two lines of CSS code:
 tab-padding .custom > p { text-align: right; }
 ul.tabs_container li.tab { float: right !important;
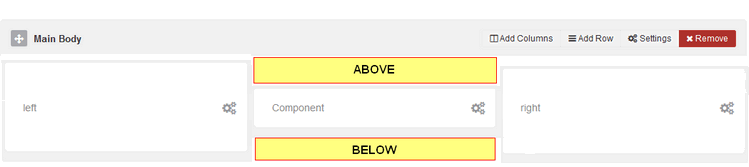
How to add custom module position above and below component area
By default Helix3 do not allows you to add a new module above or below component area. In most cases Layout Manager allows you to add new rows and columns.

But with very small php/xml customizations you can add two new modules.
Small Code Customization
If you have any JoomShaper template or just Helix3 already installed, all you have to edit those two files:
- plugins/system/helix3/layouts/frontend/conponentarea.php
- templates/JoomShaper_NAME/templateDetails.xml
First edit helix3.php file - where you should find those lines:
    $output .= '<jdoc:include type="message" />';
    $output .= '<jdoc:include type="component" />';
and do those changes, for Helix3 v2.5+ template(s) only:
    $output .= '<jdoc:include type="message" />';
    $output .= '<jdoc:include type="modules" name="above" />';
    $output .= '<jdoc:include type="component" />';
    $output .= '<jdoc:include type="modules" name="below" />';
Now save changed file and upload on your server.
In second file (templateDetails.xml): you have to add new positions as well. Add them before ending </positions>.
     <position>above</position>
     <position>below</position>
For example here:
        <position>above</position>
        <position>below</position>
        <position>footer1</position>
        <position>footer2</position>
        <position>comingsoon</position>
        <position>offcanvas</position>
        <position>pagebuilder</position>
        <position>404</position>
        <position>debug</position>
    </positions>
Do not forget to save this edited file also. Those two changed files must be on server, not only on your local drive,
if you know what I mean.
That's all now you can use those two new: above and below module positions in Module Manager for all installed modules.
Until it won't be included in new version of Helix3 framework you can use this temporary but 100% working solution. Remember about that change!
How to hide on mobile
Unfortunately, those module position do not have any options in Helix3 Layout Manager. So to hide them in mobile (small device) view you have to use addcional module class suffix.
Please use:" hidden-xs hidden-sm" - of course without (") !
How to increase logo size
If in template based on Helix3 uploaded/chosen by you logo is displayed too small or too big, you have to make small changes, start with:
- For desktop purposes, use logo image with finial height, for example 100px. Do not use HUGE images, it doesn't make sense.

- In some templates to see bigger logo image (in normal size), you have to also:
a) Increase Logo column in Template settings > Layout > Header. If 3,9 is too small, use 4,8 or custom layout.
b) Override logo height limit#sp-header .logo h1 > img {max-height: none; height:100px;}
How to fix Cannot use object of type stdClass as array
If after Joomla update to 3.9+ you cannot edit menu any items you have to remove extra menu plugin.
- Extensions > Manage > Plugins
- Then disable and uninstall plugin "System - Extra Menu Params"
It's not compatible with Joomla 3.9+, it was developed by YouTech Company, not JoomShaper.
How to transfer template settings
In this guide we will show you how to transfer (copy) Joomla template settings (also based on Helix3 framework) from one website to another. We will show you all steps, which you should follow:
- On second (desitanion) site install Joomla template (this same like you have on first site), of course with default settings.
- On server where you have both sites (A & B) open tool named PHPMyAdmin, it should be in your Hosting panel. If you cannot find it ask support. But you can use also standalone php script named Adminer (formerly phpMinAdmin) which is a full-featured MySQL management tool written in PHP. Conversely to phpMyAdmin, it consist of a single file ready to deploy to the target server.
- Open both databases in that tools on which you have installed your Joomla sites.
- Find table named: PREFIX_template_styles and click "Select" to browse content.
- On the list find your Helix3 template name and click on "edit" link.
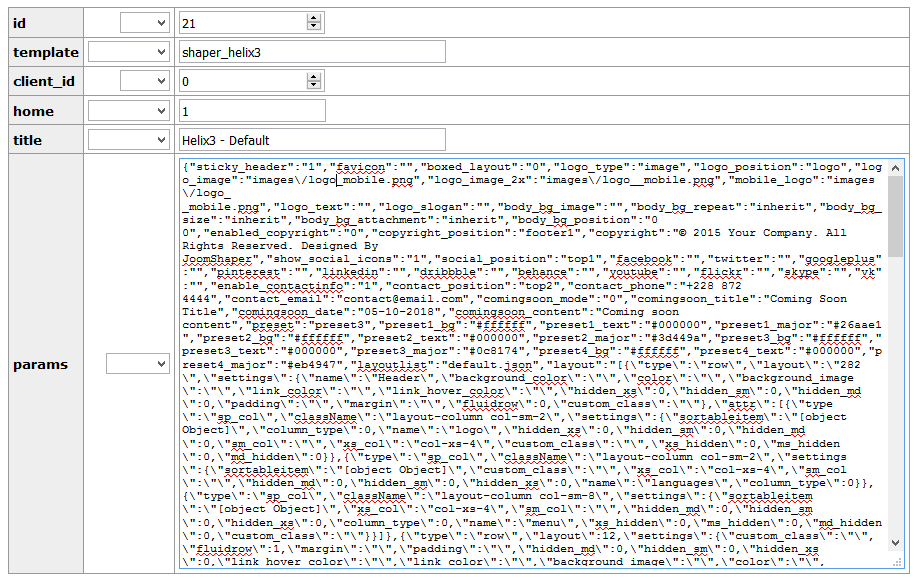
6. Select and copy whole area from "params" field (see above image), scroll window if you have to.
7. Open in edit mode this same table on second ("B") database and paste whole settings code.
8. Then click "Save" to keep new changes (modifications).
9. Next in template settings "Basic" tab check if logos have assigned this same path for logo images. If not, you have to correct only this part.
10. If in your first template you made manually some changes in core files like in: templateDetails.xml - which might be possible. Using FTP client tool you have to copy them into second (B) server as well.
Now you can use both sites with exactly this same template settings inside them. But it doesn't mean this same modules or content of course. That's all.
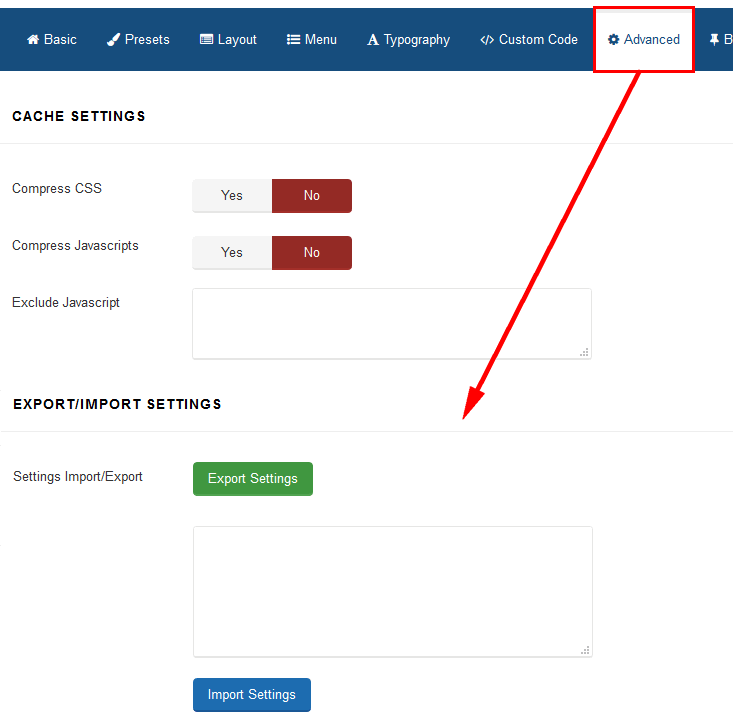
Import & export
New version of Helix3 allow you to use new feature: Export &b Import settings. Since that moment you do not have to use PHPMyAdmin or similar tool to copy-clone template settings from site A to site B. We implement a new transfer feature. On first site you have to export json file, then open it in text editor, copy whole content and paste on second site in export textarea field.