- TemplatesTemplates
- Page BuilderPage Builder
- OverviewOverview
- FeaturesFeatures
- Dynamic ContentDynamic Content
- Popup BuilderPopup Builder
- InteractionsInteractions
- Layout BundlesLayout Bundles
- Pre-made BlocksPre-made Blocks
- DocumentationDocumentation
- EasyStoreEasyStore
- ResourcesResources
- DocumentationDocumentation
- ForumsForums
- Live ChatLive Chat
- Ask a QuestionAsk a QuestionGet fast & extensive assistance from our expert support engineers. Ask a question on our Forums, and we will get back to you.
- BlogBlog
- PricingPricing
Package
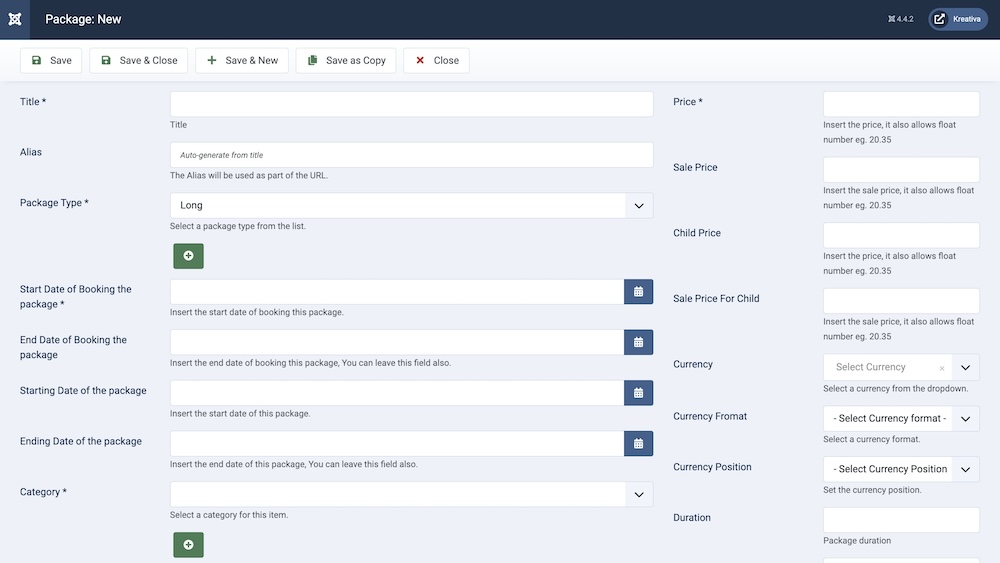
Creating a package plan is similar to creating categories, coupons, or rooms. You need to browse to Components > SP Booking > Packages > Click “+New”. Then you’ll be presented with the following screen.

Title: Provide a title for the package in this field.
Alias: You can leave this field blank, it is automatically generated from the title.
Package Type: Set the package time to a long or day tour. You can also add a new package type by clicking the “+” icon.
Start Date of Booking the Package: Set the date from which the customers can start booking the package.
End Date of Booking the Package: Set the last date the package can be available for booking by customers.
Starting Date of the Package: Set the date from which the customers can start availing the package.
Ending Date of the Package: Set the last date the package can be available for use by customers.
Category: It is a required field. You need to assign this hotel to the category it belongs to. You created categories in the previous step. However, if you have not already created a category for this hotel, you can create one by clicking on the little green “plus” sign next to the field. It will bring you a new category creation window.

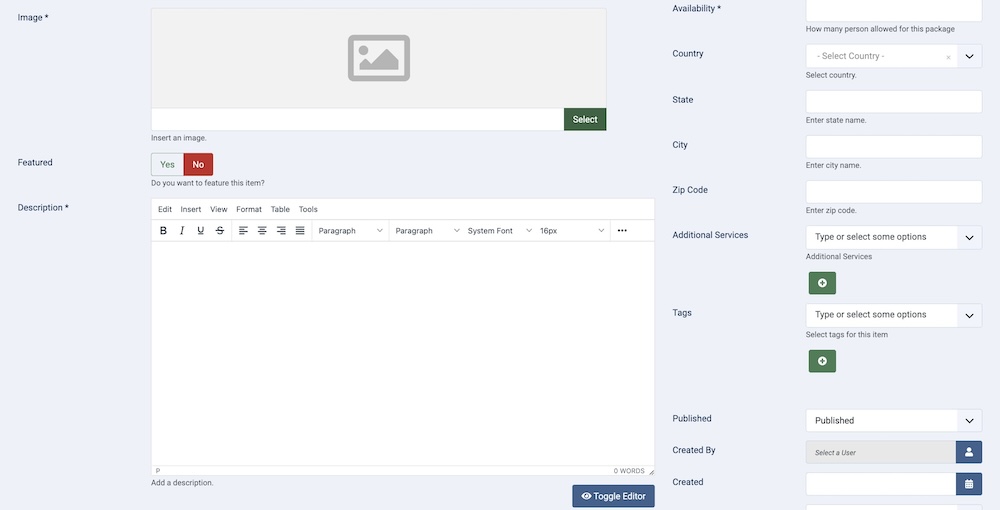
Image: Showcase the package by adding images.
Featured: Set if this package is set as featured. It will appear in the located area of the frontend of your website according to the template you are using.
Description: Provide the description for the package.

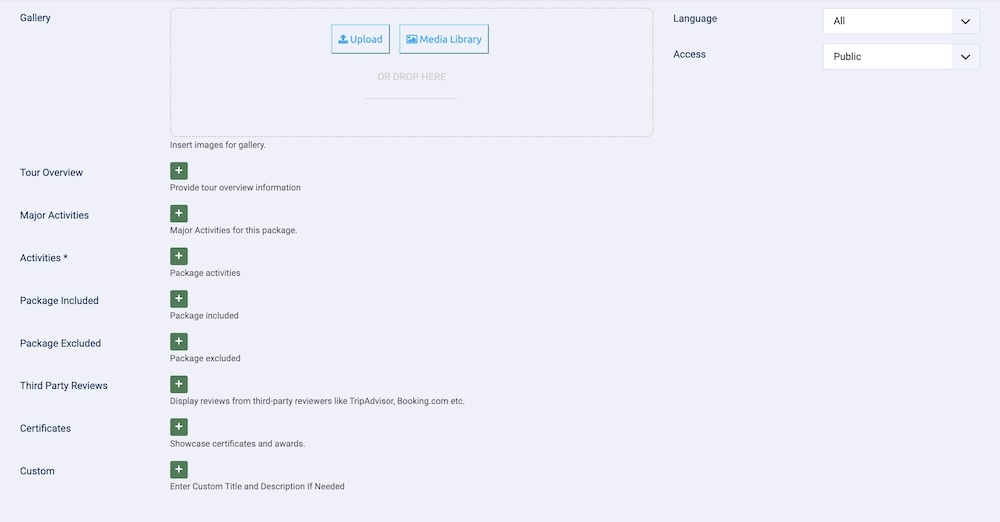
Gallery: Make sure you have chosen the photos that describe the provided package the best.
Tour Overview: Provide tour overview information.
Major Activities: Provide major activities for this package.
Activities: Provide all the activities that customers can participate in with this package.
Package Included: Add the features and activities that are included with the package.
Package Excluded: Add the features and activities that are excluded from the package.
Third-Party Reviews: You can add third-party reviews of your business using this feature. You should proudly add as many reviews as possible using the green “Plus” icon since more reviews bring more business.
Certificates: Earning certificates is a prestigious thing, it can be a local certificate from the regulation committee or it can be from a reputed platform like TripAdvisor. You should always add as many certificates as possible by clicking on the green “Plus” icon.
Custom: Enter a custom title and description if needed.
Price: Set the price for the package.
Sale Price: Set a sale price for the package.
Child Price: Set the child price for the package.
Sale Price For Child: Set a sale price for children.
Currency: Even though you set a global currency and its format in the SP Booking setting. You can set a different currency for this particular hotel using this feature.
Currency Format: You can adjust whether the currency will be displayed in short or long format.
Currency Position: You can adjust the position at which the currency will be displayed.
Duration: Set the duration for the package.
Availability: Set the number of people allowed for this package
Country: Select the country where this package can be used.
State: Another required field. For your customers’ convenience, you need to provide the state of your business (hotel/motel).
City: Another required field. For your customers’ convenience, you need to provide the city of your business (hotel/motel).
Zip Code: For your customers’ convenience, you can provide the Zip of your business (hotel/motel). This field is optional.
Additional Services: The features let the customers know about the luxury your hotel can offer. The more the features are the higher the price can go up. By clicking in this field, you can select from the existing features (additional service), if you don’t see your desired one in the list. Click on the little green “plus” sign right beside the field. It will open up a new feature (additional service) creation window.
Tags: Set the tags for the package.
Published: The publication status of the category. You can set it to "Published" to make it visible on the frontend, or "Unpublished" to hide it.
Created By: Specifies the user who created the category.
Created: Specifies when the category was created.
Language: Specifies the language for this category. If your site is multilingual, you can assign the category to a specific language. If it's meant to be available in all languages, you can set it to "All".
Access: Controls which user groups can view this category. You can restrict access to certain categories based on user permissions. You can choose between
- Public
- Guest
- Registered
- Special
- Super Users

