- TemplatesTemplates
- Page BuilderPage Builder
- OverviewOverview
- FeaturesFeatures
- Dynamic ContentDynamic Content
- Popup BuilderPopup Builder
- InteractionsInteractions
- Layout BundlesLayout Bundles
- Pre-made BlocksPre-made Blocks
- DocumentationDocumentation
- EasyStoreEasyStore
- ResourcesResources
- DocumentationDocumentation
- ForumsForums
- Live ChatLive Chat
- Ask a QuestionAsk a QuestionGet fast & extensive assistance from our expert support engineers. Ask a question on our Forums, and we will get back to you.
- BlogBlog
- PricingPricing
Events
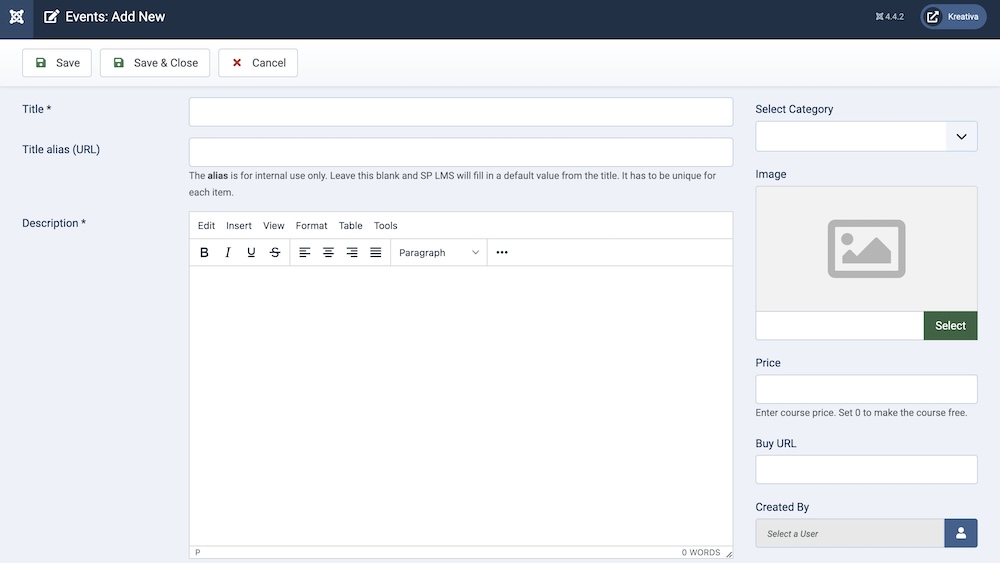
You need to browse to Components > SP LMS > Events > Click “+New”. Then you’ll be presented with the following screen.

Title: This is a mandatory field when creating a new event, you can type in the event name in this field.
Title Alias (URL): An alias is a URL for the event, you don't need to put in any data unless you want to in this field, the alias will automatically be generated after the lesson name once an event is created.
Description: It's another required field when creating an Event. An elaborated description comes in handy, and unless you put some data in it the participants won't have a clue about the event.

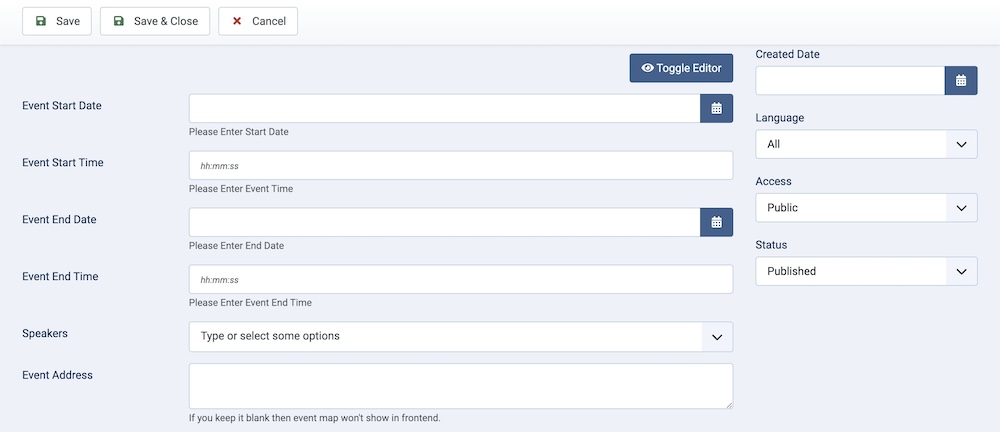
Event Start Date: Define the starting day of the event.
Event Start Time: Define the starting time of the event.
Event End Date: Define the ending time of the event.
Event End Time: Define the ending day of the event. The starting and ending can be on the same day.
Speakers: Once you start typing the names, all the speakers you've created before will appear and you can choose the speakers of the event.
Event Address: Type in the physical address of the event location.

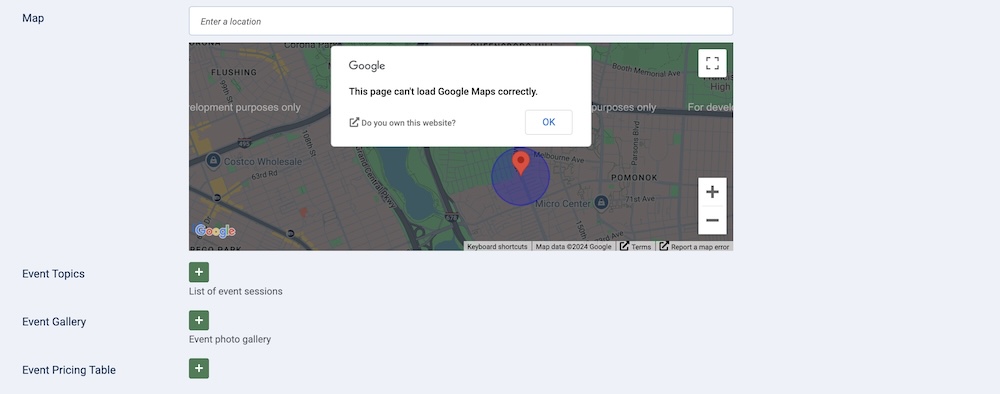
Map: You can pinpoint the location of the event using this feature.
Event Topics: You can create more than one topic in an Event and assign different speakers with their allocated time.
Event Gallery: You can add a few images to get the participants excited.
Event Pricing Table: If you have different packaging plans, you can show it using this section.
Title: Define the package name
Price: Put the package price
Pricing Features: Put the details about the package
Button Link: The link for the package
Event Category: Choose the event category from the dropdown list.
Image: Upload a banner photo for the event or choose from the media library.
Price: Define the actual price of the course.
Buy URL: Put the link for buying the event.
Status: You can show/hide an event by changing its status from Published/Unpublished.
Created By: The person who creates an event will be automatically assigned to this field once the lesson is created, but an admin (Super User) can change the user at any time.
Created Date: Clicking on the calendar icon will enable you to set a different date for the creation date but if left blank, it will automatically take the current date when the lesson is created.
Language: Specifies the language for this category. If your site is multilingual, you can assign the category to a specific language. If it's meant to be available in all languages, you can set it to "All".
Access: Controls which user groups can view this category. You can restrict access to certain categories based on user permissions. You can choose between
- Public
- Guest
- Registered
- Special
- Super Users

