

AI Text and Image Generator

With SP Page Builder Pro, you have the exciting capability to automatically generate text and image content using an AI Generator. This powerful tool allows you to generate text and images for your web pages in just a matter of seconds! Please watch the video introduction of new features. The AI feature was introduced in SPPB 5.2.3 version, and it's available in newer versions.
You can now enjoy the support for the following AI models:
- OpenAI: GPT-3.5 Turbo, GPT-3o Mini, GPT-4, GPT-4 Turbo, GPT-4o Mini, GPT-4o, GPT-5, GPT-5 Mini, and GPT-5 Nano.
- Gemini: Gemini 3.1 Flash Lite and Gemini 2.5 Flash.
OpenAI API Integration
- Start by heading over to the OpenAI website. If you haven't signed up yet, go ahead and create an account.
Note: It must be a premium (paid) account, for example, GPT-3.5 Turbo.
- Once you're in, look at the top bar where your avatar is. Click on it and then select "View API Keys."
- Click on the "+ Create new secret key" button to generate an API key.
- Once you've got your API key. Next, go to SP Page Builder > Settings > Generative AI.
- In the OpenAI API key field, paste the key you just obtained. This will create a smooth connection between OpenAI and SP Page Builder. If you do not enter this key, you can not use OpenAI to generate the content.
- To utilize the API, payment is required for each request you will make.
- Now select the desired OpenAI Model from the "Choose OpenAI Model" dropdown list.
Gemini Integration
- Start by heading over to the Google AI Studio website. If you haven't signed up yet, go ahead and create an account.
- While on the API Keys tab, click on the "Create API Key" button in the top-right corner to generate your API Key.
- Name your key and choose a project type.
- Select a Billing Tier. By default, you’ll be accessing the free tier.
- Once you've got your API key. Next, go to SP Page Builder > Settings > Generative AI.
- In the API key field, paste the key you just obtained. This will create a smooth connection between Gemini and SP Page Builder. If you do not enter this key, you can not use Gemini to generate the content.
- Now select the desired Gemini Model from the "Choose Model" dropdown list. You can choose from Gemini 3.1 Flash Lite and Gemini 2.5 Flash for text generation.
You can learn more about obtaining and setting up Gemini API keys in Google’s official documentation.
That's it! You're all set to tap into the power of AI right within your SP Page Builder Pro site.
AI Text Generator
To generate AI content for your text areas, simply follow these straightforward steps:
Step 1: Select the Addon
Begin by selecting the text block where you'd like to generate AI content.
Step 2: Click on the "Generate with AI" Icon
Look for the "Generate with AI" icon associated with your selected addon when you open its settings. Click on it to initiate the AI content generation process.
Step 3: Enter Your Prompt
A window will pop up, prompting you to provide a brief description of the content you want to generate. This description, or "prompt," guides the AI in creating relevant content.
Step 4: Define Word Limit (Optional)
For more control over the length of the generated text, you can specify a word limit. This helps tailor the content to your exact needs.
Step 5: Select Language (if applicable)
If your site is multilingual and you want the generated content in a specific language, make your language selection.
Step 6: Choose the Tone
Select the tone you desire for the generated content. Options include "Standard," "Fluency," "Normal," "Creative," and more. This sets the style and voice of the content.
Step 7: Specify Use Case
Define the use case for the generated content, whether it's for a heading, a paragraph, or any other specific purpose.
Step 8: Click "Generate"
Once you've configured all the parameters to your liking, click the "Generate" button to kickstart the AI content generation. In just moments, your AI-generated content will be ready to enhance your web pages.
Editing and Using AI-Generated Text
With AI-generated text at your disposal, you can refine, summarize, paraphrase, simplify, or regenerate it to your liking.
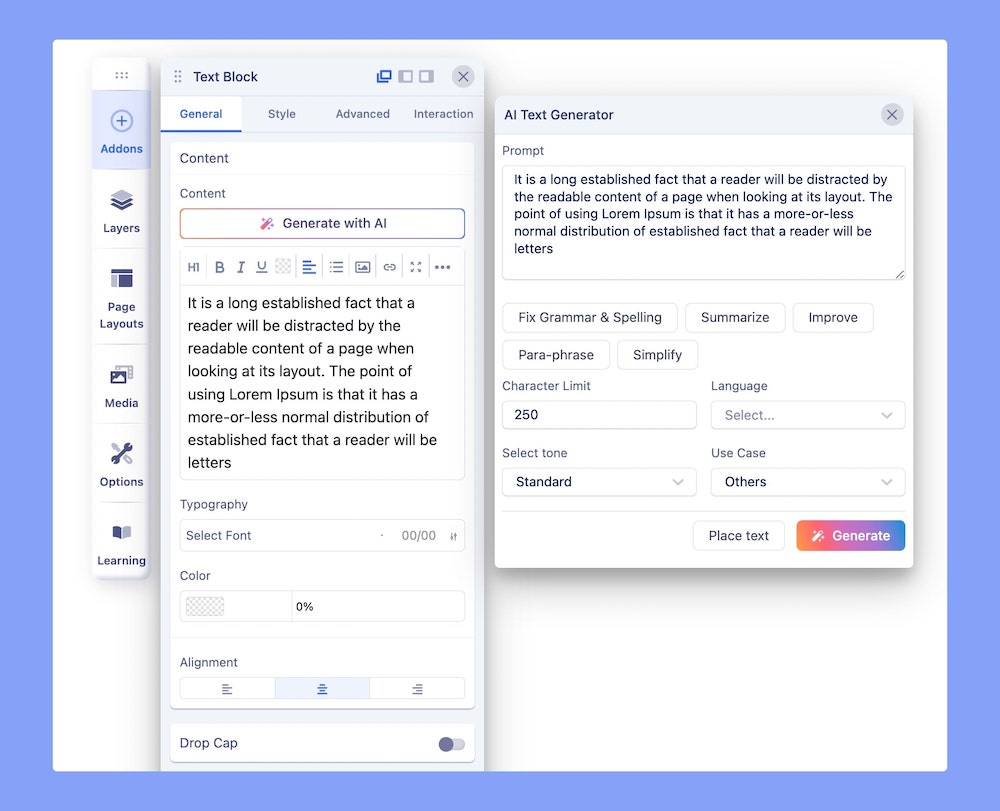
Here's how to make the most of your AI-generated content:
- Fix Grammar & Spelling: If you notice any grammatical or spelling errors in the generated text, you can make corrections to ensure it's pristine.
- Summarize: When you need a concise version of the text, use the summarization option to condense the content.
- Paraphrase: To rephrase the text while retaining the original meaning, opt for the paraphrasing option.
- Simplify: If you prefer a simpler language style, the simplification feature can make the content more straightforward.
- Regenerate: Should you wish to create a fresh version of the content, the regeneration option allows you to do just that.
If you're satisfied with the edited or unaltered AI-generated text, simply click the "Place Text" button to insert it into your web page effortlessly.
AI Image Generator
The AI Image Generator is a powerful tool that allows you to effortlessly create images using prompts. Whether you need an image for your website, social media, or any other project, this feature provides an innovative way to generate visually appealing content.
Every Image Area in the SP Page Builder Pro editor includes the AI Image Generator.
To begin using the AI Image Generator, start by selecting an image addon where you want to generate AI-powered images. Once you've chosen your image addon, you'll have the option to "Generate with AI."
After clicking "Generate with AI," you can specify the details for your images:
- What to Generate: Enter a prompt that describes the image you want to create. For example, "A cute mini robot enjoying rain, spreading hands."
- Image Size: Define the dimensions of your image, like "256px."
Generating Images
Once you've configured your preferences, clicking the "Generate" button will provide you with four image variations based on your prompt.
For each generated image, you have the following options:
- Magic Fill: Use this feature to make specific edits to the image, like filling a certain area with a new element.
- Variations: Explore different variations of the generated image.
- Expand: Enlarge the image beyond its original size while maintaining its quality.
- Insert: Once you’ve chosen the image you want to display on your website, you can select its aspect ratio to make the image perfectly fit the space in your website that you want it to fill. This will automatically save the image in the media manager for future use.
Magic Fill
If you select "Magic Fill," you gain access to further customization to make specific edits to the image, like filling a certain area with a new element:
- Brush Size: Adjust the brush size to precisely edit the image.
- What to Generate: Here, you can specify the area you want to modify within the image and replace it with your prompt.
Use the brush to mark the area that you want to add an element to, and describe what you want to add in the “What to Generate field”.
Variations
When you opt for "Variations," the AI Image Generator takes things a step further by generating four unique variations of the selected image.
You can use any of the images created by AI as a reference image or any existing image on your website to create variations.
Expand
The "Expand" feature in the AI Image Generator allows you to enlarge an image while maintaining its quality and resolution. It's an excellent option when you need a larger version of your image without compromising its clarity and sharpness.
Here's how it works:
- Scale: Specify the scaling factor to determine the degree of enlargement. For instance, "1.1x" means the image will be expanded by 10%. You can adjust the scale to meet your project's size requirements.
- What to Generate: As with other AI image generation options, you can enter specific details or prompts related to the expansion, ensuring the image aligns with your creative vision.
You exceeded your current quota...
If even with the added corrected AI API Key you cannot generate any new text or image and after using the "Generate AI" button all you see is a message with the text "You exceeded your current quota, please check your plan and billing details." (screenshot):
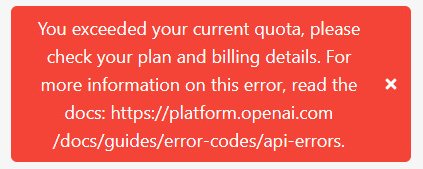
This error message indicates that you have hit your maximum monthly budget for the API (OpenAI - ChatGPT). This means that you have consumed all the credits or units allocated to your plan and have reached the limit of your billing cycle. It may also mean that you have used up the allotted API request for the day, and you have to wait for the next day (remember about the 24-hour cycle).
To resolve this error, please follow these official steps:
- Check your usage limit and monthly budget in your OpenAI account setting. Check the usage dashboard - where can see how many tokens your requests have consumed. If it is $0, add money to the credit balance.
- If you are using a basic plan, consider upgrading to a pay-as-you-go plan that offers a higher quota.
- If you need a usage limit increase, you can apply for one under the Usage Limits section. You can buy credits on the OpenAI Developer Dashboard, under Accounts > Billing page.
- Go to the Usage Limits, and set the Monthly budget field to the same as the value above (e.g.: $50), then save your changes.
- Sometimes clearing browser caches and cookies will delete the corrupt files interfering with ChatGPT activities.
You're getting an error because you created a second OpenAI account with the same phone number. It seems like free credit is given based on phone numbers.
When you upgrade to a paid plan, don't expect the error to disappear immediately. It might take 15-30 minutes after the upgrade before the error disappears. Some users suggest creating a new API Key.
Please notice that JoomShaper is not a developer of the OpenAI platform, and you cannot buy credits or API keys from Us. When you set up a paid OpenAI subscription you are invited to set a monthly limit, and you’ll be able to use any part of the system until you hit that limit.
Best Practices to Generate Great Prompts
To generate great prompts for AI image creation, consider the following key points:
- Keep the prompt neither too short nor too long, ideally under 500 characters, as vague prompts may not yield the desired results.
- Specify the type of image (e.g., photograph, painting, illustration).
- Define the subject of your image.
- Determine the mood and the color palette
Notice! Even if you have a premium account on OpenAI it has its own limits of use. With every generated line of text or image, available resources are dwindling. Delays due to content generation (text or image) are the result of increased traffic on OpenAI's servers.