

Export-Import and Save for later use
How to Reuse Custom Designs
In SP Page Builder Pro once you create a custom design (Page, Section, and addon), you can save it for later use as many times as you need.
Import & Export page
Each page offers export/import functionality. With SP Page Builder Pro, you can export any page and store it for later use and on other websites. You have two methods to export the whole page:
- On the list of Pages - click the "dots" icon at the end of the Page name, then choose "Export".
- Inside the Page itself - click the "dots" icon at the top-right section, then choose "Export".
The page structure is saved as a .json file. By default saved file doesn't contain images, .mp4, or attachments inside — only links to those resources. This will export a static version of the page, including Page content and CSS styles. During that process, you can set the option to export to include SEO data and Media data. Doing so will provide you with a .zip file that should be downloaded by you.
How to import an exported page
To import an exported & saved page, select & click the “Import Layout” or "Import" link inside the newly created Page. You’ll see a prompt to choose the exported file, select it, and you’ll get the page right away! But don't let your excitement fool you; you still need to hit the "Save" button at the bottom to complete the process.
Notice! The import process will override the current page content. That's why we recommend doing it for newly created pages only.
Multi-Page Export
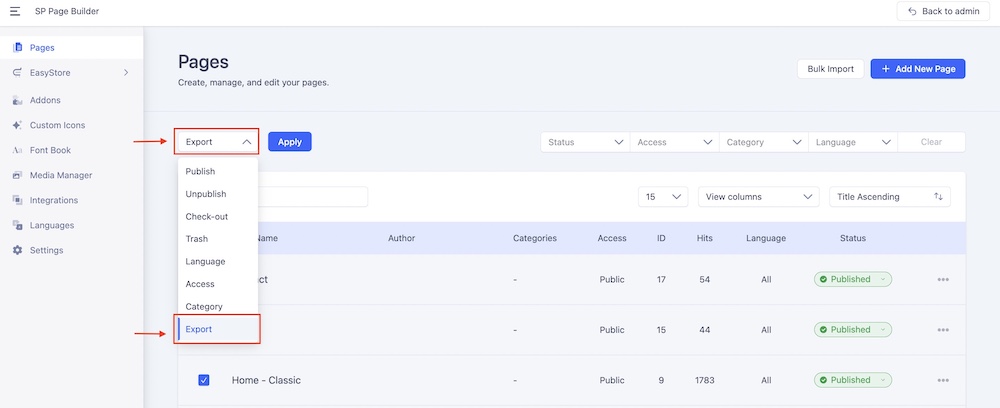
On the list of Pages, you can mark [x] more than one Page, and also click the "Export" to export those with media files support. This feature allows you to either import your saved items or archive existing pages directly onto your device for easy access or backup purposes.
To bulk export your pages, select all the SP Page Builder pages you wish to export, then click on the Bulk Action button. From the drop-down menu, choose the Export option. Once selected, click on the Apply button right next to it. Your export process will commence, and your pages will be downloaded in zip format.
Notice! You can reuse exported pages also on different websites, but you have to be sure that they contain the same list of addons and image structure. If not, part of the content may not work. The exported .json file does not contain any addon code inside, only layout and page settings. Also, you need to have the same images stored in the new destination to get the visuals.
Multi-Page Import
With SP Page Builder, you can effortlessly import and export multiple pages.

Within your SP Page Builder dashboard, you'll notice the Bulk Import option conveniently located beside the “+Add New Page” option. Simply click on it to initiate the process of importing your saved pages directly from your device. Please note that pages should be imported in zip format from SP Page Builder.
If your ZIP file is large, importing all the data may take several seconds. Please wait until the process is complete before continuing.
Page Duplicate (Save as Copy)
You can create a Page duplicate (Copy/Clone) and use it. It's useful when you finish the edition of the page, and now you want to create a similar one, but this time in a different language. After you click "Save as Copy", the editor will create a new page with the content of the copied page, and the new page will be active and ready to use.

Save Section - Save and Reuse the Custom Section
After you’ve created a section and put everything you need inside, you can then save the entire section and save it for later use. To do so, click on the Settings icon in the top-right corner of that section, then click on the Save button. See the screenshot below.

Then before saving you can name a custom section as you need.
Later, you can reuse it any time from either the frontend or backend editor by going to Saved Items > Sections.

Notice! You can save the Section with a columns grid and all addons inside. But you cannot save the selected column. Save feature is working only for Sections and addons.
Save Addon(s)
First, right click on any addon (while on the fronted editor) or click on the three-dot icon on the side of the addon (while on the backend editor). You can save any added addon (by clicking the "Floppy disk" icon) with its content, and all settings for future use. This is a great time-saving feature when you are creating a new website. This saved addon you can use multiple times in Pages, SPPB modules, and Articles with SPPB mode.

Where Can I Find Saved Addon(s)?
In SP Page Builder, while in the frontend or backend editor, go to Saved Items > Addons to locate your saved addons.

Option to Include SEO and Media Data While Exporting Page
When exporting pages, you can choose to include SEO data, which saves your SEO settings (such as titles, descriptions, and keywords) to ensure they are preserved when the page is imported to another site. Additionally, you can select "Include Media Data" to export all media files associated with that page, including images, videos, GIFs, audio files, and attachments. During the import process, both the SEO settings and media files will be restored, ensuring a smooth transition without the need for manual reconfiguration or re-uploading.
The option to export pages with metadata or media files appears when exporting a single page or multiple pages in bulk.