

Instagram Gallery Access Token
In this guide, we will give you step-by-step instructions on how to add & set the Instagram gallery feed to your Joomla website by using a dedicated addon from SP Page Builder Pro. We prepared two versions of our manual: video and more current text. We suggest checking both.
Step 1: Enable SSL/HTTPS for the site
Facebook (Instagram) requests using a valid SSL for the domain where you are going to use the Instagram gallery. Contact your hosting provider to guide you through the whole process. After it is enabled, please in Joomla Global Configuration enable/force SSL for the whole website. You can also find it in our blog post about SSL/HTTPS.
If you have an SSL Certificate Problem: "Unable to Get Local Issuer Certificate" - this error message usually indicates that the server cannot properly verify the SSL certificate chain. Even if the SSL appears valid in the browser, the server may still be missing the intermediate or root certificate, or the local CA bundle used by PHP/cURL may be outdated. Read more in that documentation.
On localhost, it may not be possible to configure SSL or to configure all the steps below. We suggest using the final domain.
Step 2: Switch to Instagram Business Account
Instagram will only allow you to access images from your Instagram profile if you have switched your account to a business account. To do so, you must first log in to your Instagram account and navigate to Settings > Account > Switch to Professional Account. Then you can add details such as the business email, phone number, and address. Click next, and you are good to go! For further information, you can visit Instagram’s documentation.
Step 3: Create a Facebook App
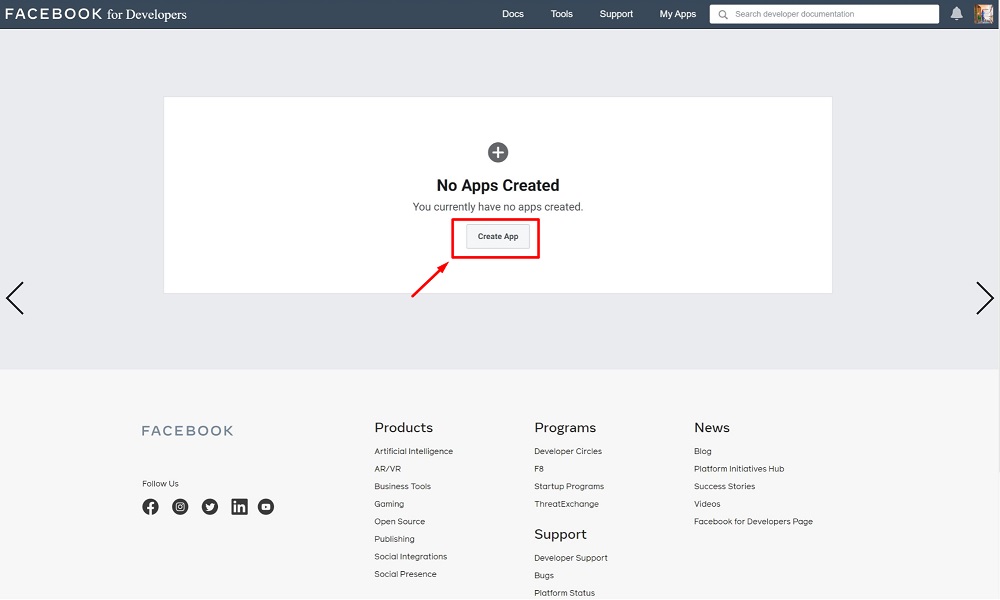
Create a new app with App Type set as "None". The next step involves creating a Facebook App that will give the functionality to create an Instagram feed in Joomla. Head over to https://developers.facebook.com/apps to create an app for developers. The app creation process will guide you through all the settings.
Step 4: Create a Facebook Page for your Instagram Business Account
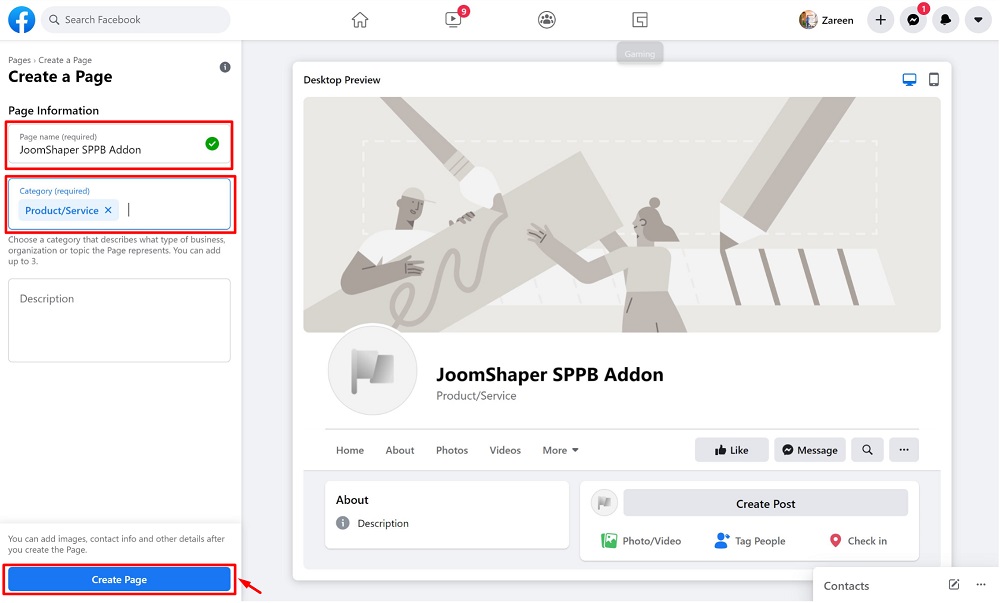
For the next part, we will create a Facebook Page that also connects to Instagram to give you the required functionality. To do so, head to facebook.com/pages/create and start creating a Facebook Page. However, if you already have a Facebook Page for your business, you can skip this part and simply connect it to your Instagram profile.
To connect the Page to your Instagram profile, head to Page Settings > Instagram and click on “Connect Account”.
Notice! As of June 2020, Instagram will no longer offer access to its old API which is used to display feeds from Personal Instagram accounts.
Notice! Since 2018, you will only be able to display user feeds from accounts that you have a matching access token.
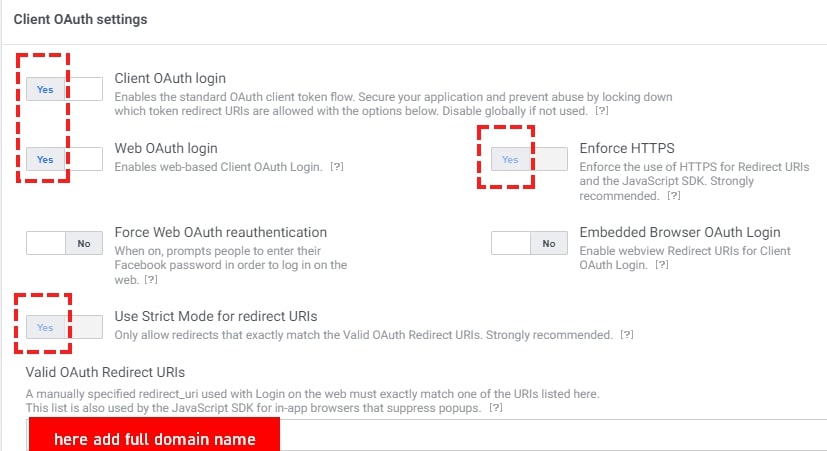
Step 5: Add the Site URL to Facebook
In Facebook: Login - Settings - Valid OAuth Redirect URIs. If you're using localhost it may not possible to validate that temporary URL. Please check all the below settings. In the Valid OAuth Redirect URIs, use the following URL but replace your domain name with the real one: https://your-domain.com/administrator/index.php?option=com_sppagebuilder&task=instagram.accessToken
Step 6: Configure SP Page Builder
Then we need to head to https://developers.facebook.com/apps/ to get our Instagram access token. Navigate to Settings > Basic, and click on “Show” to view the App ID and App Secret. Copy the App ID and the App Secret.

Head to the SP Page Dashboard and then Settings. In the Options tab, you will find fields to paste the App ID and App Secret. Paste the App ID and the App Secret accordingly, below that you will see a button that says Generate Token.
Click on Generate Token and this will present you with a screen that will ask you to select the Instagram Business Account that you would like to link with the SP Page Builder addon. Select your Instagram account and hit on Next. Now, select the Facebook Page that you have created earlier and click on Done. Your access token will be generated and all that is left to do is click on Insert & Save Token.
Note: The naming scheme on Facebook’s side is a bit inconsistent as “App ID” are sometimes called “User ID”, “Instagram ID” and so on. However, please don’t get confused as there are only two codes you need to be concerned with: ID and Secret. As long as you have them in check, you will be fine.
Step 7: Add Instagram Gallery Addon to Your Site
Once you have successfully linked your Instagram account and the Facebook Page, all you have to do now is add and customize the Instagram Gallery Addon. It can be added to an SP Page Builder page just like any other addon. Go to the editor view of the page you want to add an Instagram Gallery, and simply add the addon.
Step 8: Customize Instagram Gallery
From the General tab, you can now customize this addon. You will be presented with the following sections along with their additional settings:

Options: From options you can set several parameters.
- Get Images By: You can choose to get images by “User ID”, which will fetch recent content from the linked Instagram profile. It can be your Instagram profile for your portfolio, or from your business’s profile. The other option is “Hashtag”. This will fetch images that match the specific hashtag. For example, if you want to display images of cupcakes, you can simply write “cupcakes” and the gallery will load all images with a matching hashtag in their caption. Insert the URL of the YouTube or Vimeo video you want to display.
- Item Limit: You can set a limit to the displayed items.
- Photos per row: You can limit the photos that will be displayed per row.
- Show Stats: Through this option, you can choose to show specific states of the video such as Image Caption, Likes Count and Comments Count.
- Layout Type: You can set the layout type to either Default or Classic.

Title: You can also give your Instagram Gallery a Title.
- Title: Enter the text for the Title.
- HTML Element: Set the HTML element hierarchy as H1, H2, H3, etc.
- Top Margin: Set the Top Margin of your Title.
- Bottom Margin: Set the Bottom Margin of your Title.
- Title Color: Select the Title’s Text Color.
- Select Font: Adjust the typography of the title.