- TemplatesTemplates
- Page BuilderPage Builder
- OverviewOverview
- FeaturesFeatures
- Dynamic ContentDynamic Content
- Popup BuilderPopup Builder
- InteractionsInteractions
- Layout BundlesLayout Bundles
- Pre-made BlocksPre-made Blocks
- DocumentationDocumentation
- EasyStoreEasyStore
- ResourcesResources
- DocumentationDocumentation
- ForumsForums
- Live ChatLive Chat
- Ask a QuestionAsk a QuestionGet fast & extensive assistance from our expert support engineers. Ask a question on our Forums, and we will get back to you.
- BlogBlog
- PricingPricing
How To Tips & FAQ
This section contains answers for popular "How to create/use/change/hide/override/translate ..." questions about SP Page Builder (Pro). To solve technical problems, use the support forum.
How to add the license key and activate Pro feature
If you see the message 'This feature is only available in the Pro version of SP Page Builder' when trying to use certain extension features, first make sure that you have the SP Page Builder Pro version installed.
You cannot upgrade Page Builder from Lite to Pro by adding a license key only. The Pro version must be installed first.
- If you have a Lite version installed, please download the Pro version* and install it. It will upgrade the code of the extension without touching content created before; it's a fully safe process.
- Go to your JoomShaper Dashboard. Then, please copy the license key, only numbers without any spaces around it. The License key is a 32-digit number.
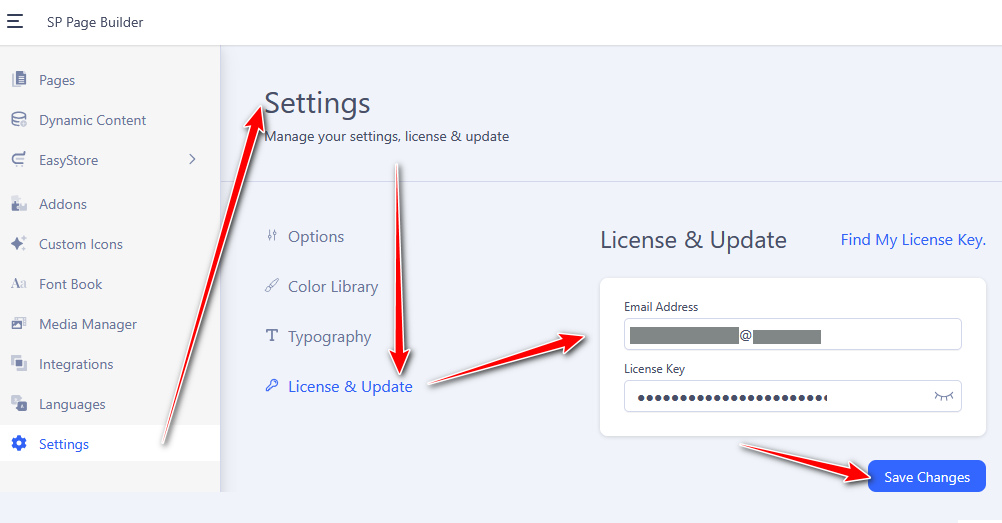
- Then from the Joomla! Backend, go to: Components > SP Page Builder Pro > Settings > License & Update. Settings link you can also find in the list of pages on the left sidebar (screenshot).
- Insert email address and license key into their respective fields. Use the same email you entered while signing up for the JoomShaper account.
Note: any extra space will result in an error. - Click the "Save Changes" button.
- Clear Joomla & Browser cache to be able to use all PRO features.
*Paid subscription is required to download SP Page Builder Pro and upcoming updates. Personal and Business Membership plans have different limitations. The SP Page Builder Pro that's included in the quickstart package, does not allow you to update and download SP Page Builder separately.
How can I add support to .WebP files?
WebP is an image format developed by Google that aims to provide efficient image compression while maintaining high image quality. It's designed specifically for use on the web, where fast loading times and reduced bandwidth consumption are crucial. WebP images can significantly reduce the size of image files compared to other commonly used formats like JPEG and PNG. This can result in faster loading times for web pages.
Browser Compatibility: WebP is supported by all major modern browsers such as Google Chrome, Firefox, Safari, Edge, and Opera. Older versions of browsers may not support that format.
By default, Joomla Media may not support .webp files and during file upload, you may see "Unable to upload file". Hopefully can add .webp support for pages (and addons, rows), and articles easily. Go to the Media global configuration (Content > Media > Options).
- Add
webpin Allowed Extensions, you can replace bmp, which is not used anymore. - Add
webpin Legal Image Extensions (File Types). - Add
image/webpin Legal MIME Types.
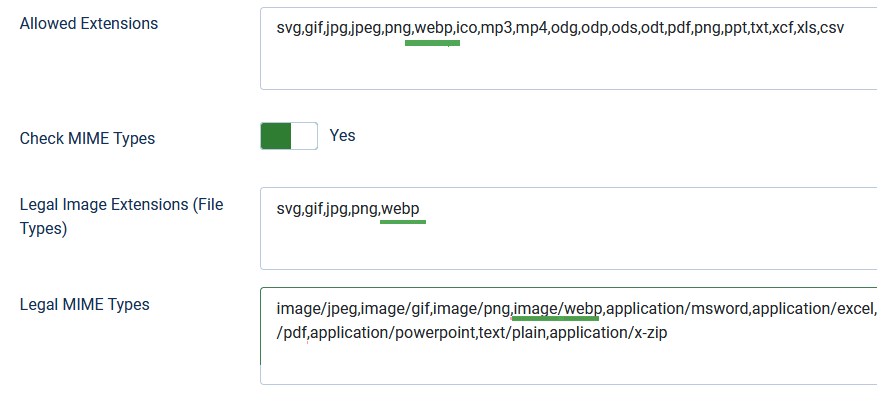
From that point on, you will be able to see WEBP files in the Media Manager; you won’t have any preview for those files, but you can easily select file(s) wherever the media manager is used for image insertion.
In the JCE editor, you need to add ‘webp’ to the list of permitted file extensions if you cannot see/select them. Plugin Parameters -> Image Manager Permitted File Extensions.
How can I add support to SVG files?
SVG stands for Scalable Vector Graphics. It's an XML-based file format for vector images. They can be scaled to any size without an adverse effect in quality, that is why this type of image file is so popular for logos and icons.
Browser Compatibility: SVG is supported by major modern browsers such as Google Chrome, Mozilla Firefox, Safari, Microsoft Edge, and Opera. IE9-11 & Edge don't properly scale SVG files and do not support animations.
By default, Joomla Media does not support SVG files and during file upload, you may see "Unable to upload file". Hopefully can add SVG support to articles, pages, and templates easily. Go to the Media global configuration (Content > Media > Options).
- Add
svg,SVGto the list of global extensions (file types), - Add
svgas legal image extension, - Add
image/svg+xml,application/svg+xmlas legal MIME types.
From that point on, you will be able to see SVG files in the Media Manager, you won’t have any preview for those files but you can easily select the SVG files wherever the media manager is used for image insertion.
In the JCE editor, you need to add ‘svg’ to the list of permitted file extensions if you cannot see/select them. Plugin Parameters -> Image Manager Permitted File Extensions.
How to add reCaptcha Inivisble v2 in Joomla 5.2+
Sadly, recaptcha invisible was removed from Joomla 5, and there is no official tip from the Joomla Team to recover it for now. But there is an unofficial way to get it done.
The Easy method:
- Download the Google Invisible reCAPTCHA v2 plugin (download link).
- This plugin can replace the core Joomla! “CAPTCHA - Invisible reCAPTCHA” plugin that is no longer shipped with Joomla! as of Joomla! 5.2.
- Go to System > Manage > Plugins, and edit the “CAPTCHA - Invisible reCAPTCHA” plugin. Then, enter the Site Key and Secret Key.
- Go to System > Global Configuration, and select this plugin as your Default CAPTCHA and Save changes.
More complicated, older method:
- Download Joomla_4.4.7-Stable-Full_Package.zip (or a more recent version).
- Unzip/Extract this folder:
plugins\captcha\recaptcha_invisible
and those two lang files: administrator\language\en-GB\plg_captcha_recaptcha_invisible.ini and administrator\language\en-GB\plg_captcha_recaptcha_invisible.sys.ini
- Using FTP tool upload them inside your Joomla 5 website (website server) and keep that same folder structure as it was in the original J4.4.
- Login to Joomla 5 Admin area
- System Dashboard > Discover > click "Discover" and install the Recaptcha invisible plugin
- Then you can find & edit it from Plugin Manager,
- Put valid keys, Save changes, and choose it in SPPB addons.
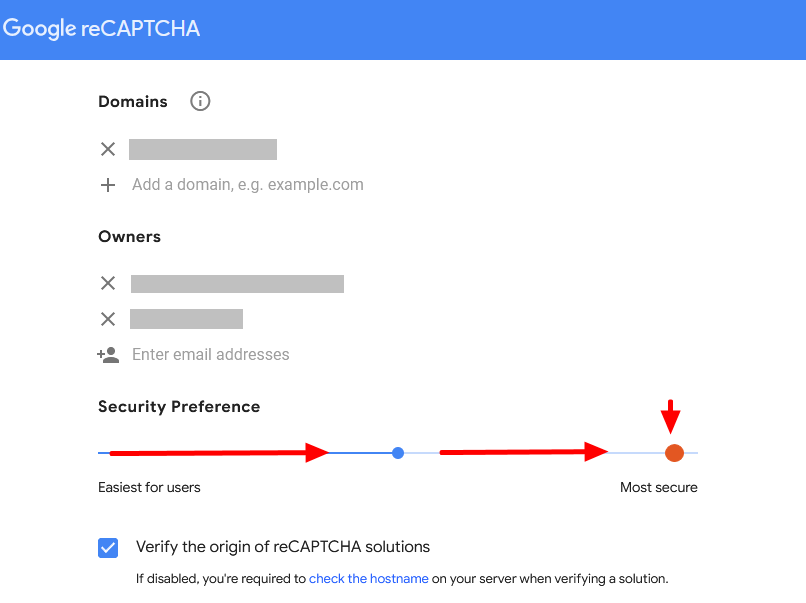
Extra tip! In Google ReCaptcha settings > Security Preference - set "More secure" level.
How to use Custom JavaScript
Can I use custom JavaScript code inside SP Page Builder? In general, the answer is No. There is no custom JS addon yet. Also, we do not recommend using RAW HTML addon for such code, it wasn't developed for JavaScript (!).
You have to install an extra module (extension) that allows you to put custom JavaScript inside. For the first try, we suggest adding & test this method from the back end, with database backup done.
- For a module, we suggest using: HD-AnyCode or Flexi Custom Code or similar.
- Then put your custom JS code inside.
- Set status "Published" for that module.
- Choose position: "pagebuilder".
- Then use the "Module" addon (from SP Page Builder) to choose and insert this module inside the Page layout.
How to use RSForms or Convert Forms inside Page Builder
Both those extensions have a module that can display the selected form - using this method is more accessible than a shortcode.
- In Joomla Module Manager click Add button and choose a module from one of those Form Builders components. For example RSForm! Pro Module or ConvertForms Module.
- Inside the module choose the needed form ID/name from the list.
- Publish the module (Status: Published) and then select "pagebuilder" position (or other not used in layout).
- Inside Page from SP Page Builder add Module addon then find & select that RSForm/Convert Form module.
- Save settings. The form should be displayed on your Page.
We used that method many times - always worked, just make sure that you have the needed Form Module installed. The only problem with not displaying the Form module is when you select the wrong or disabled module.
How to use Module inside Text addon
Since the SP Page Builder Pro update (5.4.4+) this is possible and quite easy to use. You can use the Joomla content shortcode to load the module inside the Text addon. You can load almost any Module by:
- Module ID, Syntax: {loadmoduleid 120}
- Module Position, Syntax: {loadposition user1}
- Module Name, Syntax: {loadmodule mod_login}
Remember that the plugin "Content - Load Modules" (Joomal core) must be enabled to use that feature inside Joomla content areas.
How to use ShortCode inside SP Page Builder
By default is not easy, but still possible. You can use the classic method which requires the use of the Joomla Custom module. In Option (tab), enable Prepare Content [YES], and in the content area add your shortcode (from plugin). Publish that module, then use it by Module addon (SPPB Pro).
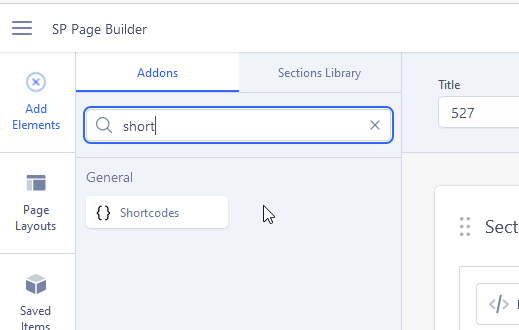
You can also use a smart method with an unofficial shortcode addon (Free). The zip file must be downloaded and unzipped. Then using the FTP tool or File Manager unzipped folder must be transferred to the`components\com_sppagebuilder\addons` folder. Then search it on the list of addons by its name "Shortcode". Inside the addon content area paste the shortcode from the plugin, save changes. In theory, you can use more than one shortocode inside that addon. The content of the plugin will be displayed on preview, it may not be visible in front-end editor mode.
For more details please read the Forum topic (ID 34130) with a description and file link. It was tested with SPPB 3.x, 4.x and SPPB 5.x on PHP 8.x. It's based on Raw HTML addon code made in cooperation with the forum user (Pavel) and support team (Paul). Enjoy it. Soon more updated version.
Tip! If your extra installed component has a module already (or can be installed) - it's better to use its module by our Module addon inside Page or SPPB Module.
How to translate Contact Addon
You have to translate/override several language phrases. Just use Joomla Admin : Languages: Overrides, and choose your native language (Site). Translate the phrases, one by one.
COM_SPPAGEBUILDER_ADDON_AJAX_CONTACT_NAME="Name"
COM_SPPAGEBUILDER_ADDON_AJAX_CONTACT_EMAIL="Email"
COM_SPPAGEBUILDER_ADDON_AJAX_CONTACT_SUBJECT="Subject"
COM_SPPAGEBUILDER_ADDON_AJAX_CONTACT_MESSAGE="Message"
COM_SPPAGEBUILDER_ADDON_AJAX_CONTACT_PHONE="Phone"
COM_SPPAGEBUILDER_ADDON_AJAX_CONTACT_SEND="Send Message"
COM_SPPAGEBUILDER_ADDON_AJAX_CONTACT_WRONG_CAPTCHA="Wrong answer! Please enter the right answer."
COM_SPPAGEBUILDER_ADDON_AJAX_CONTACT_SUCCESS="Email sent successfully!"
COM_SPPAGEBUILDER_ADDON_AJAX_CONTACT_FAILED="Email sent failed."
COM_SPPAGEBUILDER_ADDON_AJAX_CONTACT_CAPTCHA_NOT_INSTALLED="Please make sure that, re-captcha plugin is enabled"
COM_SPPAGEBUILDER_ADDON_AJAX_CONTACT_INVALID_CAPTCHA="Invalid Recaptcha"
COM_SPPAGEBUILDER_ADDON_AJAX_CONTACT_INVISIBLE_CAPTCHA_NOT_INSTALLED="Please make sure reCaptcha v3(invisible) is enabled or reCaptcha secret/site key is valid."
COM_SPPAGEBUILDER_ADDON_AJAX_CONTACT_CUSTOM_CAPTCHA_NOT_INSTALLED="Please make sure the selected Captcha is enabled or the Captcha secret/site key is valid."
COM_SPPAGEBUILDER_ADDON_AJAX_CONTACT_SENDER_IP="Sender IP"
COM_SPPAGEBUILDER_ADDON_AJAX_CONTACT_TAC="Accepted Terms, Privacy/GDPR"
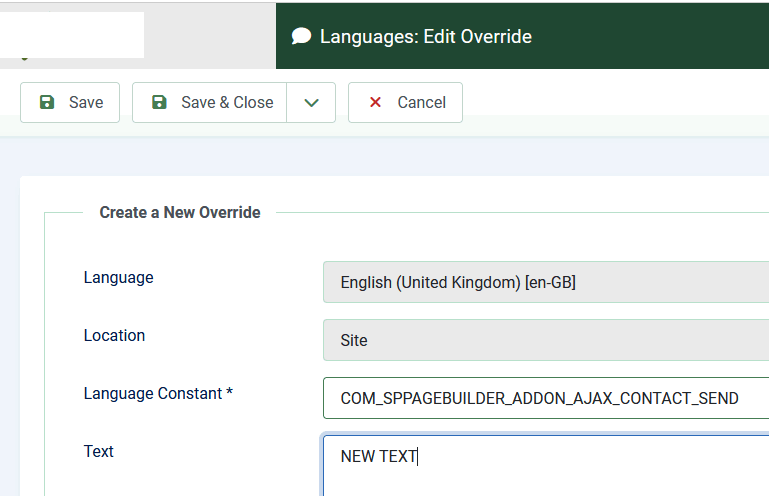
The same translation should be done for all used languages (ES, IT, PL, FR). This proven and very reliable method has been known for many years. As you noticed, you don't have to touch any file, just follow the guide tips.
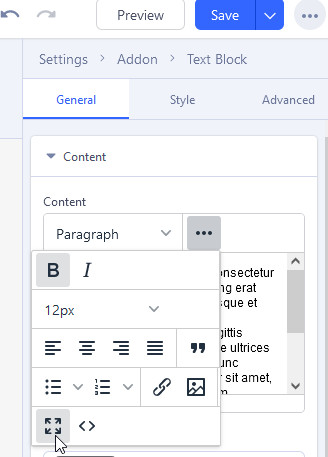
How to increase the size of the textarea in the Text addon
In SPPB using the text editor inside the Text addon you can increase the textarea area from the default to full screen, which is very useful when you edit long text.
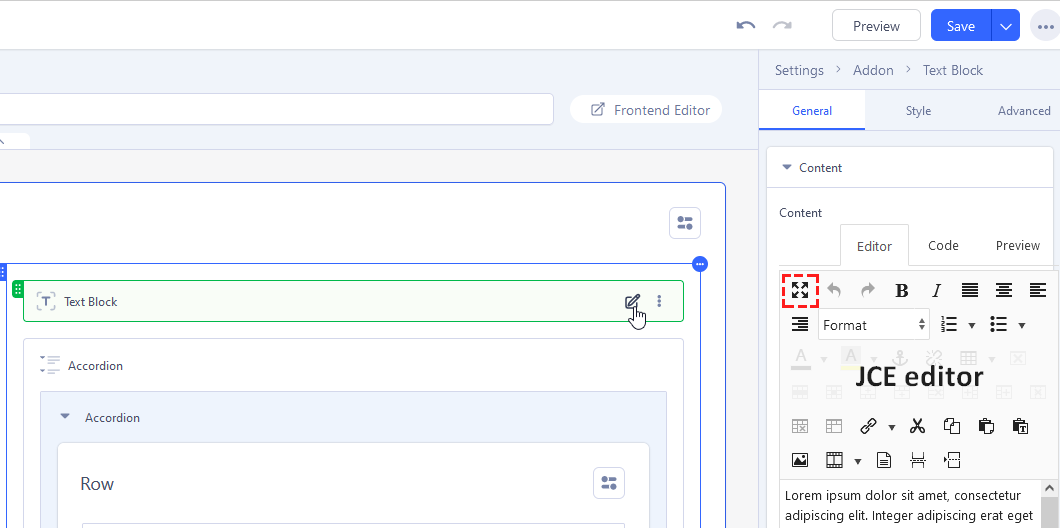

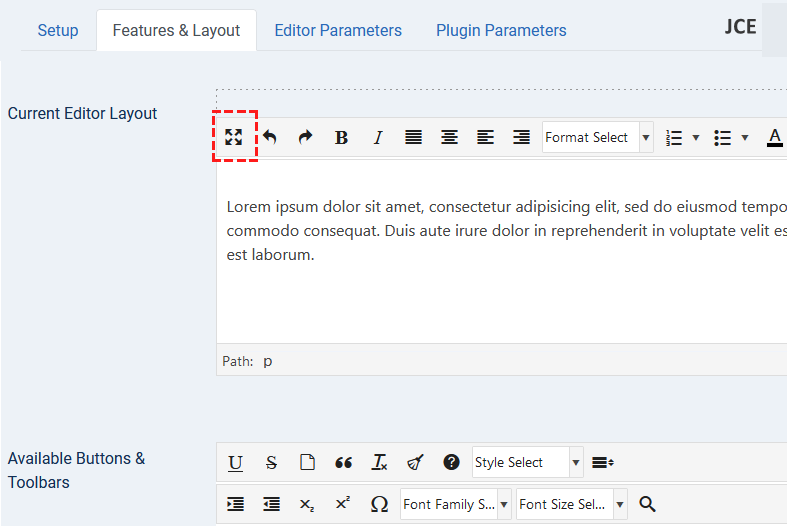
- If you have a JCE (Core/Pro) editor you can add the missing icon using Components > JCE > Editor Profiles > Default > Features & Layout (tab) > Current Editor Layout - take the icon from Available Buttons & Toolbars.
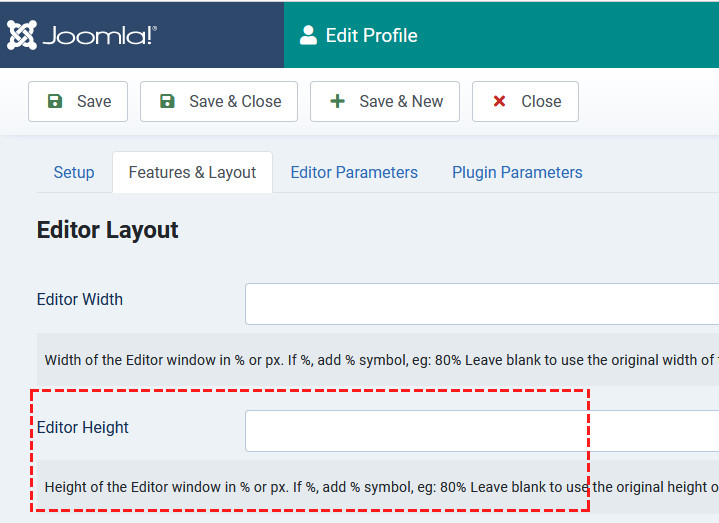
Also from JCE settings (Edit Profile), you can set the Editor height of the JCE editor. You can use px or % value. Remember that height of the editor window can be also increased in the fullwidth view from the editor itself (bottom-right corner).Extra advice: in the JCE toolbar keep only those icons that you really need to use during typical text editing. In most cases, you can reduce 50% of icons. This will save you a lot of space in the editor window.
- If you have a TinyMCE editor click the [...] icon to see the fullscreen icon. That icon is already on the toolbar.
How to make 5 columns and center these columns
You can easily make 5 columns in SP Page Builder 5 (Joomla) and center these columns with flexbox utilities. Those are the basic steps:
- New Row
- Columns > Custom: 2+2+2+2+2 > Generate
- Row Settings > Style (tab) > CSS Class: d-flex justify-content-center
- Page settings > Page CSS (or template custom.css):
.justify-content-center .sppb-row {
  justify-content: center; }
After using it

If you prefer to watch than read we have also the video guide (YouTube clip).

