- TemplatesTemplates
- Page BuilderPage Builder
- OverviewOverview
- FeaturesFeatures
- Dynamic ContentDynamic Content
- Popup BuilderPopup Builder
- InteractionsInteractions
- Layout BundlesLayout Bundles
- Pre-made BlocksPre-made Blocks
- DocumentationDocumentation
- EasyStoreEasyStore
- ResourcesResources
- DocumentationDocumentation
- ForumsForums
- Live ChatLive Chat
- Ask a QuestionAsk a QuestionGet fast & extensive assistance from our expert support engineers. Ask a question on our Forums, and we will get back to you.
- BlogBlog
- PricingPricing
Collections
Product Collections allow you to group related products, making it easier for customers to navigate your store. Collections can be organized by various categories, helping you streamline product management and improve the shopping experience.
Accessing Product Collections
- Log in to your Joomla dashboard.
- Navigate to the EasyStore > Collections section.
- If you haven't created any collections yet, you’ll see the message: "No Product Collections Yet."
- Click on Create new collection to start organizing your products.
Creating a New Collection
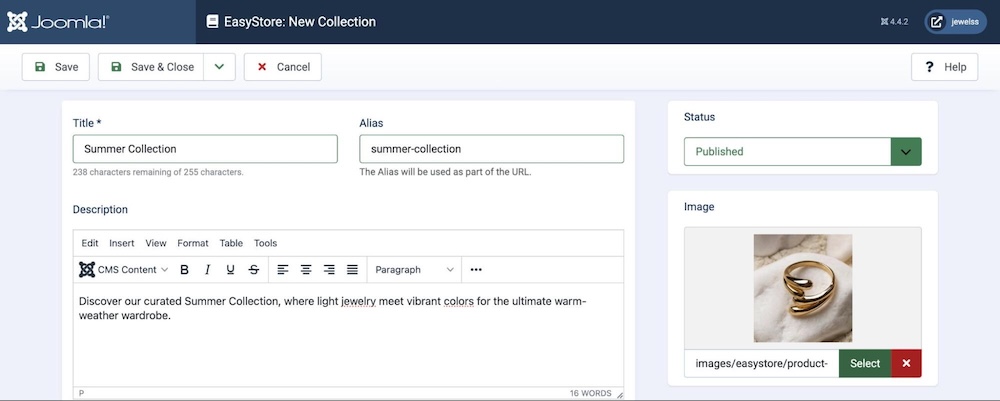
After clicking on Create New Collection, this will take you to the collection creation window where you can define the essential details of your collection.
- Title: Give your collection a name such as "Summer Collection", "New Arrivals", "Limited Editions", etc.
- Alias: Automatically generated from the title. This alias will be used in the URL, making the link SEO-friendly.
- Description: Provide a description of the collection to help customers understand its purpose. Use the editor to format the text (bold, italicize, lists, etc.).
- Image: Upload a representative image for the collection. This can enhance the visual appeal and help users identify the collection’s theme.
Adding Products to a Collection
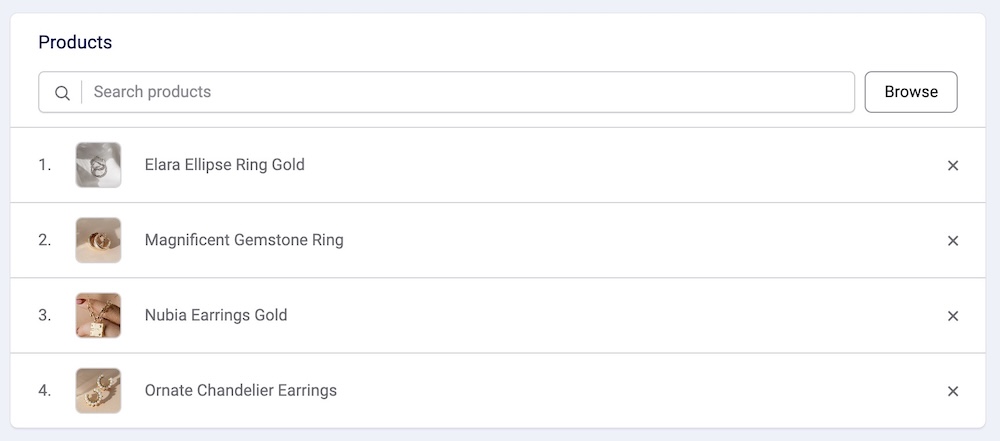
After defining the collection details:
- Scroll down to the Products section.
- Use the Search Products bar to locate items you'd like to add to the collection.
- You can only add products that are marked as "Published."
Configuring SEO Metadata
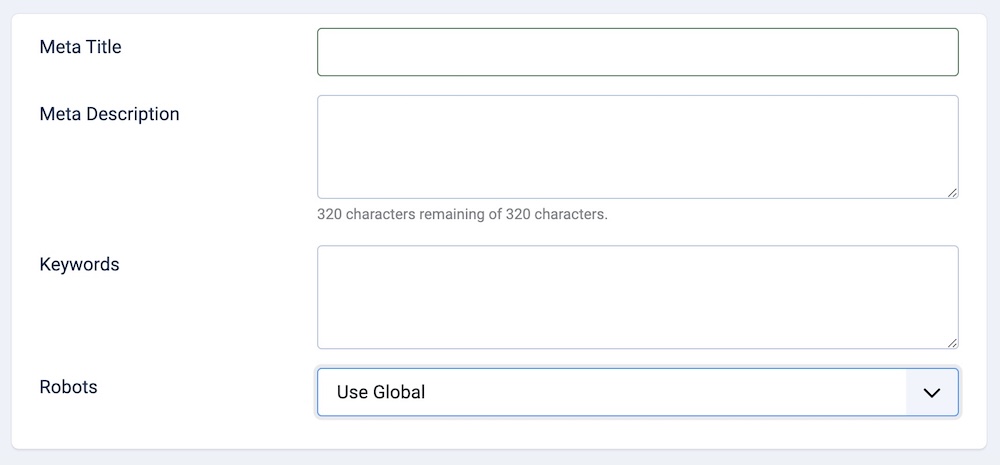
To enhance the SEO of your collection page, configure the following fields:
- Meta Title: A short, descriptive title that appears on search engines.
- Meta Description: A brief description (up to 320 characters) that appears in search engine results, summarizing the content of the collection.
- Keywords: Relevant keywords to help search engines index your collection page.
- Robots: Configure how search engines should index this collection page.
For optimal results, make sure your meta description is engaging and includes important keywords.
Set the collection to "Published" to make it visible on your site. After configuring the settings, click Save to finalize the collection.
Assigning Collections as a Menu Item
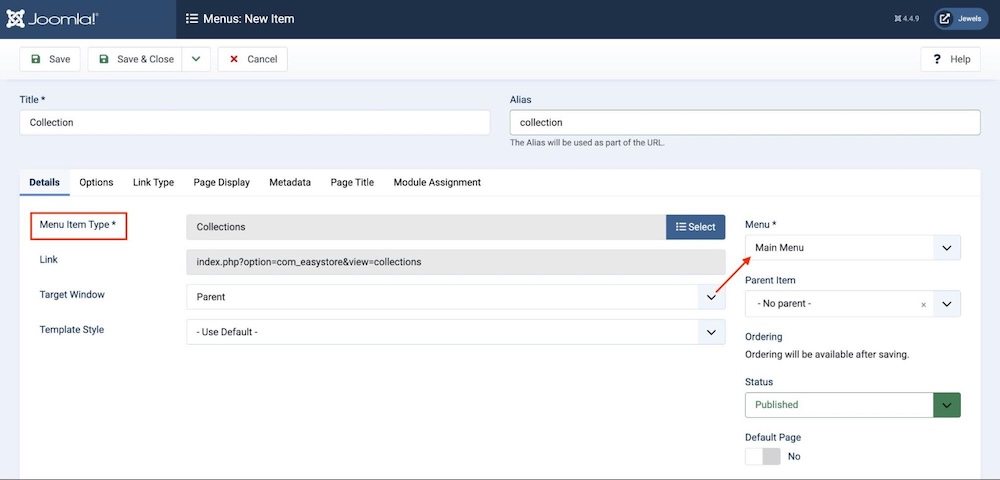
To display Collections on your website’s menu:
- Go to Joomla Dashboard > Menus > All Menu Items.
- Click +New to create a new menu item.
- Select Menu Item Type and choose EasyStore > Collections.
- Click Save to display the Collections on the frontend.
Options for the Collections Menu
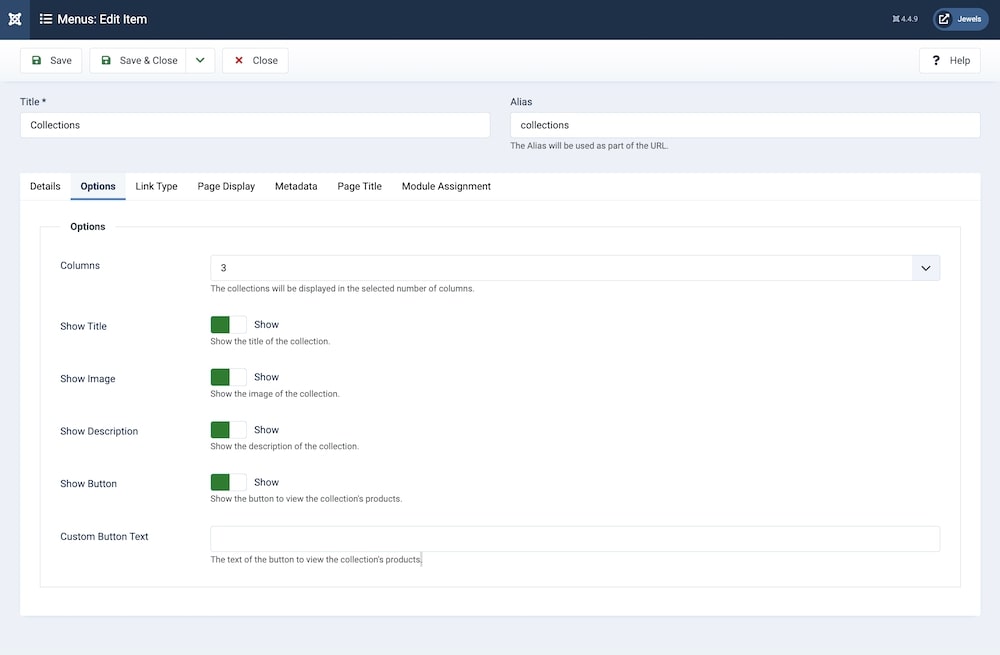
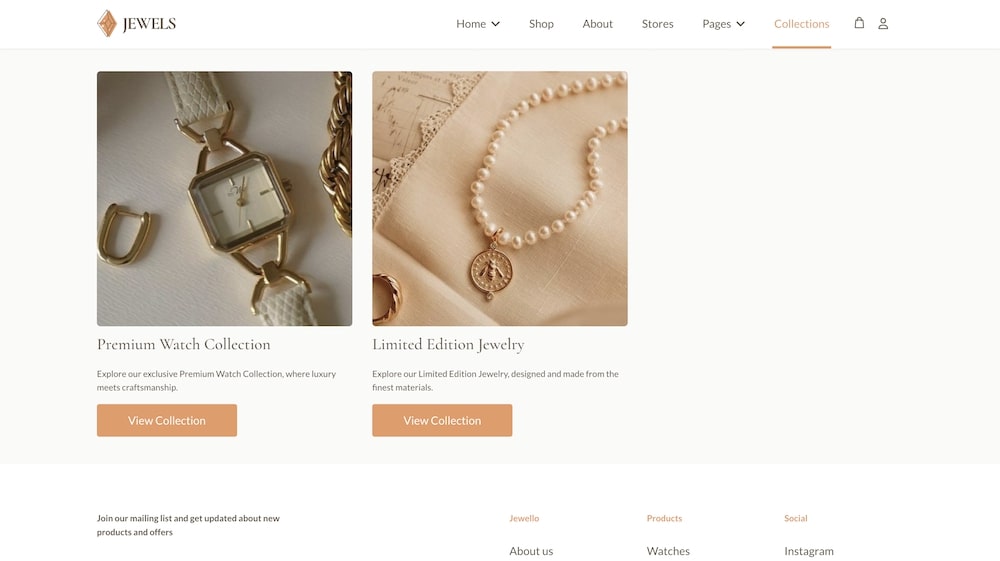
After you have assigned the Collections Menu Item, click on the Options tab to further customize the Collections Page, which will be accessed upon clicking the Collections Menu from your website. You will be presented with the following settings:
Columns: This setting determines how many columns the collections will be arranged. By expanding the dropdown menu, you can select a number between 1 and 4.
Show Title: Enabling this option displays the collection's title on the collections page.
Show Image: By enabling this option, you can display the collection’s thumbnail image on the collections page.
Show Description: This option controls the visibility of the collection descriptions on the collections page.
Show Button: This option displays buttons that will redirect to each specific collection from the collections page.
Custom Button Text: You can customize the text within the aforementioned button using this setting.
Customizing Dynamic Collection Pages with SP Page Builder
SP Page Builder’s integration with EasyStore enables you to design individual Collection pages with custom layouts.
Note: If you don’t use SP Page Builder, individual Collection pages will use the default Joomla layout.
To customize your Collection page:
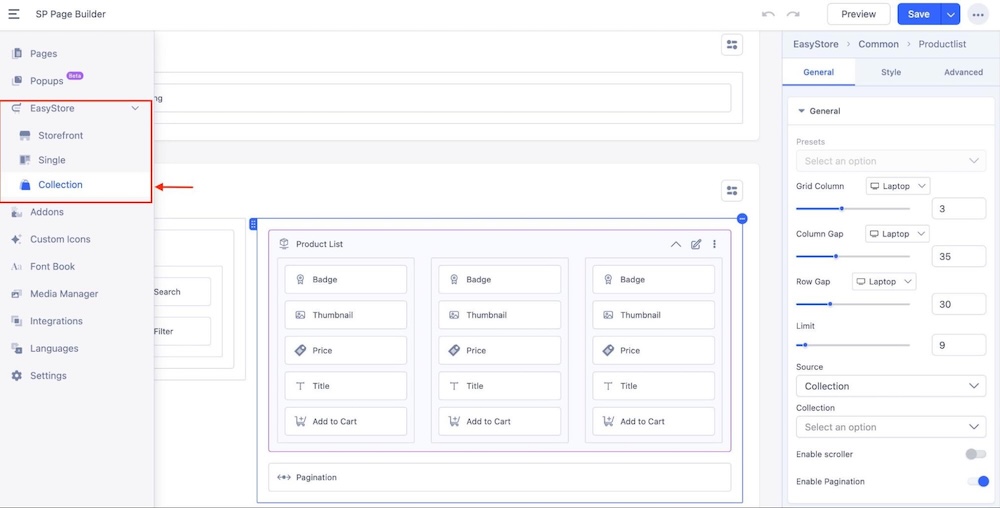
- Navigate to Joomla Dashboard > SP Page Builder Pro > EasyStore.
- Open the Hamburger menu at the top, then go to EasyStore > Collection.
- Use SP Page Builder to design the individual Collection page with the same creative control as your storefront and product pages.
Dynamically Display Collection Title, Description, & Thumbnail
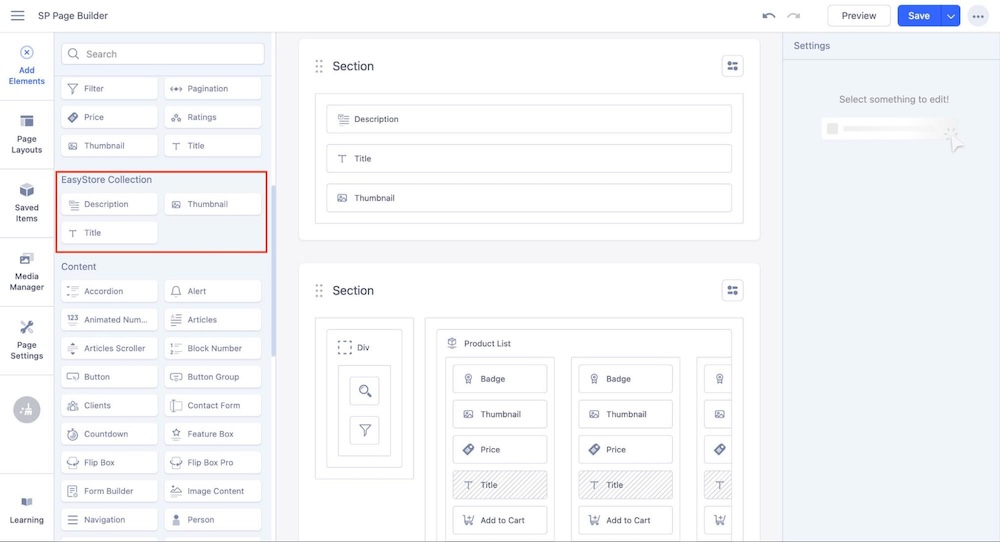
SP Page Builder offers three dedicated addons to dynamically display Collection information:
- Thumbnail: Displays the collection’s image.
- Description: Shows the description of the collection.
- Title: Displays the collection’s title.
Note: These addons are accessible only on individual Collection pages.
Connecting Collections with the Product List Addon
To dynamically display items from a specific collection on a Collection page:
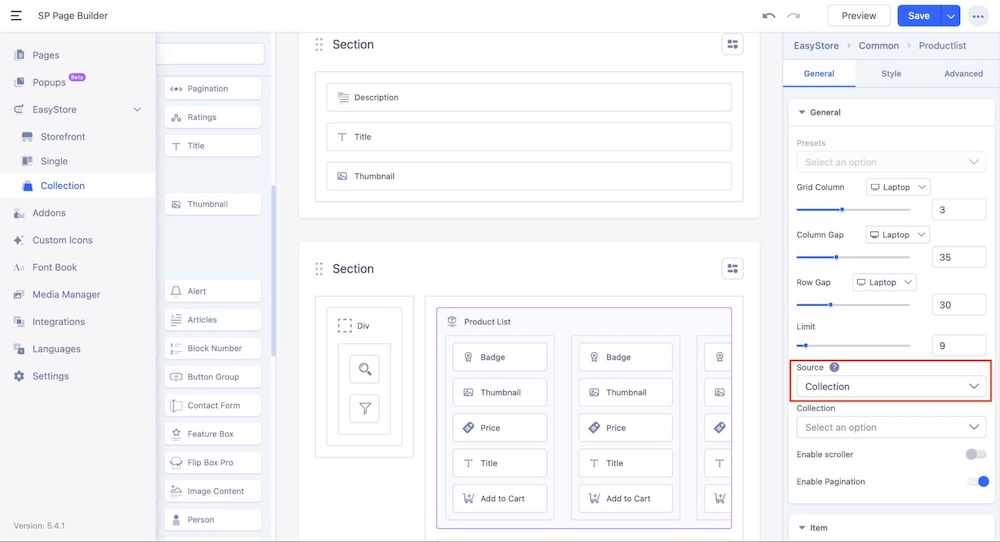
- Add the Product List addon to your page.
- Set the Source of the Product List addon to Collection. This automatically connects all the collections you've created in EasyStore, allowing the Product List addon to dynamically fetch and display items from each collection.
- You can then style this page similarly to your storefront or individual product pages.
Note: You do not need to select a specific collection here when you’re customizing the Collection page.
Note: If the Collection page is left blank or unpublished, the individual Collection page will revert to the storefront layout by default.
Displaying Collection Items on Any Page
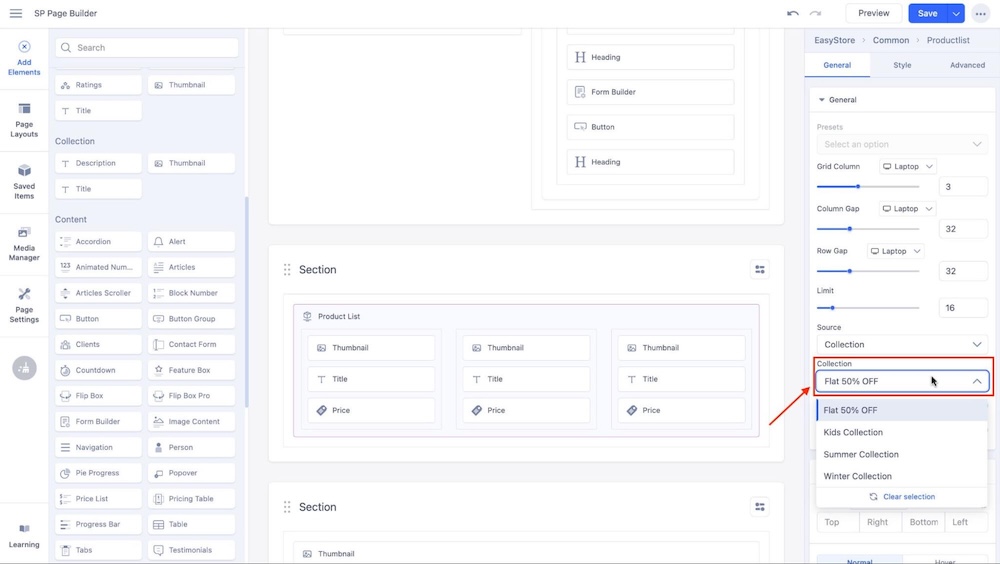
Apart from the dynamic collection pages, you can also display items from a specific Collection on any page:
- Set the Source of the Product List addon to Collection.
- Choose the desired collection from the Collection dropdown to display its items.

