- TemplatesTemplates
- Page BuilderPage Builder
- OverviewOverview
- FeaturesFeatures
- Dynamic ContentDynamic Content
- Popup BuilderPopup Builder
- InteractionsInteractions
- Layout BundlesLayout Bundles
- Pre-made BlocksPre-made Blocks
- DocumentationDocumentation
- EasyStoreEasyStore
- ResourcesResources
- DocumentationDocumentation
- ForumsForums
- Live ChatLive Chat
- Ask a QuestionAsk a QuestionGet fast & extensive assistance from our expert support engineers. Ask a question on our Forums, and we will get back to you.
- BlogBlog
- PricingPricing
FedEx
EasyStore integrates with FedEx, one of the world's most popular shipping carriers, enabling merchants to offer it as a reliable shipping option at checkout. After setup, they can manage shipping rates and generate shipping labels directly from EasyStore.
Before You Begin
To integrate FedEx, ensure you have the following:
- An active FedEx merchant account
- API credentials (Account Number and Password for both Live and Test modes)
- Shipping regions configured in EasyStore
Adding FedEx As Your Shipping Carrier
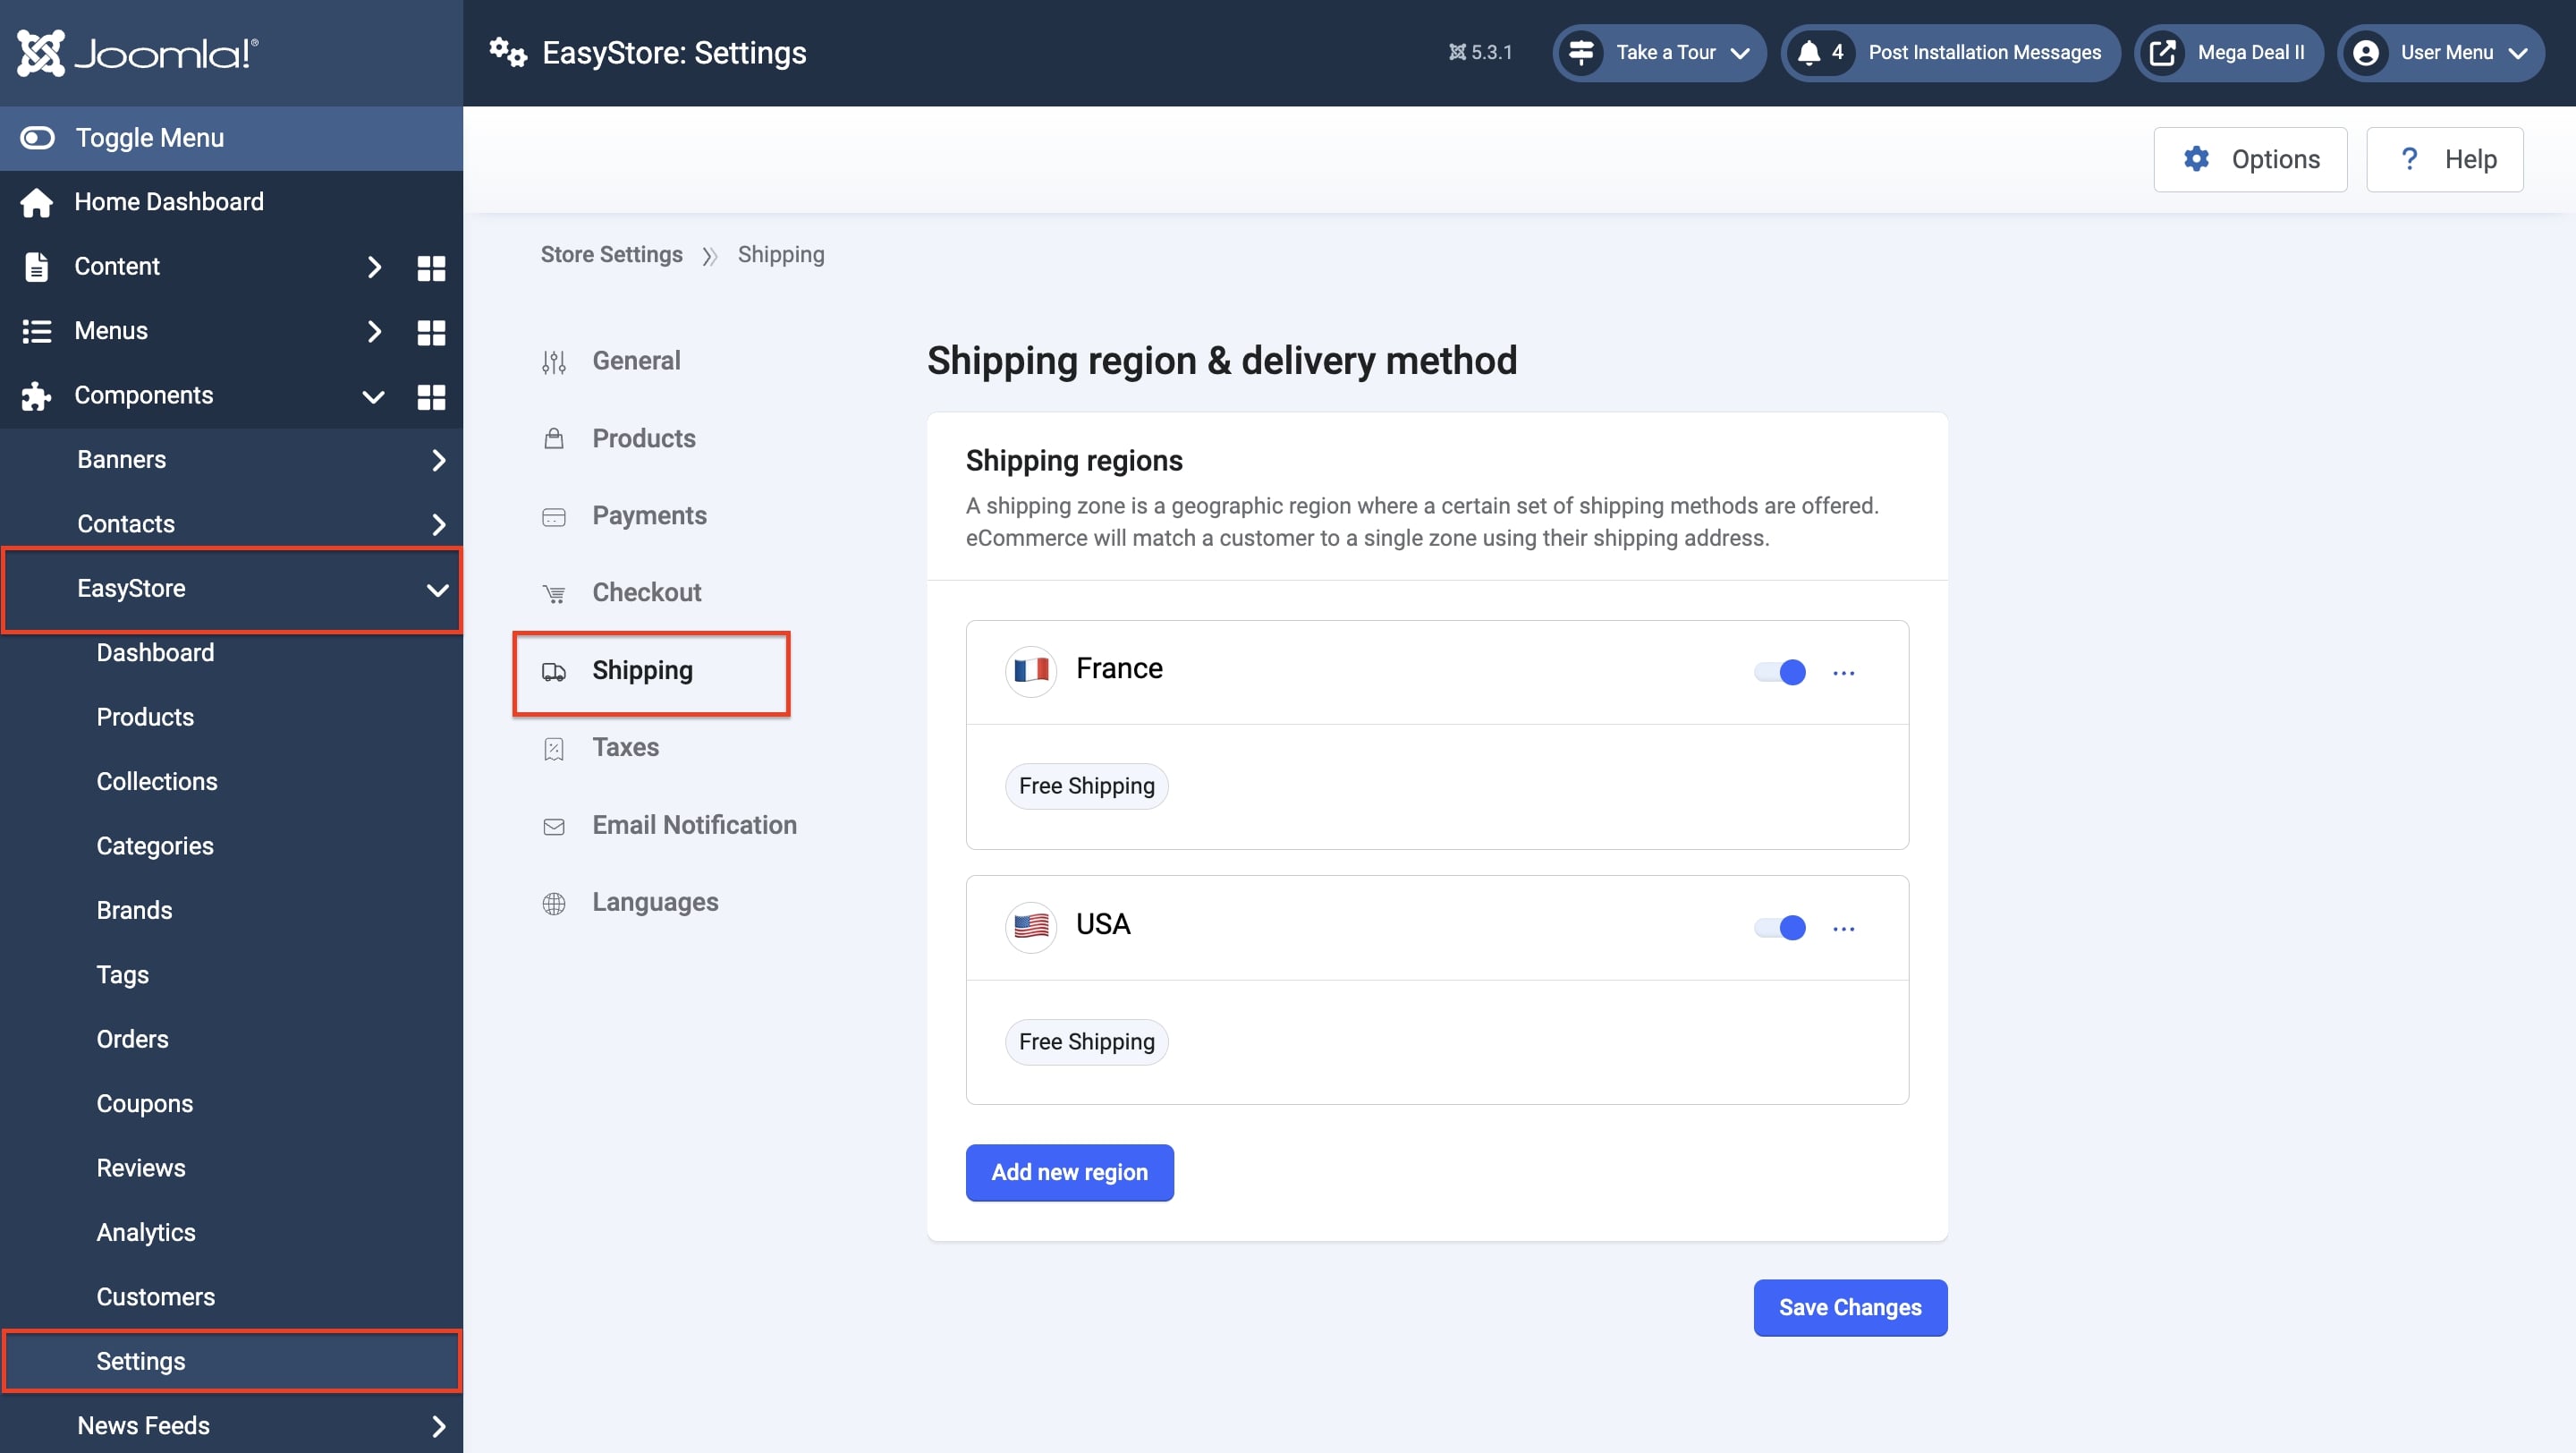
- Log in to your Joomla Dashboard and navigate to Components > EasyStore > Settings > Shipping.
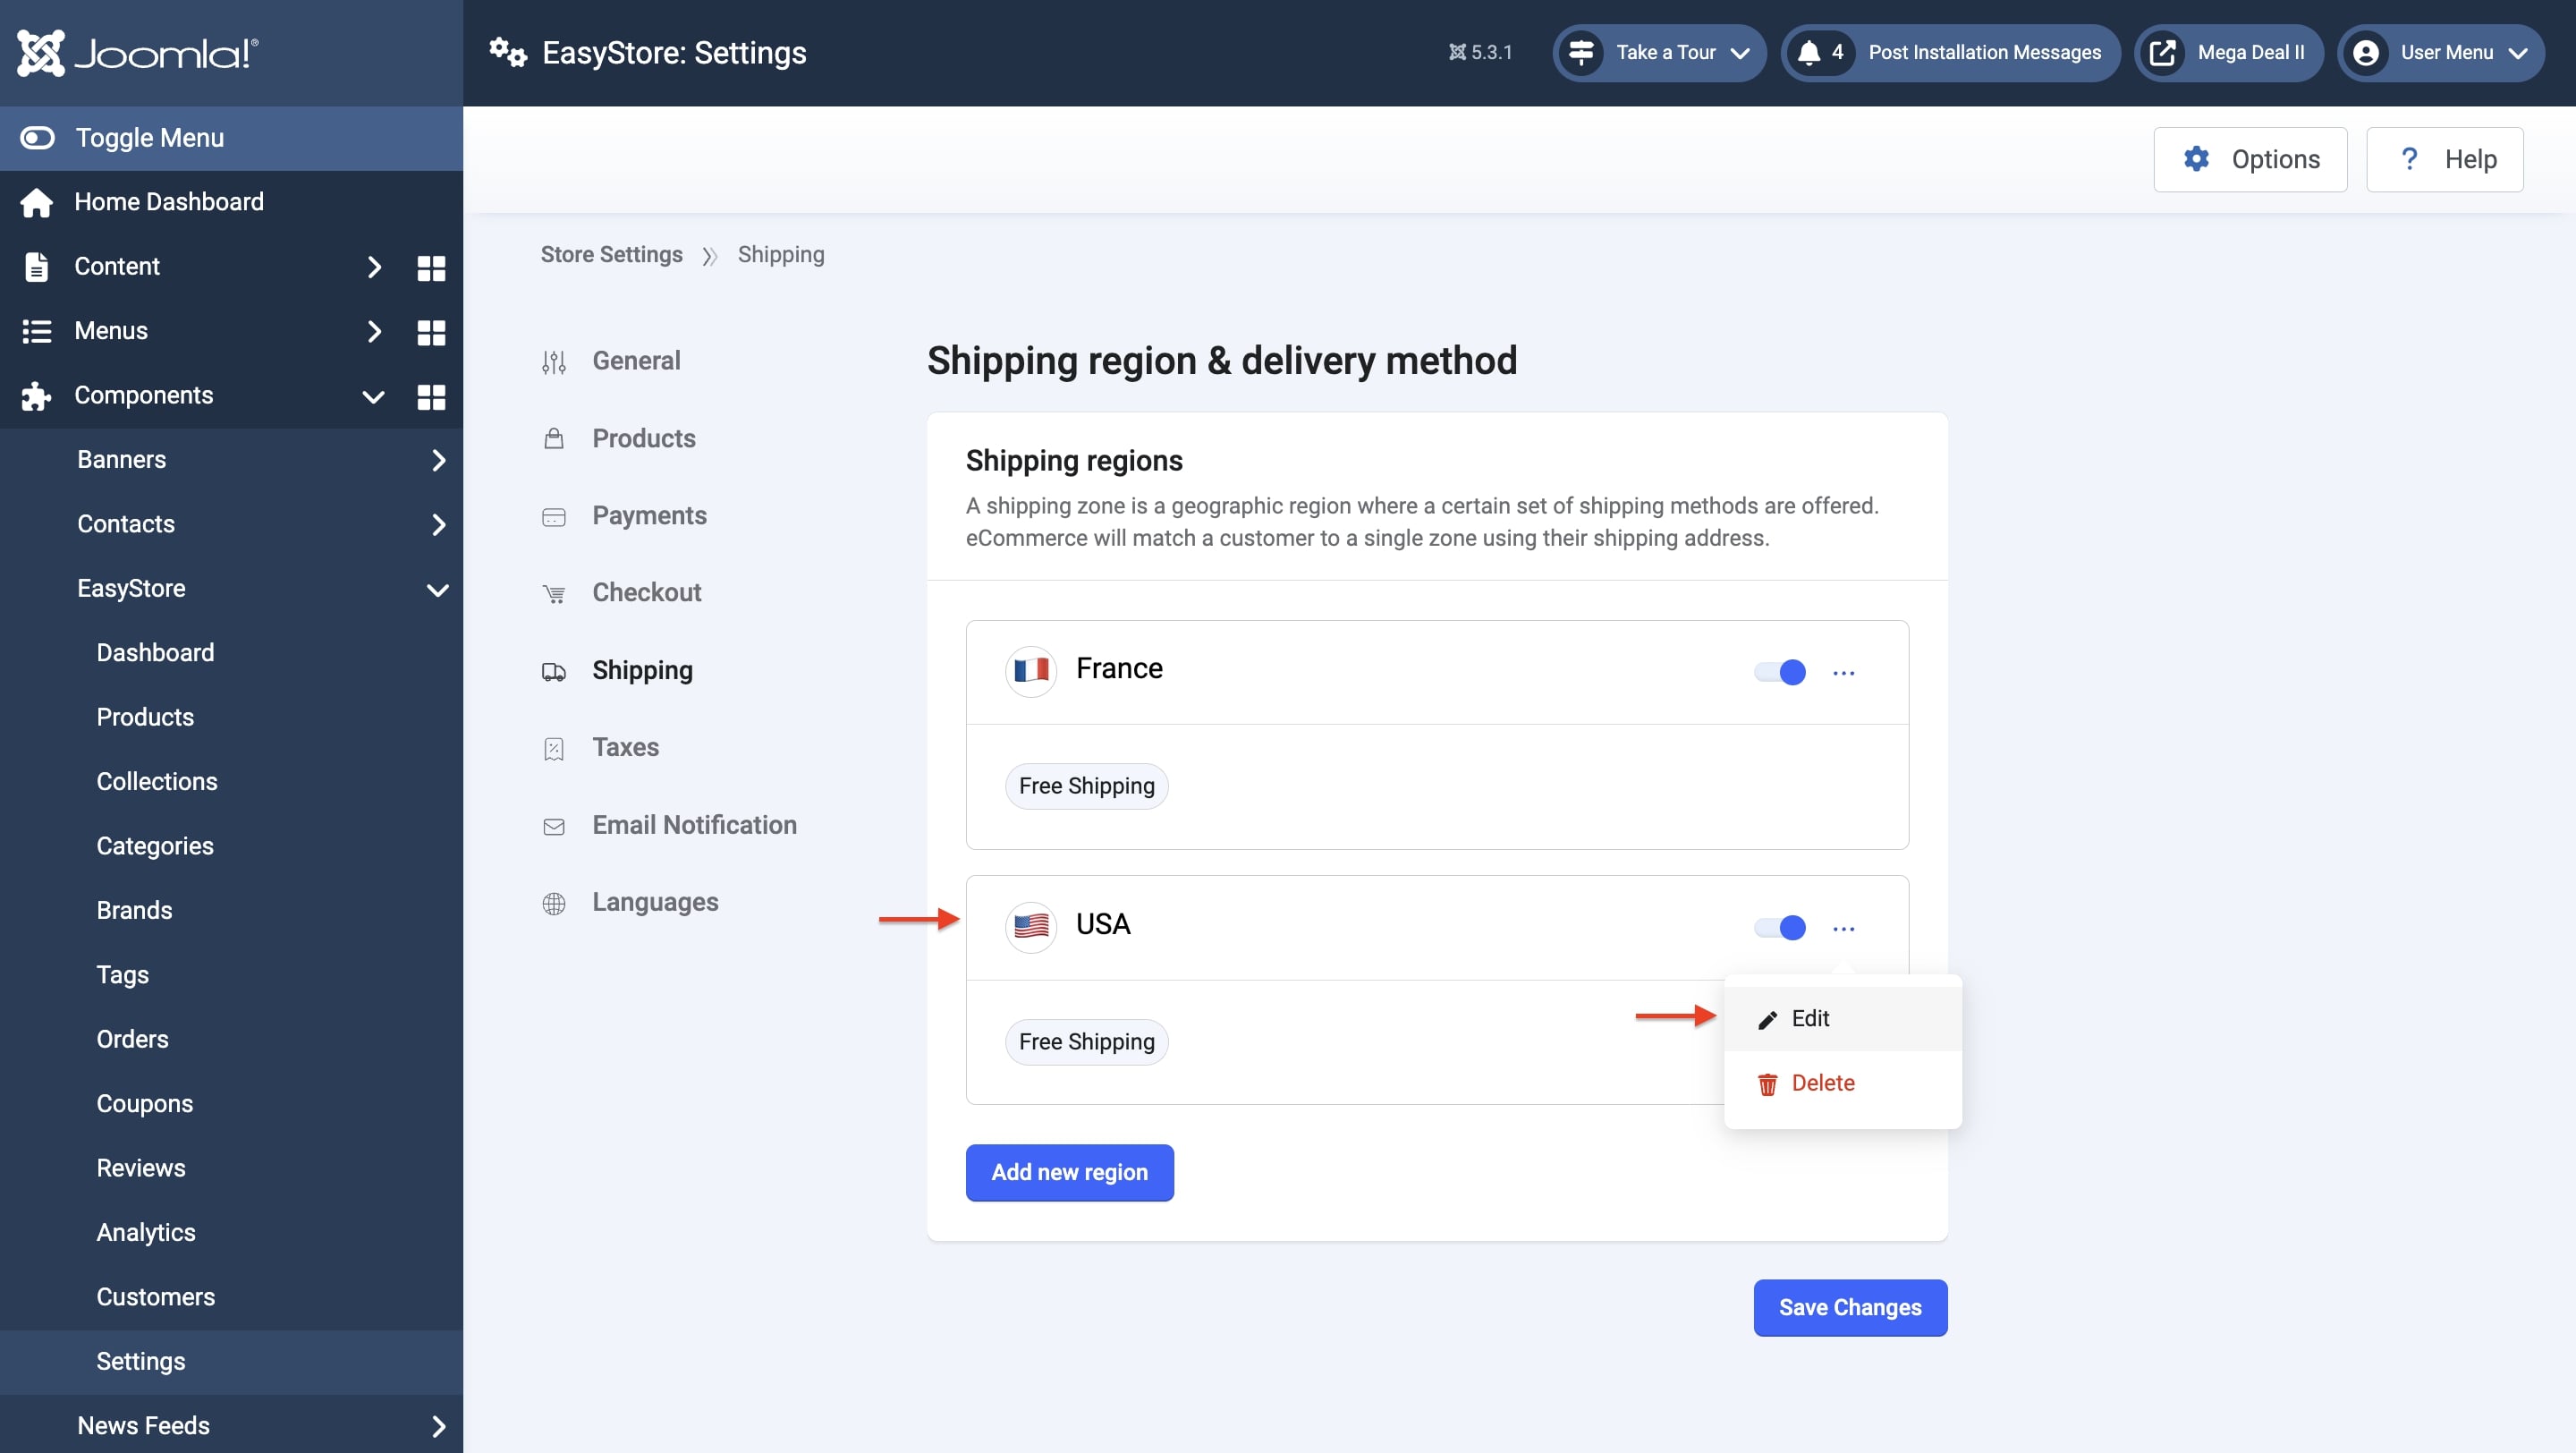
- If your region is already set up, click the three-dot icon next to it and select Edit. If you haven't set up your regions yet, you'll need to configure them first before you can add any shipping carriers.
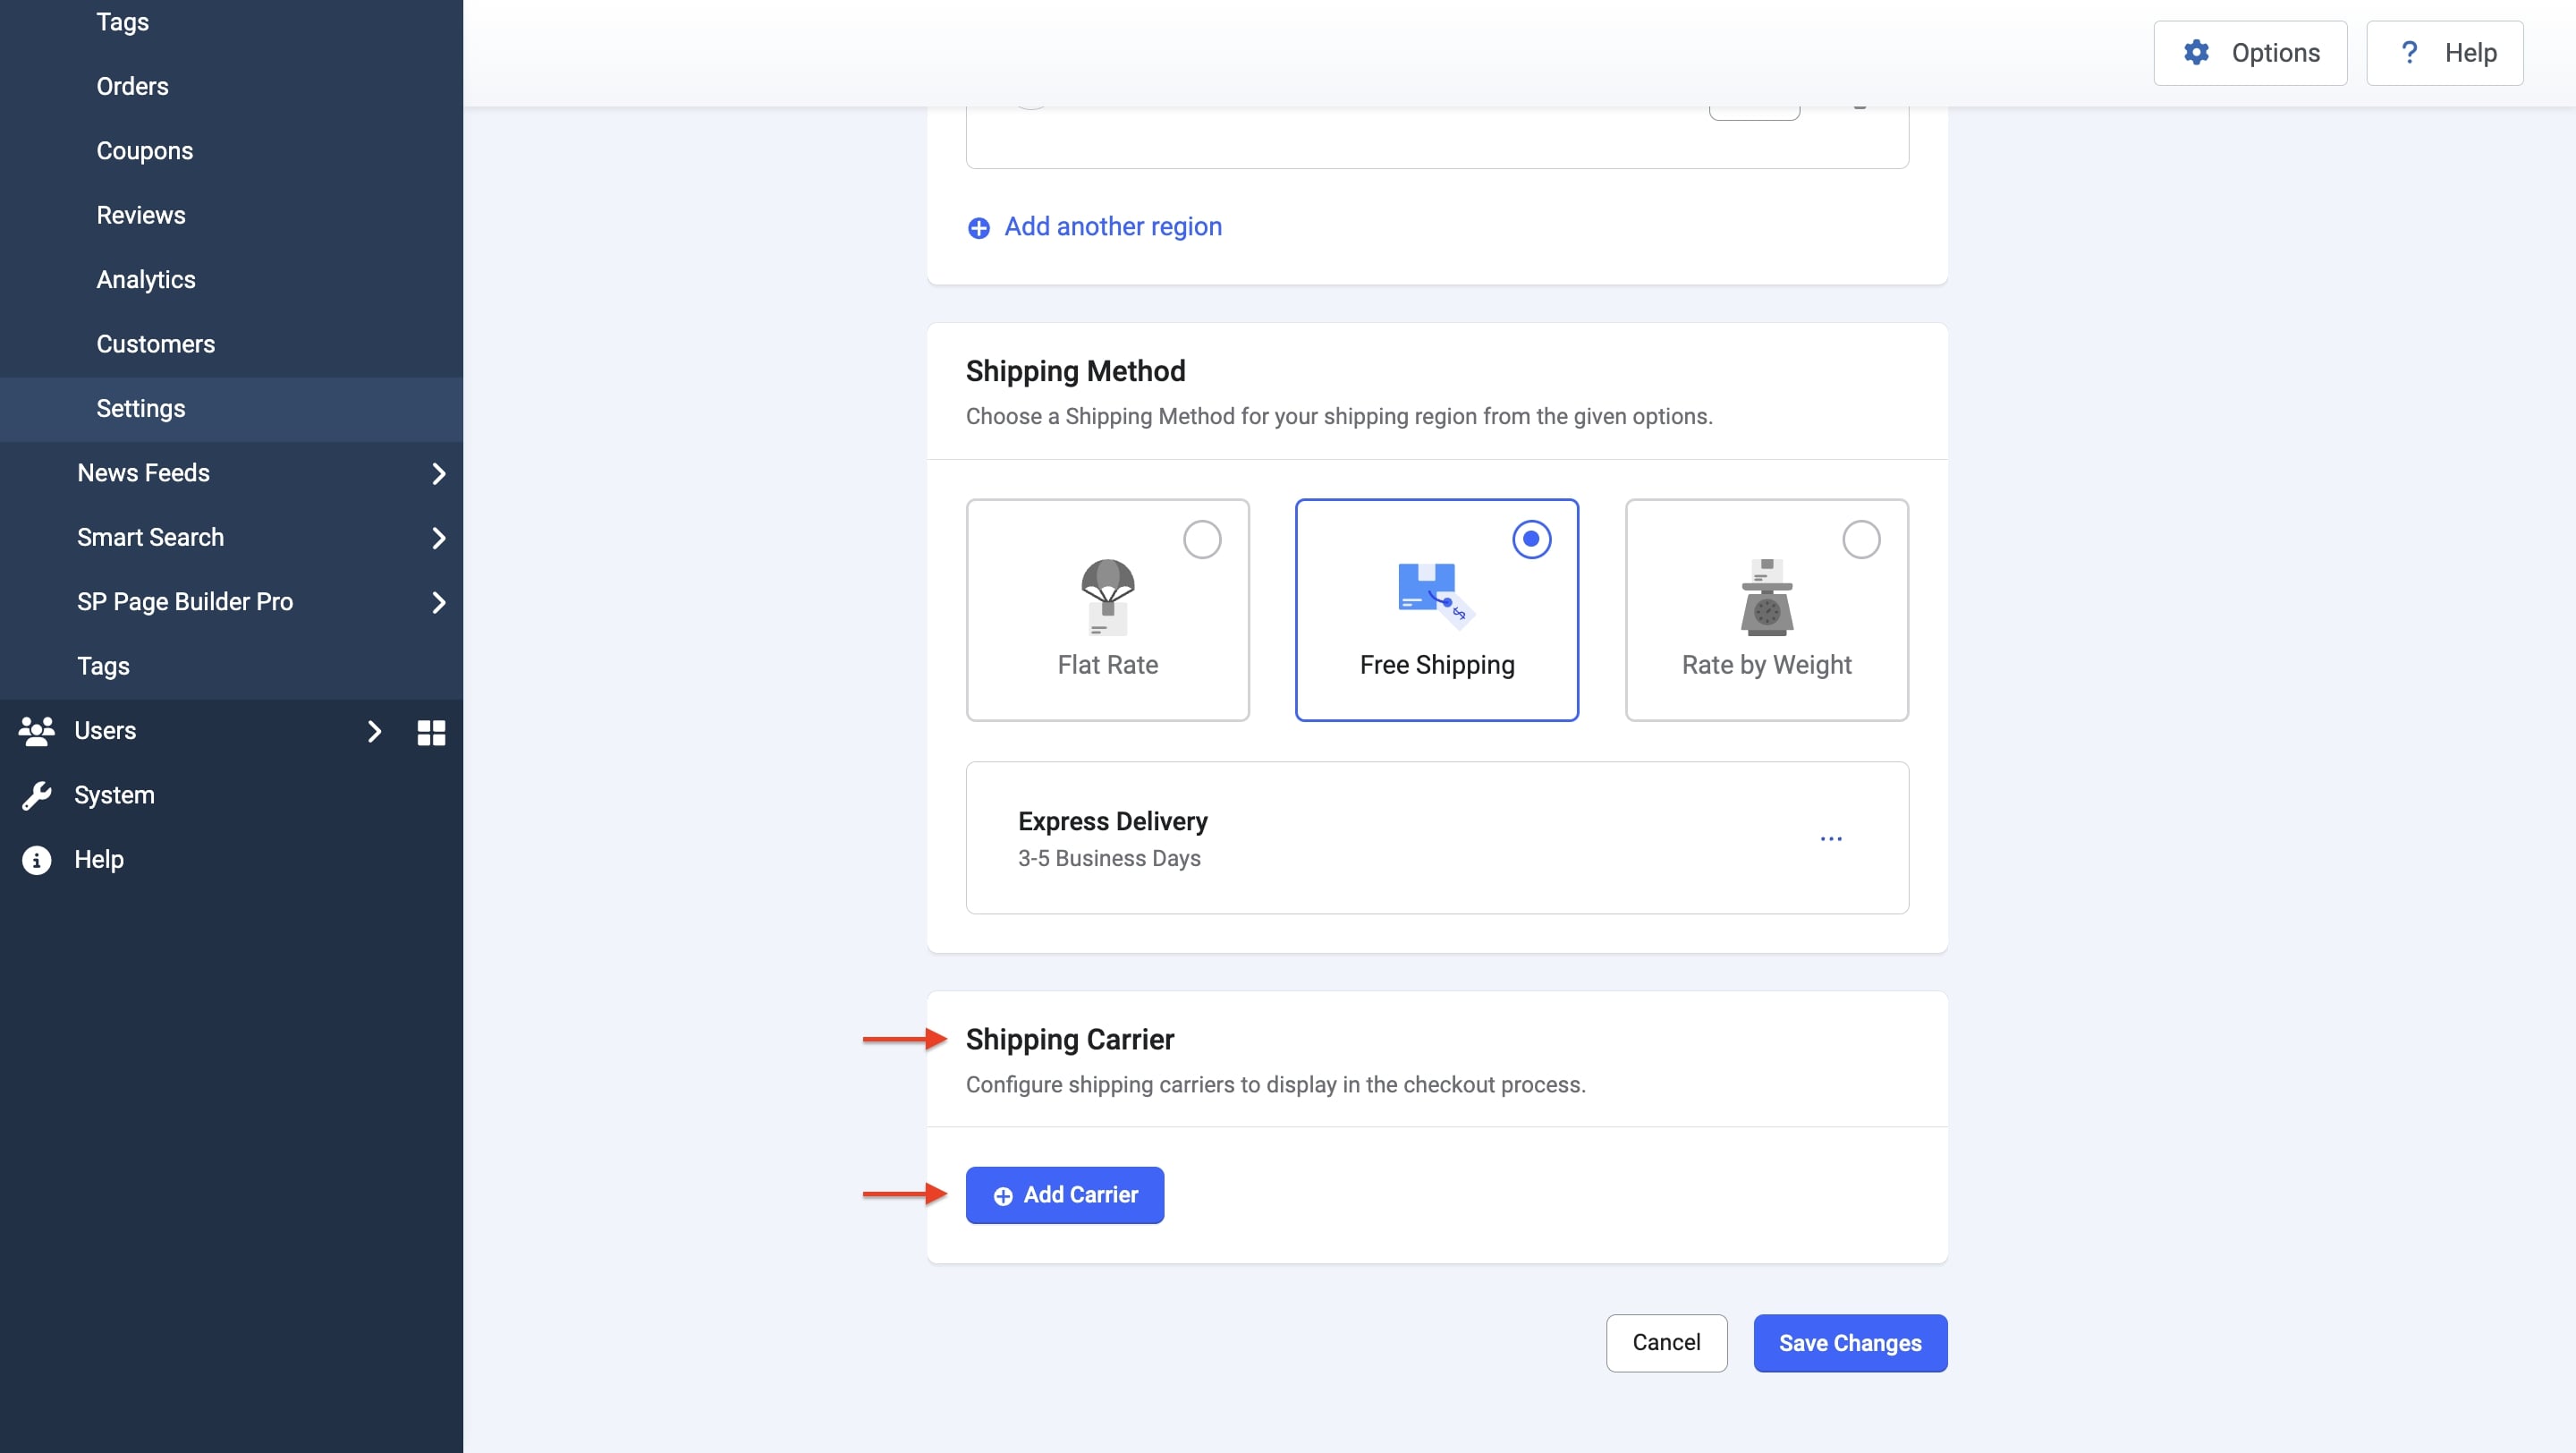
- Scroll down to the Add Shipping Carrier section and click on the Add Carrier button to open the list of available shipping providers.
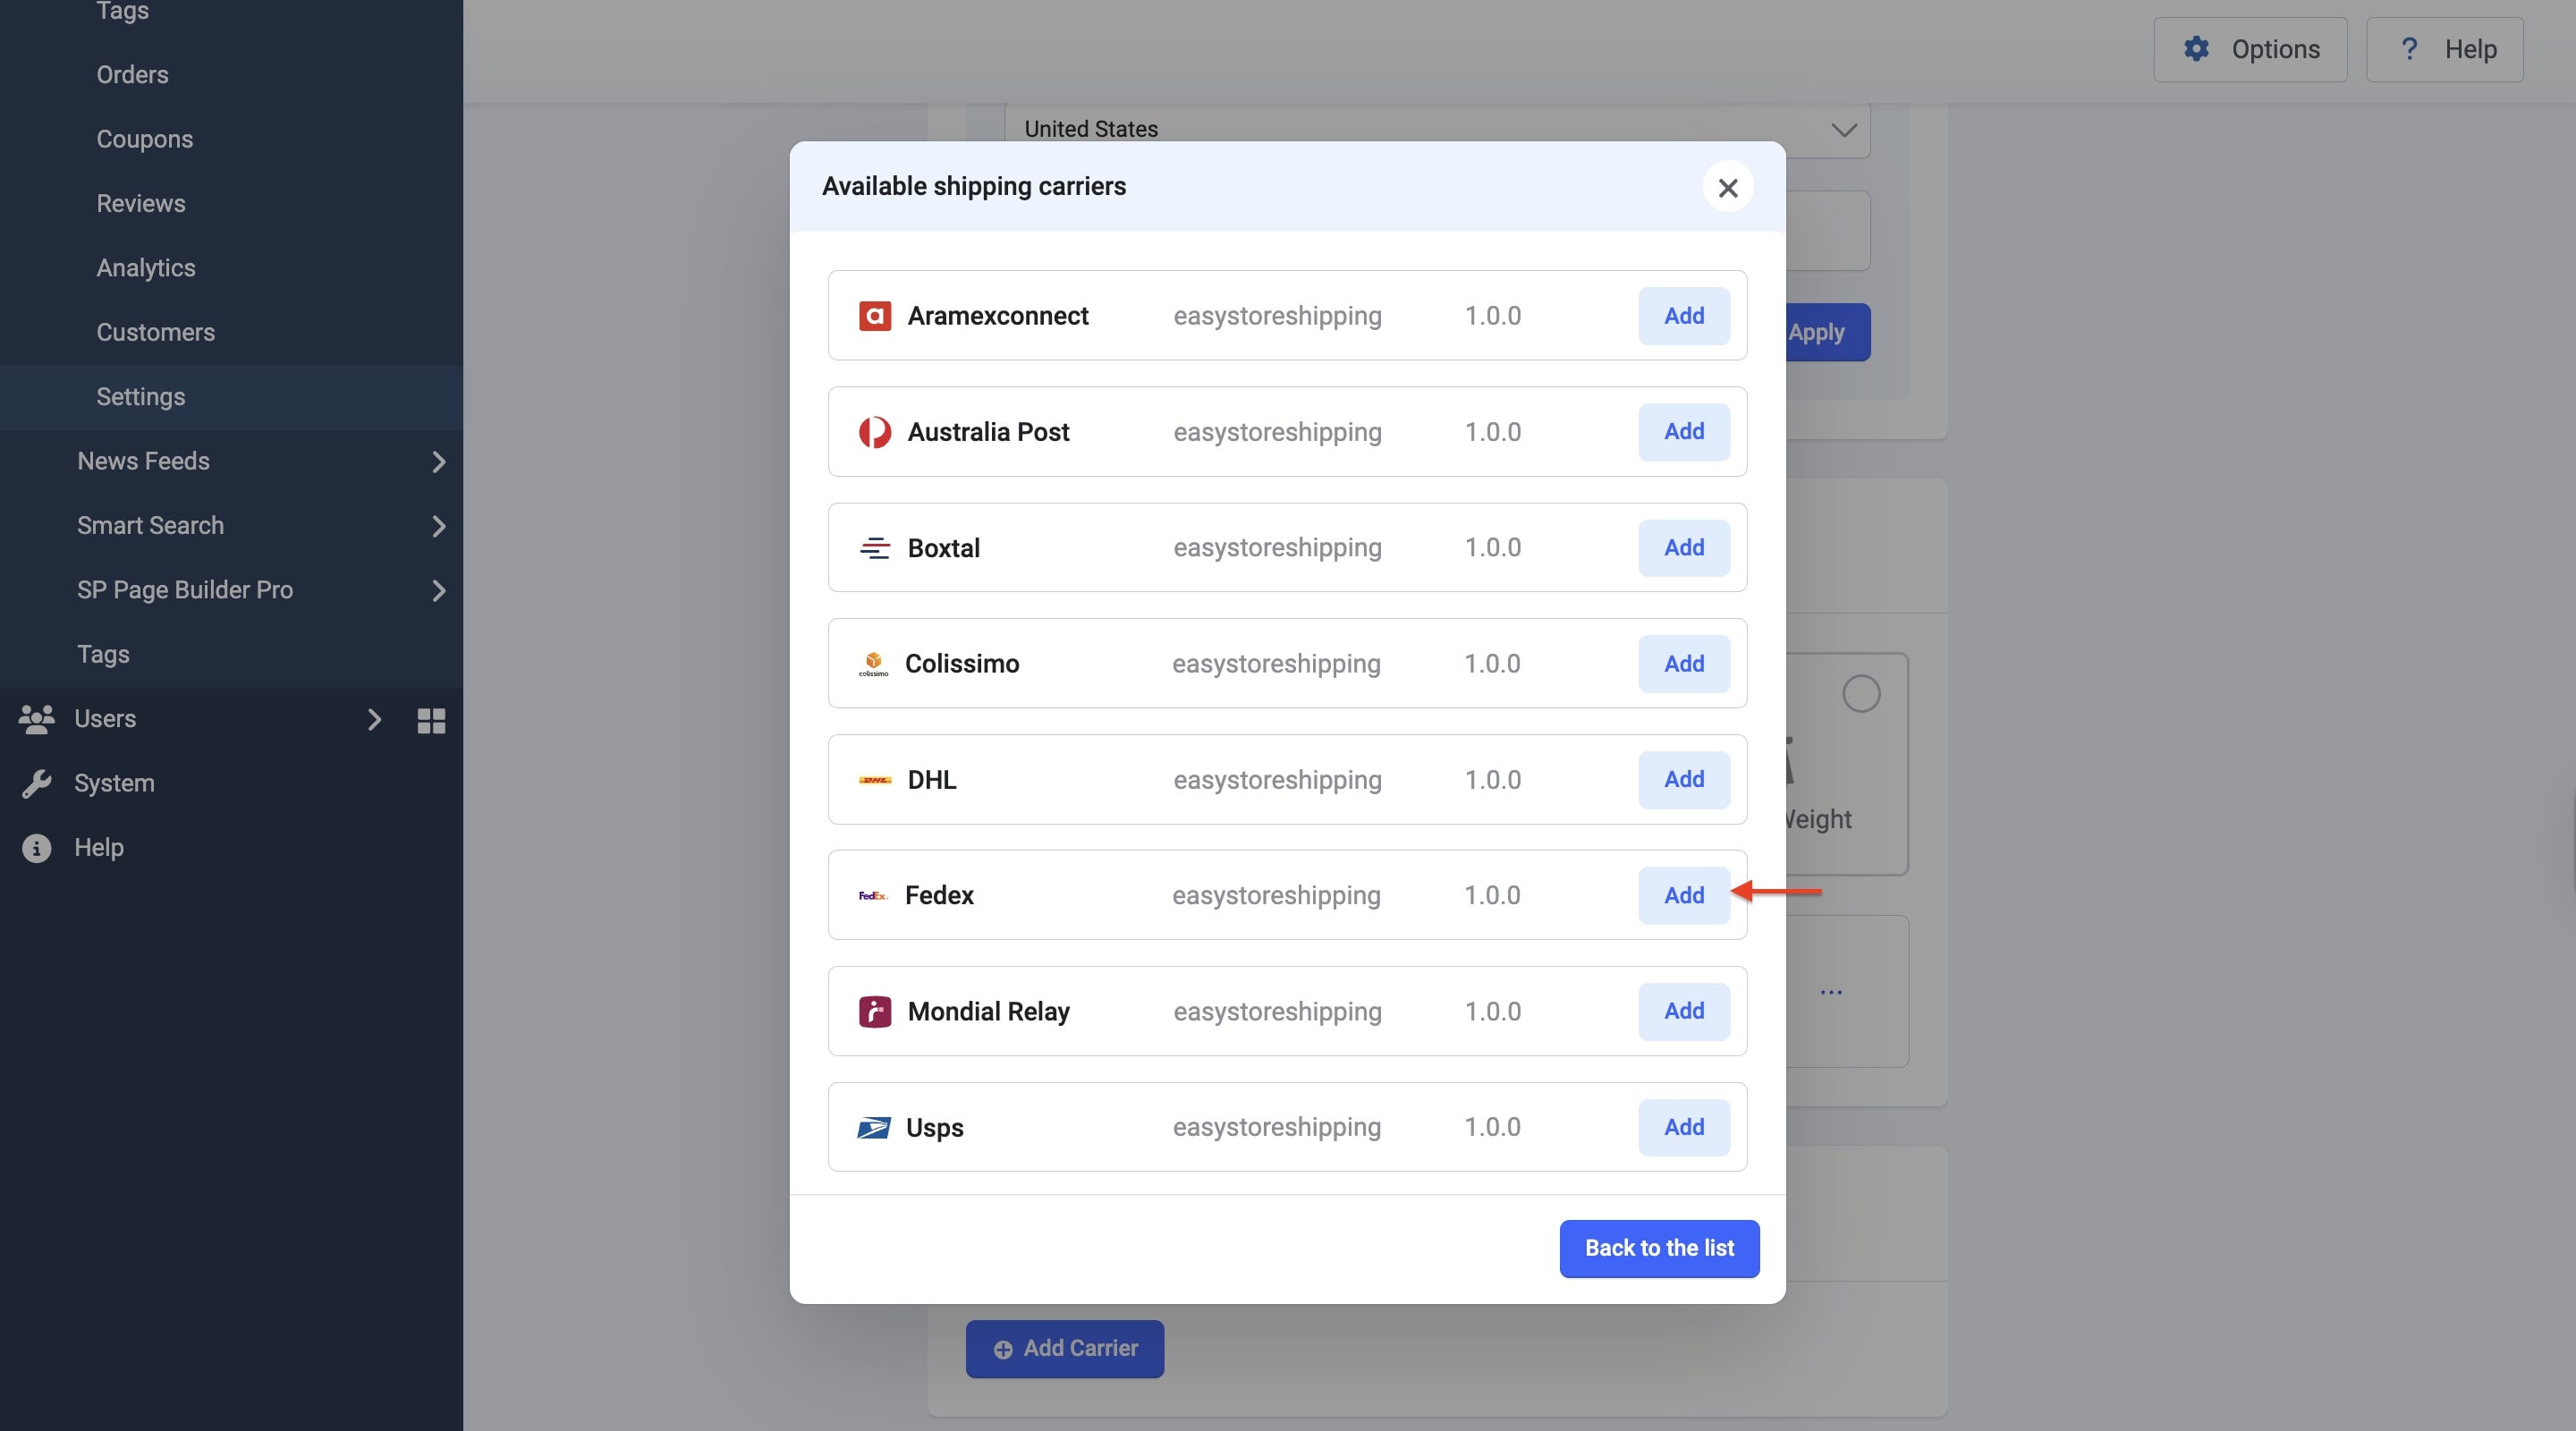
- Locate FedEx in the list and click the Add button.
- After completing the setup, click the "Back to the list" button. FedEx will now be added to your store’s available shipping options.
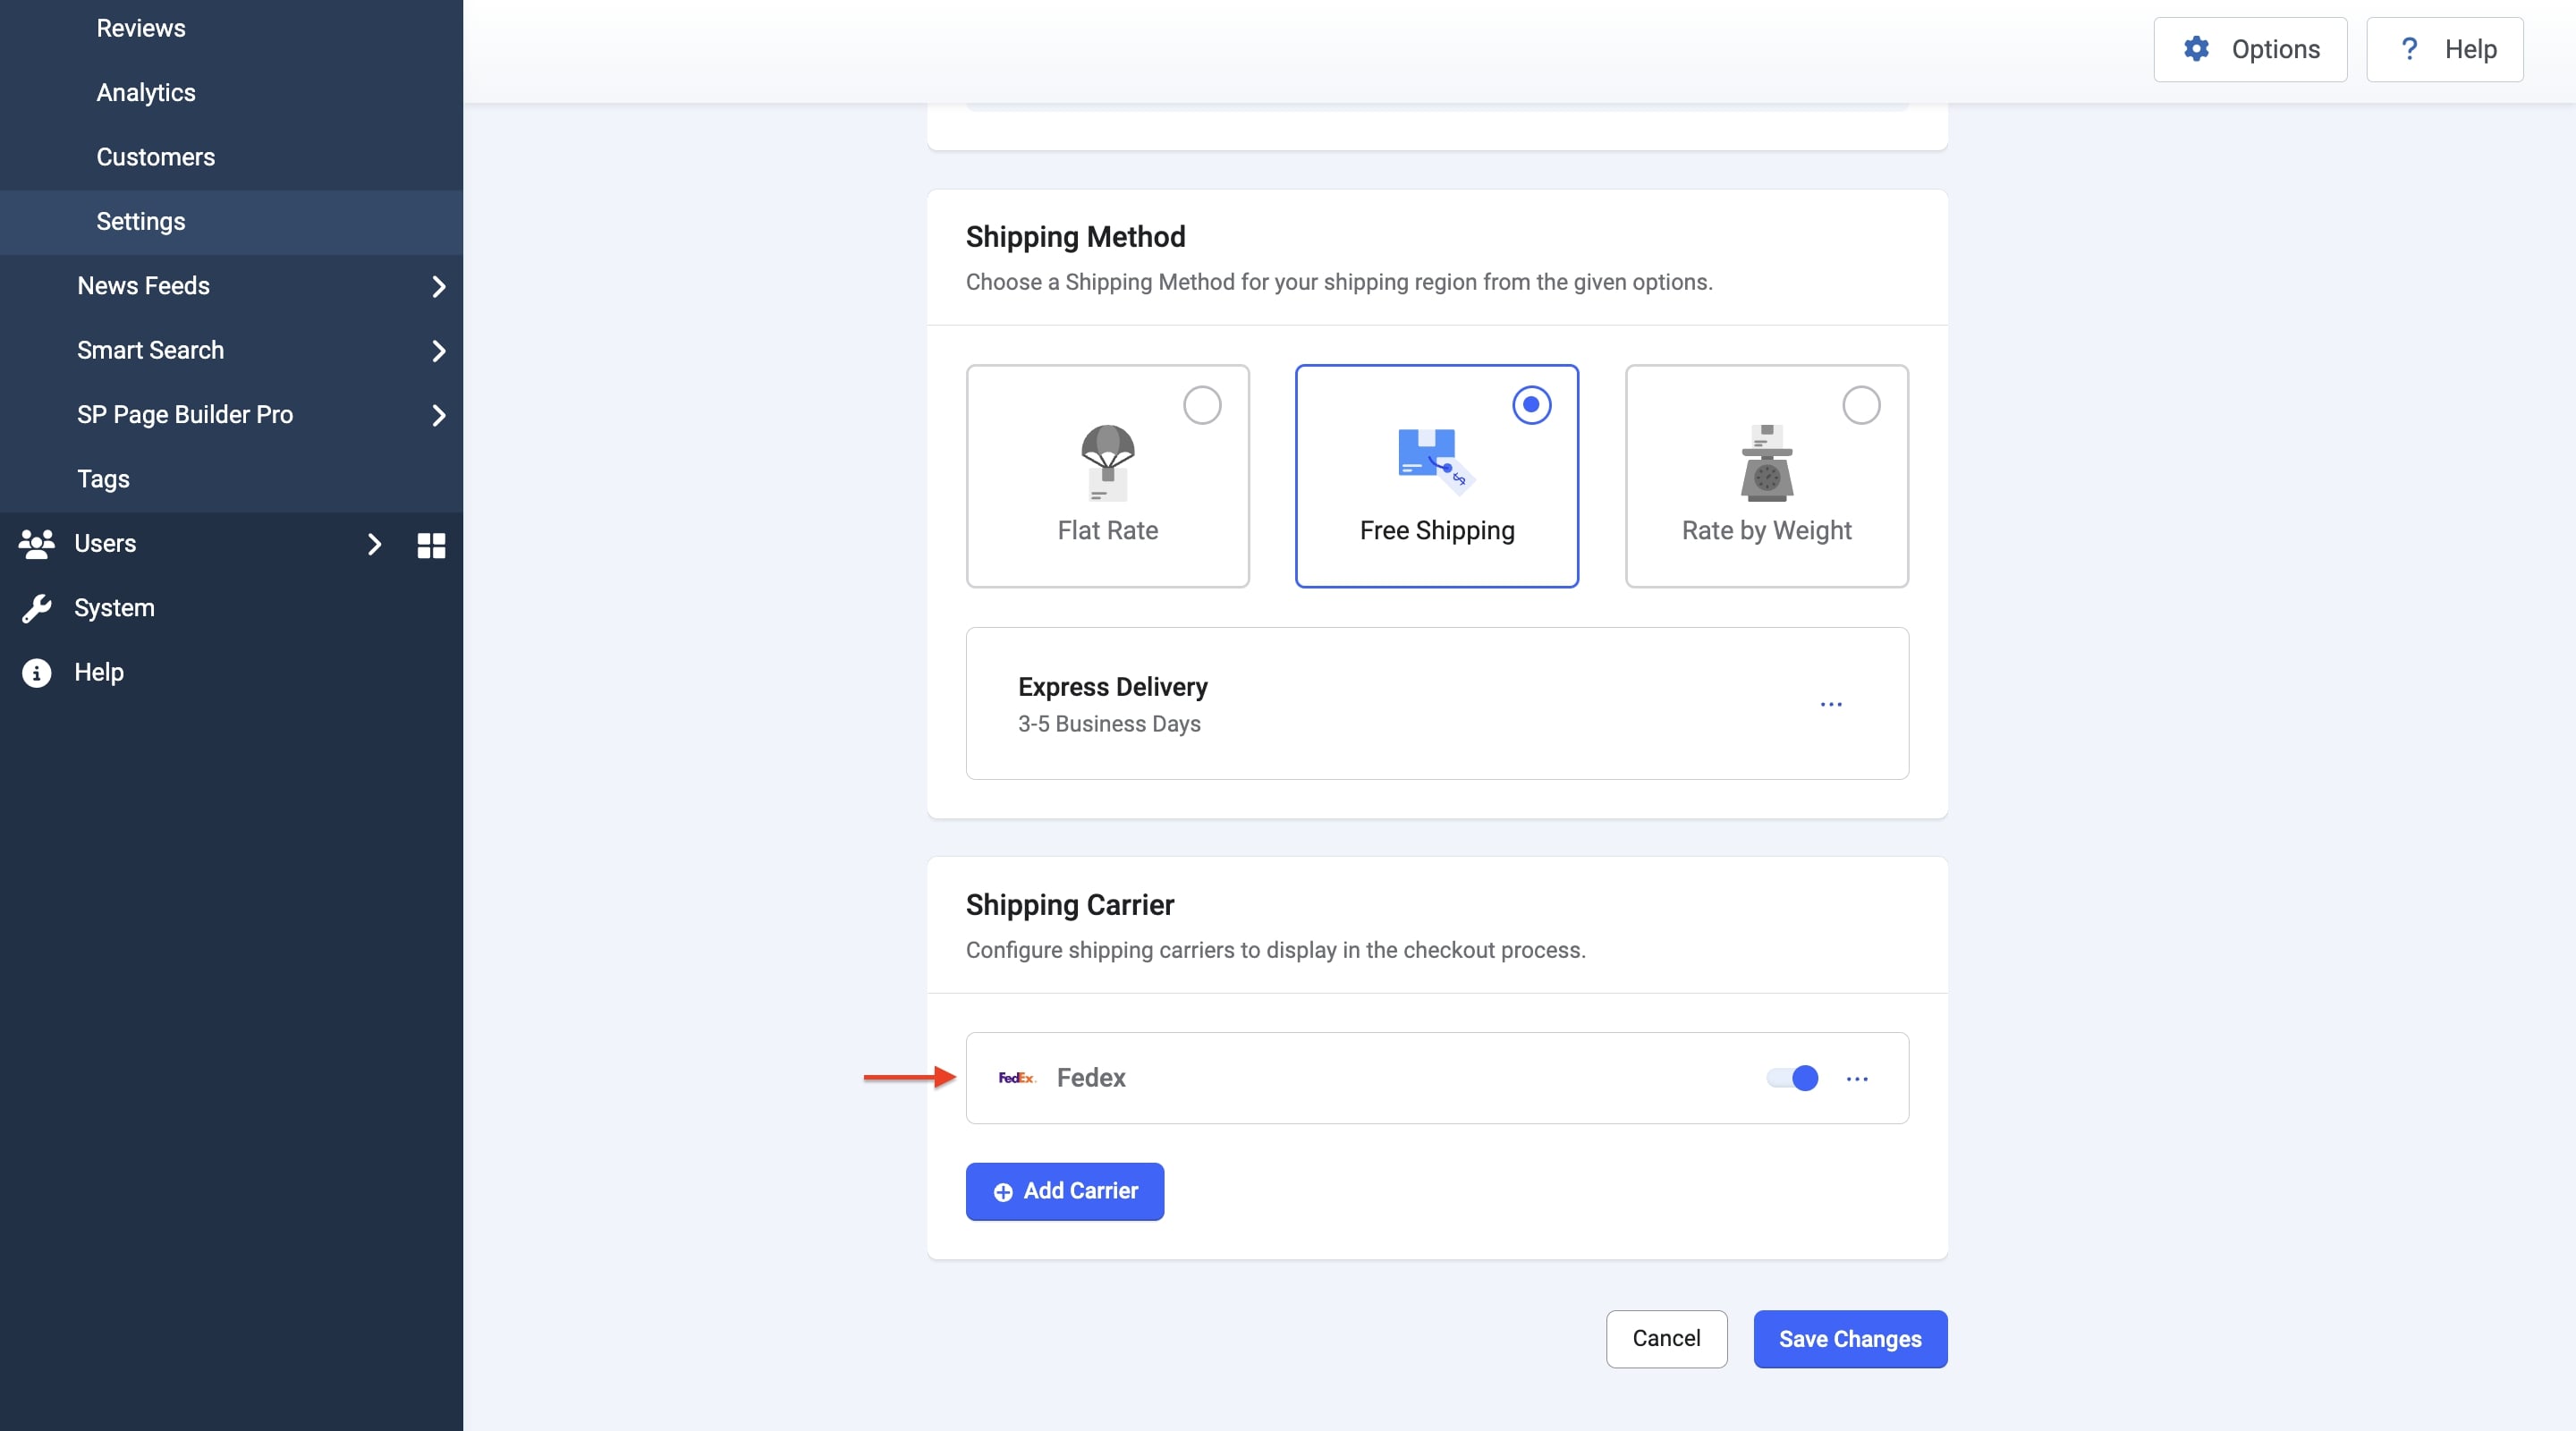
Enable the toggle switch to make FedEx visible as a shipping option on the checkout page.
Note: For the shipping carrier to appear at checkout, make sure your Store Address in General Settings is complete and includes the correct Country and ZIP Code.
Configuring FedEx Shipping Carrier
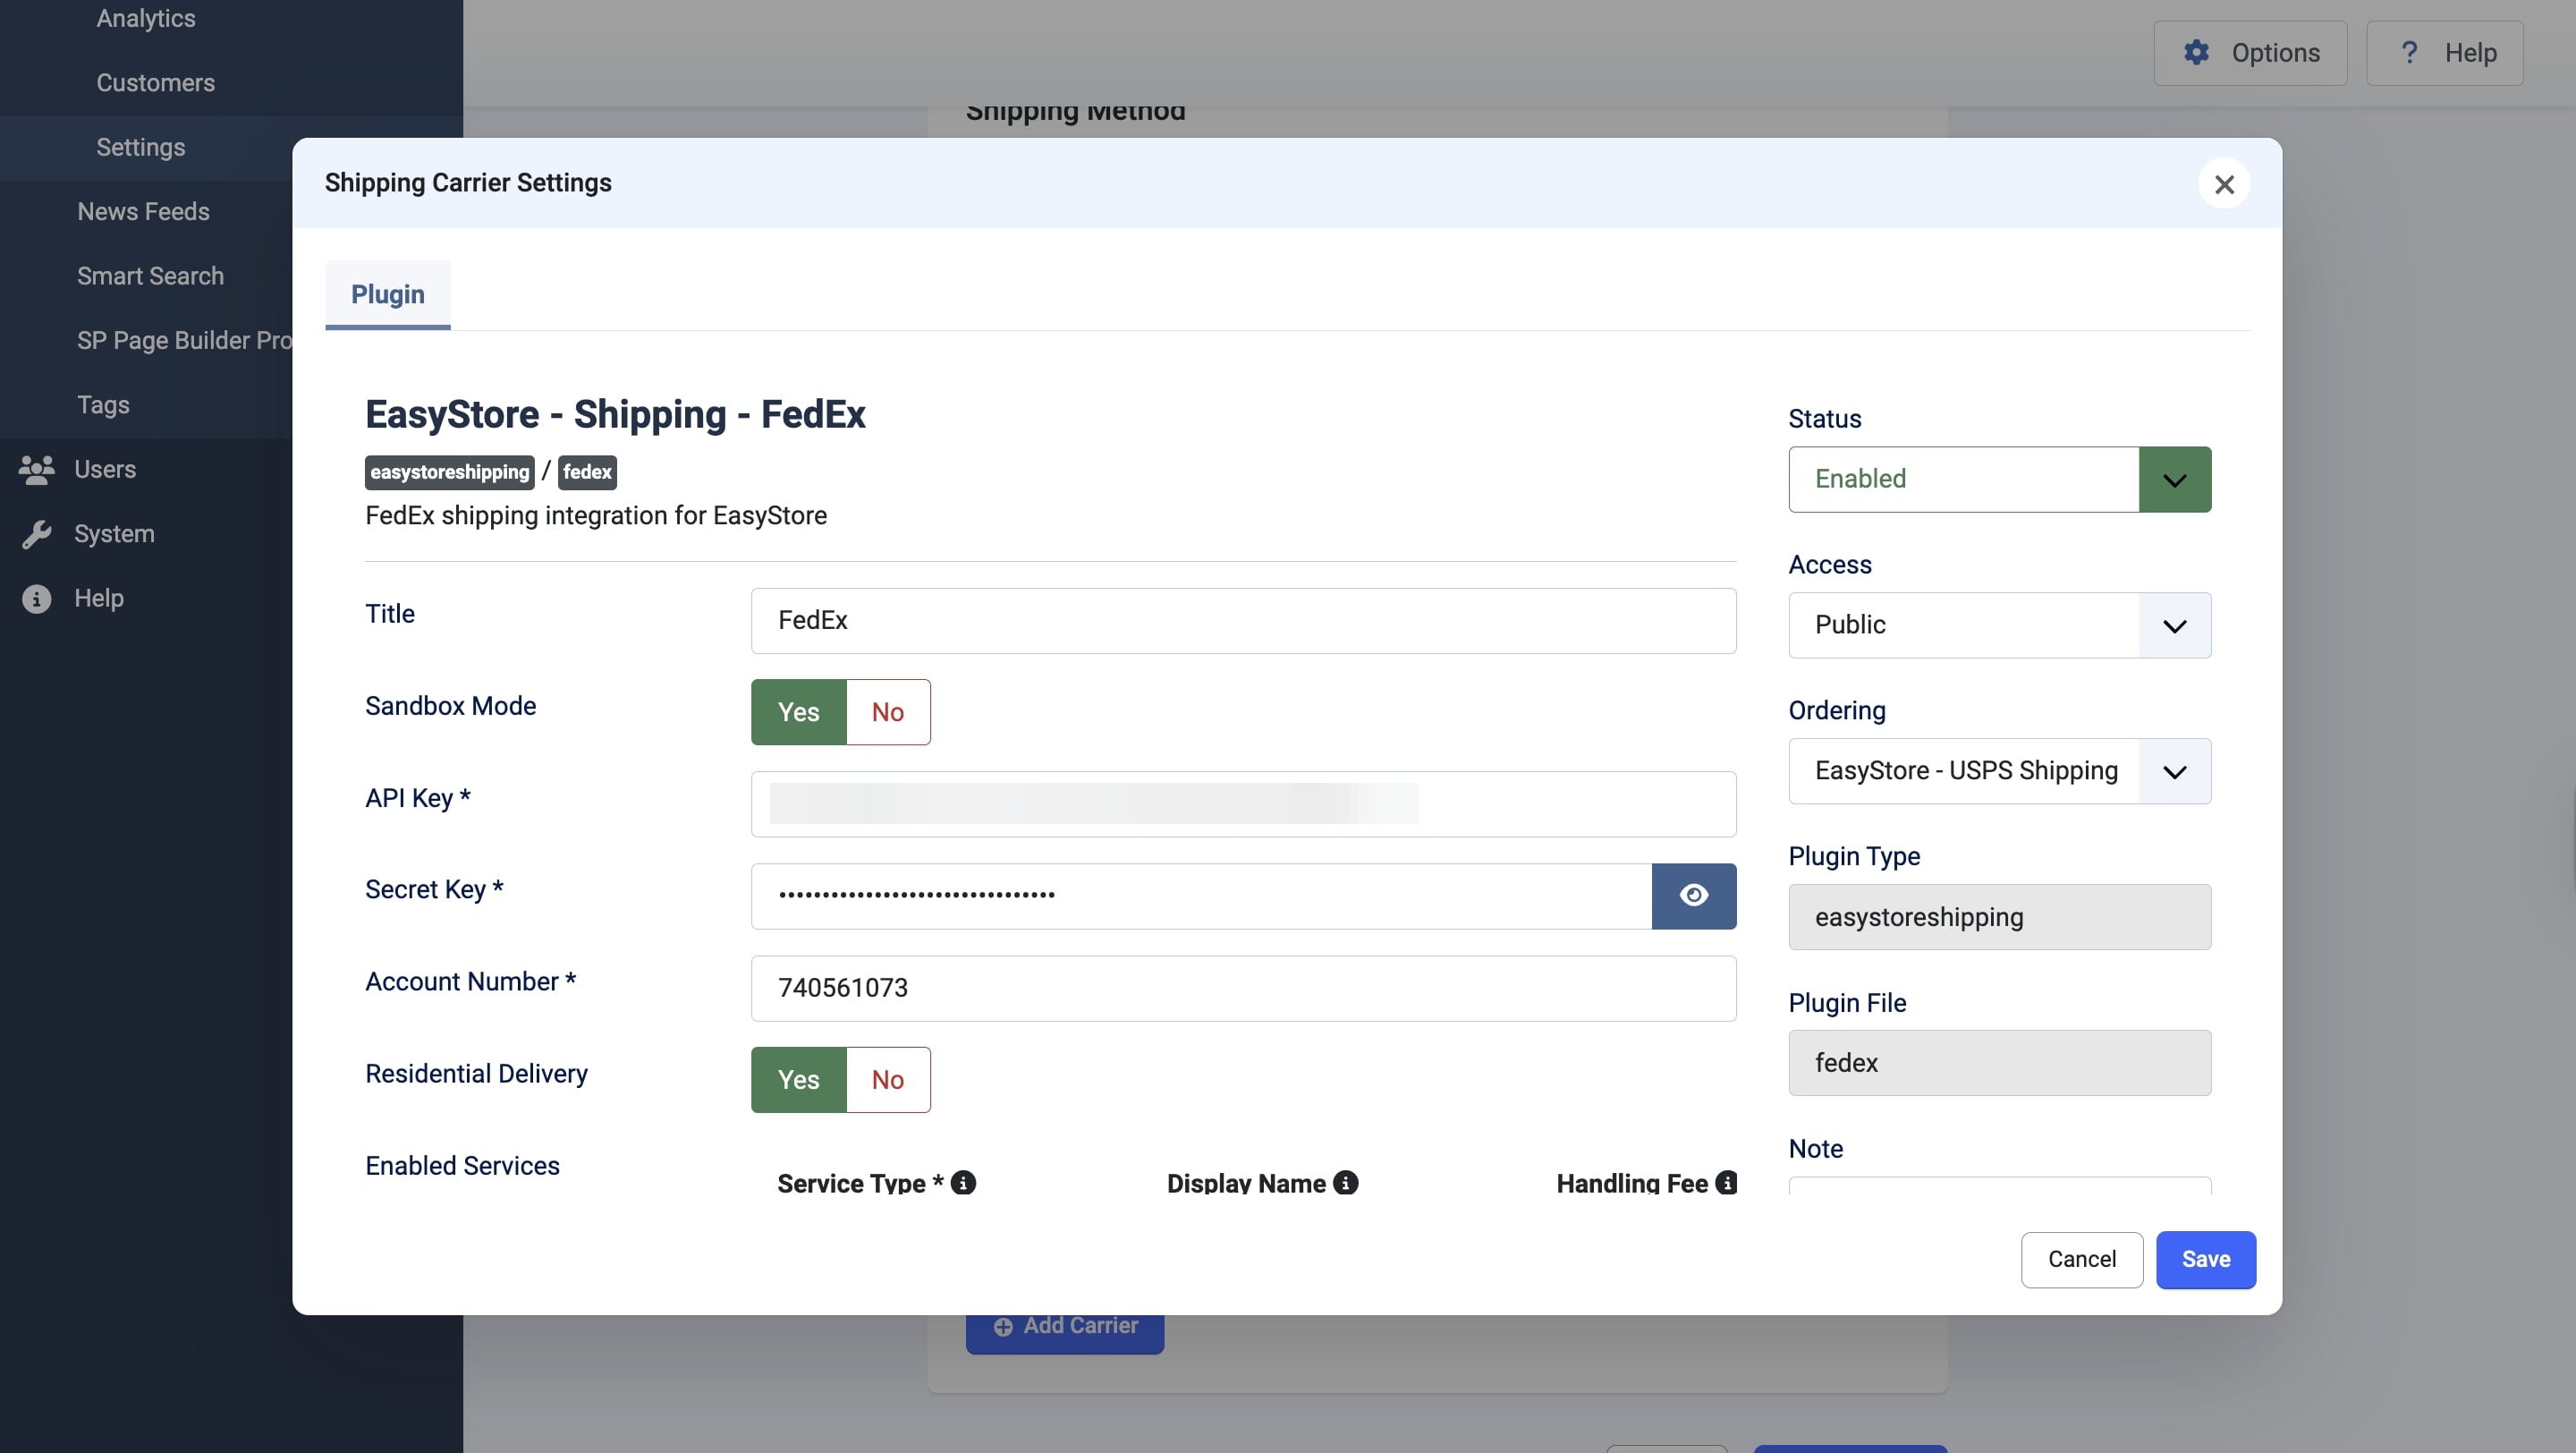
After adding FedEx as your preferred shipping carrier, locate it in the list and click the "Setup" button next to it.
This will open a pop-up window where you can configure the FedEx settings for smooth integration with your store’s shipping process.
Title
Give your integration a title (e.g., "FedEx"). This is a user-defined title that helps you identify this integration within your Joomla Dashboard.
Sandbox Mode
Choose either "Yes" or "No" mode based on your needs. Select "Live" to process actual shipments in a production environment, or "Test" to simulate shipping for setup and testing purposes.
API Key
Insert your API key you received while creating your FedEx account.
Secret Key
Enter the secret key that you received when creating your FedEx account.
Account Number
Enter the account number of your FedEx account.
Residential Delivery
Choose whether there will be the option to deliver to residential areas or pick up at a nearby FedEx office.
Enabled Services
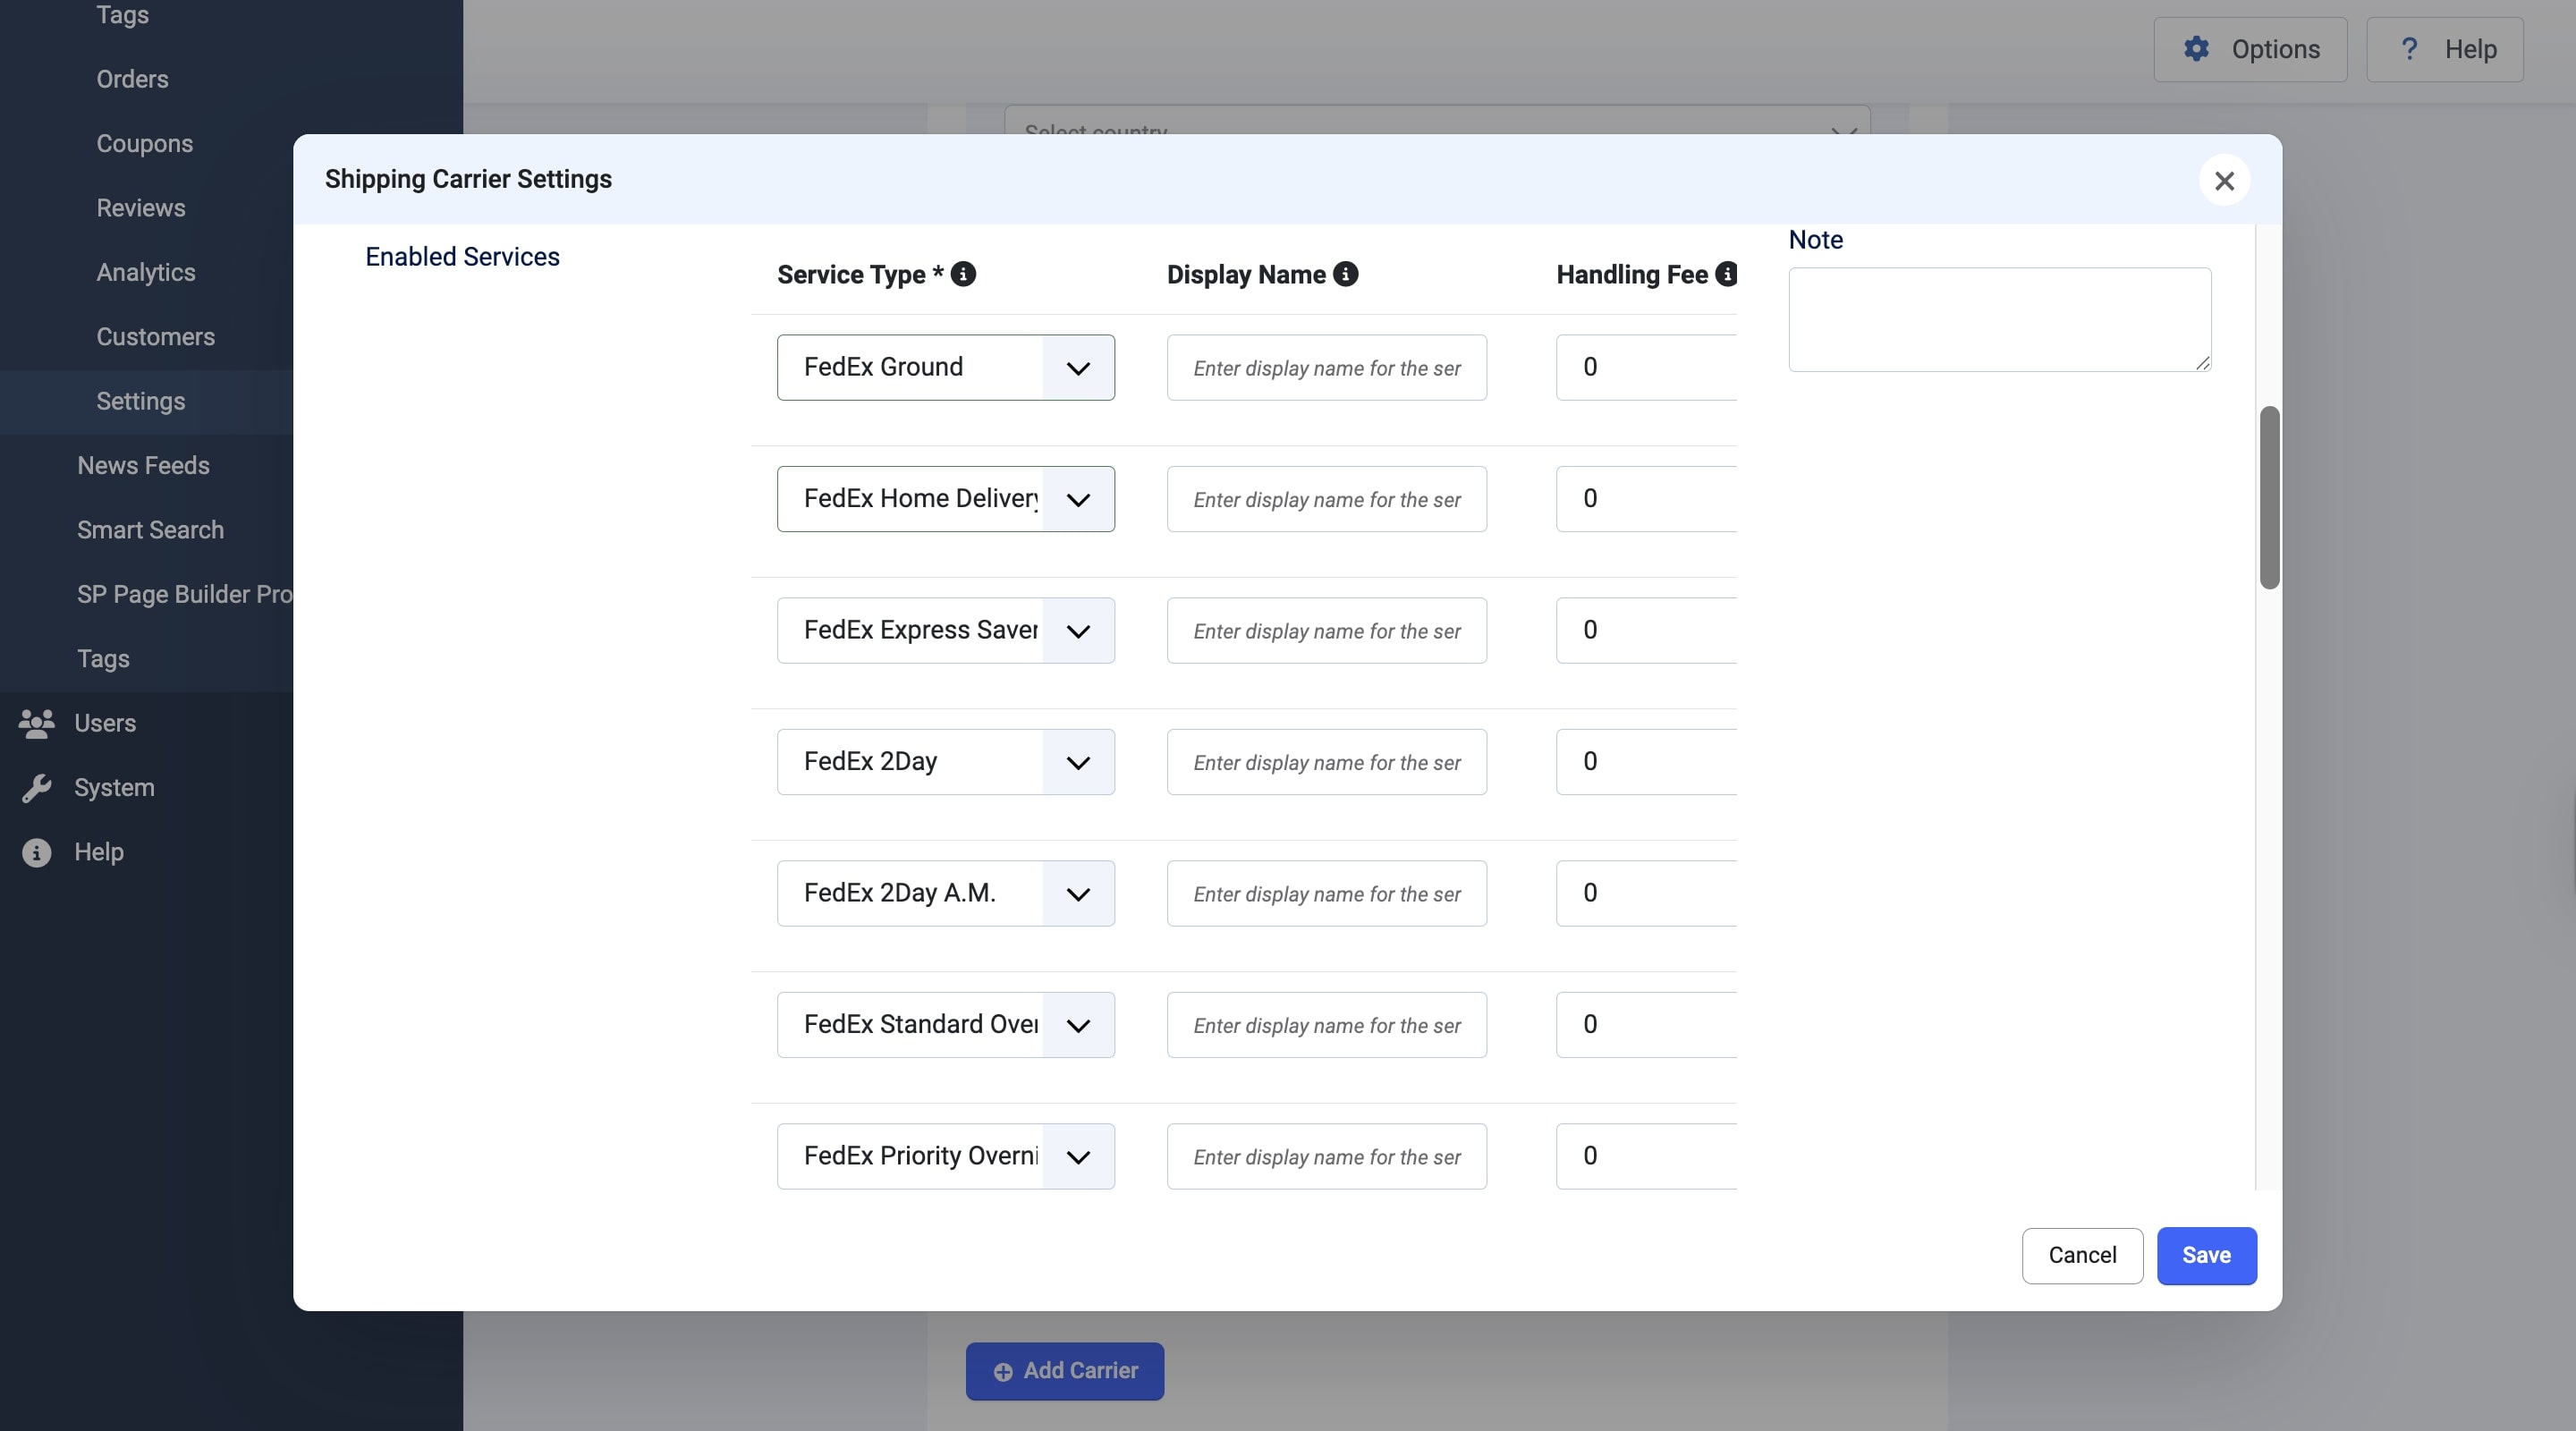
FedEx’s standard pricing rates depend on the type of services you have enabled. For the most up-to-date information on FedEx’s Shipping Services, refer to the official FedEx website.
Note: You must assign the appropriate services based on the shipping region for FedEx to calculate shipping charges accurately. For example, to ensure international shipping, you need to enable the FedEx International services.
After configuring the FedEx shipping carrier, click "Save and Close" to apply and save your changes.
Displaying FedEx as the Shipping Method on the Checkout
Once FedEx is selected as the shipping carrier, customers will be able to choose a shipping method based on the enabled services.
For example, if a customer selects New York as their city and enters the zip code 10001, the available pickup points corresponding to that location will be displayed in the pickup point list.
Please note that for FedEx to appear as a shipping method during checkout, customers must select a city and provide a valid zip code.
Currency Rates
By default, the US currency rate will be set for the products. However, if you are shipping internationally, you can set the rates. Refer to the FedEx official website to learn more about shipping rate changes.
How To Get API Key, Secret Key, and Account Number
To get your Client API Key, Secret Key, and Account Number, you will need to head over to the official FedEx Developers website and sign up for a FedEx account or log in to an existing account. Then, you will have to follow the given steps:
- From the Developer Portal, navigate to My Projects on the Menu, and click on Create an Organization.
- Enter the details of your organization, such as Company Name and Website.
- After creating your organization, go to Manage Organization > Shipping Accounts and click on + Add Account.
- Fill in the details such as your Account Number, Account Nickname, Address, etc. Follow the steps as directed. Your new shipping account will appear on the Manage Organization page.
- Navigate to My Projects again and click on + Create API Project.
- When prompted for the reason for API access, choose “Ships with FedEx and needs to integrate FedEx APIs into their system” from the dropdown menu and click Next.
- Then, select the “Ship, Rate & other APIs” option. Choose the APIs that you require. However, the “Rates and Transit Times API” must be selected for proper functioning. Click Next.
- Select the Project Name and Country. Click Next, then confirm your details. Finally, click on Create.
- You will be redirected to your Project page, where you will find the API key, the Secret Key, and the Account Number.
To learn more about how to acquire your API credentials, please refer to the official FedEx documentation.

