

General
The General Settings tab allows you to set up fundamental details about your store. These settings help establish your store's address and other basic configurations for a seamless eCommerce experience.
Store Contact Details

Set up your store’s contact information from here.
- Store Name: Enter your store name
- Store Logo: Upload your online store’s logo here. The logo image you provide here will be automatically displayed on the printable shipping label, packing slip, and invoice.
- Store Email: Enter your store’s contact email
- Store Phone: Enter your store’s phone number
Store Address
Your store's address serves as a cornerstone for various operational aspects, including tax and shipping rate calculations. Precise address information ensures smooth transactions.
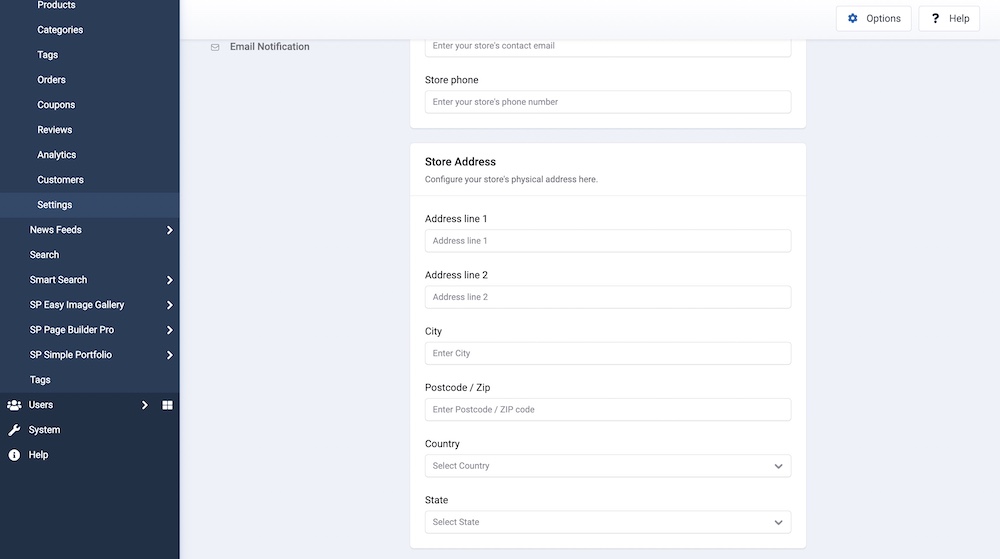
This section includes:
Address Line 1: Enter the first line of your store's physical address, where applicable.
Address Line 2: If necessary, provide a second line of your store's address to include additional details.
City: Specify the city where your store is located.
Postcode / Zip: Enter the postal code or ZIP code relevant to your store's location.
Country: Choose the country in which your store is based.
State: Indicate the state or province associated with your store's address.
General Option

Selling Location: Choose the countries where you want to sell your products.
Currency

Select the currency that will be utilized across your entire application. This choice dictates how prices are presented and how transactions are processed.
- Currency: Choose the primary currency in which your product prices will be shown.
- Currency Format: Select how currency amounts should be displayed (e.g., "Short" or "Long").
- Currency Position: Determine whether the currency symbol should appear before or after the price amount.
- Thousand Separator: Specify the character used to separate thousands in currency values.
- Decimal Separator: Set the character used to indicate decimals in currency values.
- Number of Decimals: Determine how many digits appear after the decimal point in your product prices. For example, setting it to 4 will display a price as $19.4500.
Once you’re done configuring these settings, hit Save Changes.
Order ID

- Prefix: Include a string of characters to be displayed at the beginning of an order number. This prefix can serve several purposes, such as distinguishing orders based on region, order type, or promotional campaigns. For example: EU-0001124 (for orders from Europe)
- Suffix: Include a string of characters to be added to the end of an order number. This suffix can differentiate orders based on specific attributes such as order type, shipping method, or year of processing. For example: 0001124-2025 (for orders processed in the year 2025)
Note: You can choose to use either a prefix or a suffix for your Order ID, or combine both to create a more detailed and organized categorization.
Custom Invoice ID

The Custom Invoice ID lets you personalize how invoice numbers are generated in your store. Instead of using a simple incremental number, you can design your own format with prefixes, suffixes, and reset rules.
The custom invoice ID will be displayed on all generated invoices and order details.
Prefix: Text or numbers that appear before the invoice sequence. Example: Prefix INV- + Sequence 000001 = INV-000001
Sequence: The starting number for invoice IDs. This number increases automatically with each new invoice. Example: If Sequence = 100000, your first invoice will be 100000, then 100001, 100002, and so on.
Suffix: Text or numbers that appear after the invoice sequence. Example: Sequence 000001 + Suffix -2025 = 000001-2025.
Example of Complete Invoice ID:
Prefix INV- + Sequence 500000 + Suffix -Q1 = INV-500000-Q1
Reset Invoice Counter: Define how the invoice numbering resets over time:
- Never
The invoice counter keeps increasing continuously. Example: If the last invoice ID was INV-250000, the next will be INV-250001. - Yearly
The counter resets automatically at the beginning of each year. Example: In the year 2025, if the last invoice is INV-250000, then in 2026, the first invoice becomes INV-000001 again. - Custom Date
Reset the counter on a date you specify. This is useful for fiscal years or business-specific accounting periods.
Example: If you set the reset date to April 1, on that day, the sequence restarts from your defined starting number.
Sample Invoice Formats
- INV-001
- INV-2025-001
- SHOP-500-Q1
- ORDER-001-APRIL