

Collection Index
A Collection Index displays a list of items from a selected collection dynamically. This guide provides step-by-step instructions to create and configure a Collection Index in SP Page Builder using Dynamic Content.
Creating a Collection Index Page
To create a Collection Index Page in SP Page Builder, follow these steps:
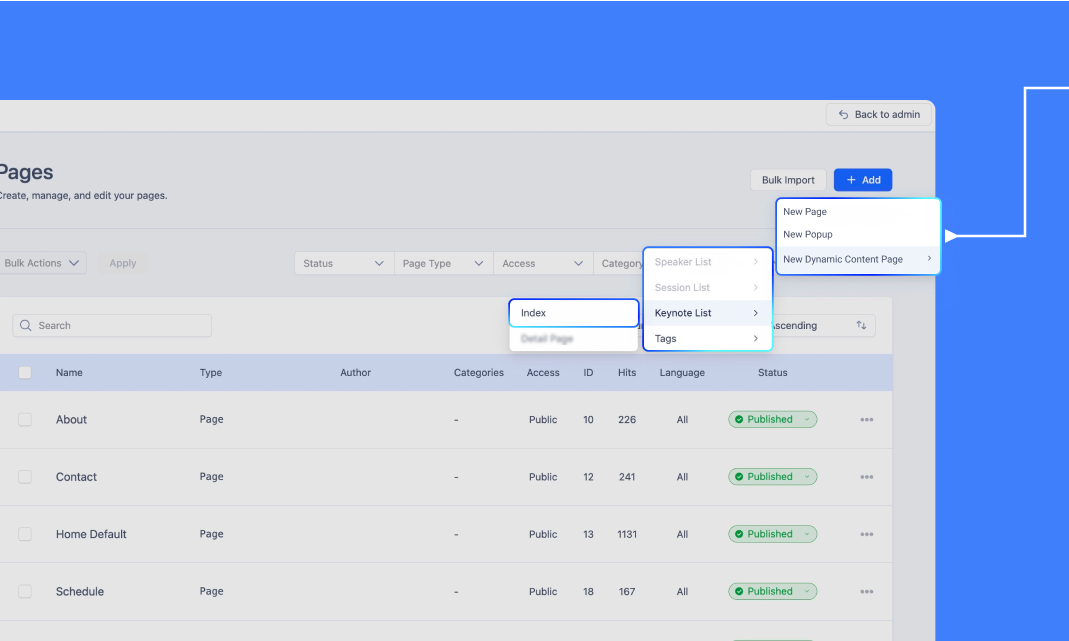
- Navigate to SP Page Builder.
- Go to Pages > Click + Add > Select New Dynamic Content Page.
- Hover over the desired Collection.
- From the submenu, select Index to create an index page for that collection.
Note:
- You can create a dedicated Index Page for the collection.
- Alternatively, you can embed a Collection Index on any existing page using Dynamic Content Addons.
- A slug (URL) will be automatically generated for each dynamic page, which can be accessed from the Pages List.
Basics of Dynamic Content Addons
SP Page Builder provides three key Dynamic Content Addons to retrieve data dynamically from a collection:
- Collection Addon – Displays a list of items from a selected collection.
- Dynamic Image Addon – Maps image fields dynamically.
- Dynamic Text Addon – Maps text, links, and other non-image fields dynamically.
For Collection Index Pages:
- On a Collection Index Page, Dynamic Image, and Dynamic Text addons must be placed inside the Collection Addon to access collection fields.
- Image fields should be mapped using Dynamic Image addon.
- Text, links, numbers, etc., should be mapped using Dynamic Text addon.
Step 1: Add the Collection Addon
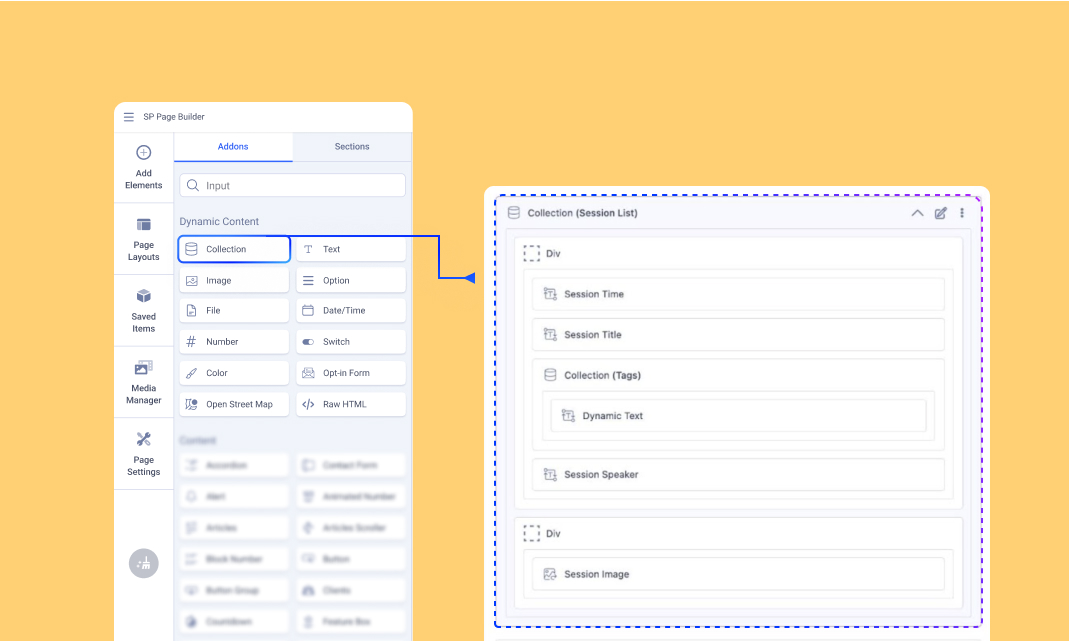
Drag and drop the Collection addon under Dynamic Content onto the page where you want the list to appear.
Step 2: Select the Source Collection
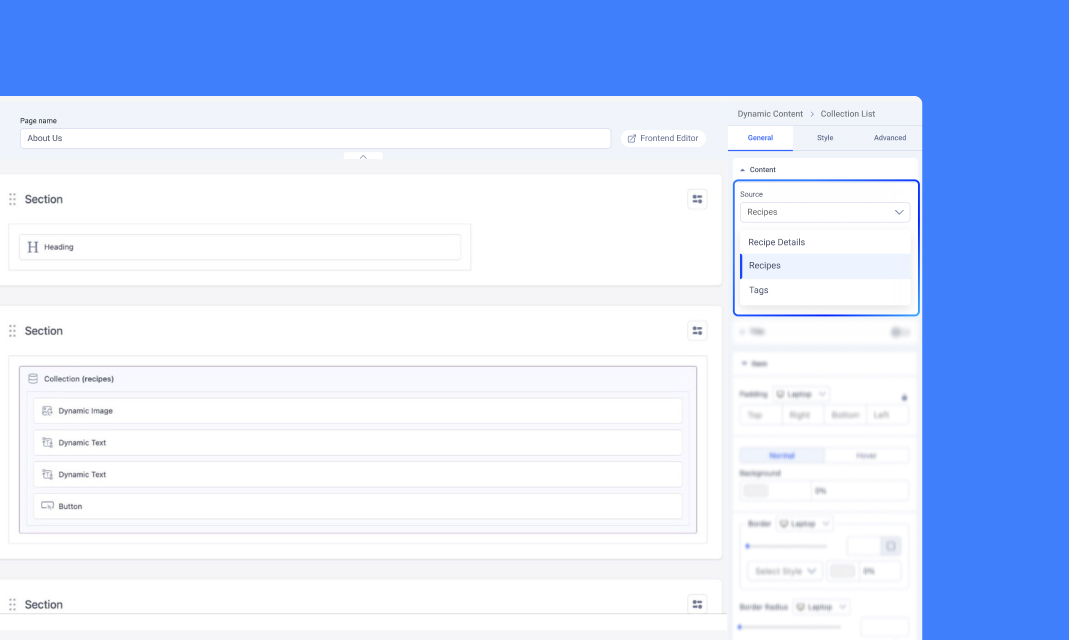
From the Source dropdown, select the collection you want to create the index for.
Step 3: Configure the Layout
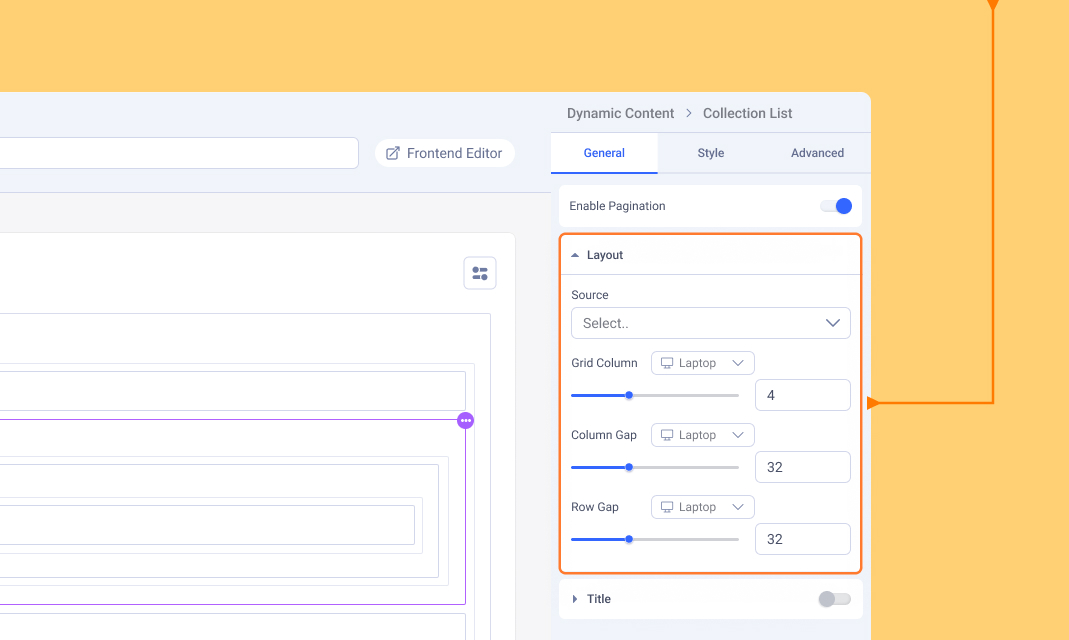
Customize the layout to match your design requirements:
- Grid Layout: Set the number of columns, column gaps, row gaps, etc.
- Stack Layout: Choose between horizontal or vertical stacking, set wrapping behavior, and adjust alignment options (horizontal, vertical, column gap, row gap).
Step 4: Map Collection Fields
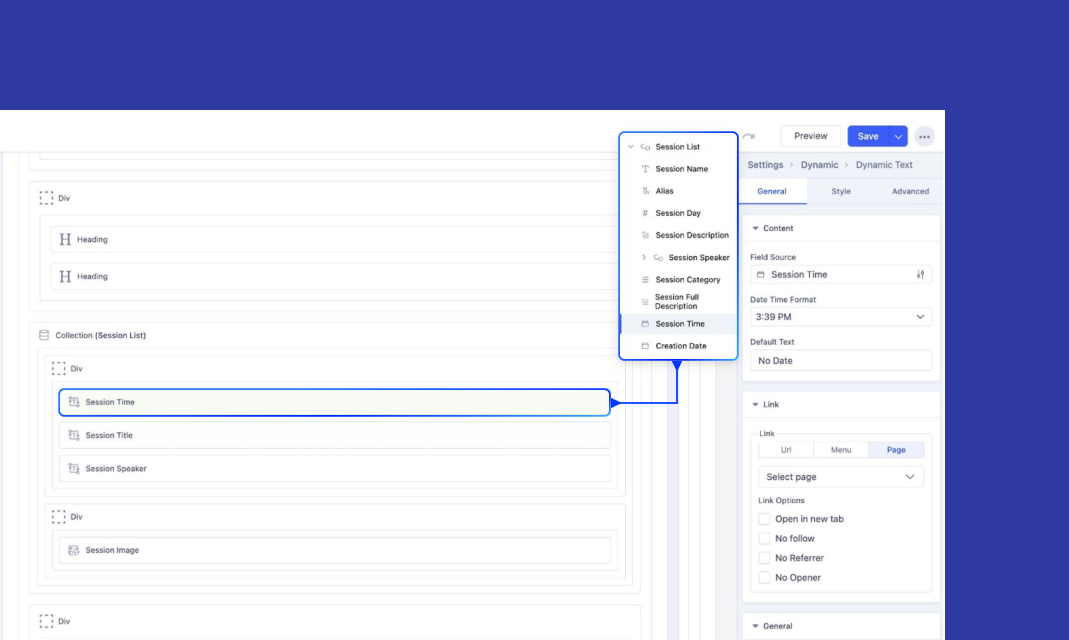
Decide which fields you want to display in the Collection Index. These can include text, images, links, and more, depending on your data.
Mapping Collection Fields Dynamically:
- Use Dynamic Image Addon to bind image fields.
- Use Dynamic Text Addon to bind text, links, numbers, and other fields.
Ensure that all addons are correctly mapped to collection data for dynamic updates.
Connecting Reference & Multi-Reference Fields
If your collection includes Reference Fields (linking a single item from another collection) or Multi-Reference Fields (linking multiple items), you can display them dynamically in the Collection Index.
Connecting a Reference Field
For example, in a Session Index Page, if you want to display Speaker details:
- Use Dynamic Text addon to display the Speaker name, bio, description, etc.
- Use Dynamic Image addon to display the Speaker’s profile picture or other image fields.
- Set the Field Source to the respective Reference Field.
Connecting a Multi-Reference Field
For example, in a Session Index Page, if you want to display multiple Tags associated with a session:
1. Add the Collection Addon to display multiple items.
2. Set the Source to the Tags Collection.
3. Filter to ensure only relevant tags appear for each session:
- Click Filter > + Add Conditions.
- Select Tags as the reference collection.
- From the Condition dropdown, choose Is Associated With.
- Select the field referencing Tags (e.g., Related Tags).
4. Use Dynamic Text addon to display Tag Titles dynamically.
Learn more about Collection References.
Step 5: Filter Collection Items
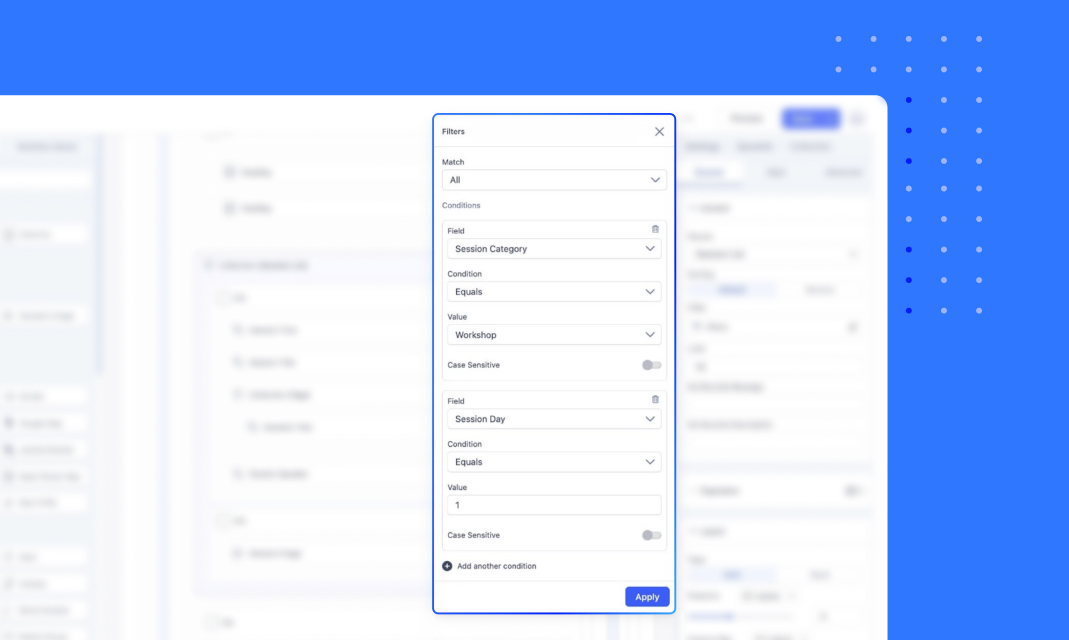
Filtering helps refine your collection by displaying only specific items that meet defined criteria. By strategically using filters and conditions, you can create highly targeted content displays.
Filtering Conditions
When applying a filter, you can choose different conditions depending on the field type. The available conditions include:
- Is Set / Is Not Set – Checks whether a field has a value or is empty.
- Equals / Not Equals – Filters exact matches or excludes specific values.
- Contains / Not Contains – Looks for specific words or phrases within a field.
- Starts With / Not Starts With – Filters items based on how the value begins.
- Ends With / Not Ends With – Filters items based on how the value ends.
- Is Associated With – Filters items based on whether the item is associated with the selected field.
- Related – Filters items based on their connection to a field other than the one already chosen.
- Is Before / Is After – Filters items beginning from before or after the set value.
- Is Between Dates – Filters items based on a specified date range.
For example, if filtering blog posts by title:
- Condition: Starts With "How to" > Shows only posts where the title begins with “How to.”
- Condition: Contains "Guide" > Displays all posts that include the word “Guide.”
If filtering blog posts by date-time:
- Condition: “Equals” and Data type: "Current Date" > Displays items up to the current date when the user accesses the page.
- Condition: “Is Between Dates” > Displays all items between the two selected dates.
Case Sensitivity
The filter settings include a Case Sensitive toggle. If enabled, "Apple" and "apple" would be treated as different values.
Combining Multiple Filters
You can apply multiple conditions by selecting "Add another condition." There are two ways to combine filters:
- Match All (AND Logic) – Only items that meet all conditions will be displayed.
- Match Any (OR Logic) – Items that meet at least one condition will be displayed.
For example:
- Match All: Category = "Technology" AND Title Starts With "Best"
- Match Any: Category = "Technology" OR Title Starts With "Best"
Step 6: Link Collection Fields

Select a collection field (e.g., Session Speaker) from the Collection index.
Choose a Link Type
Under the Link dropdown menu, you can select one of the following options:
- URL: Enter a specific URL to redirect users to an external page.
- Menu: Choose a menu item to link the field directly to a pre-configured menu link.
- Page: Select a page from the available SP Page Builder pages or dynamic content pages. For dynamic content pages, select the appropriate Details page (e.g., "Speaker Details") from the dropdown.
Configure Link Options
Use the available checkboxes to customize the link behavior:
- Open in a new tab: Opens the linked page in a new browser tab.
- No follow: Prevents search engines from following the link.
- No Referrer: Ensures the referrer information is not sent to the destination site.
- No Opener: Prevents the linked page from gaining access to the window.opener property for enhanced security.
Step 7: Additional Settings
Sort: Organize the collection items in the desired order:
- Default: Displays items in the order they were added.
- Reverse: Displays items in reverse order.
Limit: Specify how many items to display:
- Set to a specific number (e.g., 5) to display only that many items.
- Use -1 to display all items from the collection.
Empty Records Message: Configure a message or description to display when no records are found in the collection.
In the next section, learn how to create dynamic details pages on your site for your collection items.
Assigning Collection List/Index as a Menu Item
To assign a Collection Index page as a menu item, follow these steps:
- Go to your Joomla Dashboard and navigate to Menus > All Items > + New.
- In the Menu Item Type field, choose SP Page Builder > Page.
- In the Select Page option, pick collection list page you wish to assign as a menu item.
- Select the menu where you want this collection list to appear. (e.g., Main Menu)
- Provide a meaningful name for this menu item. (e.g., Speaker List)
- Click Save & Close to finalize the setup.
The collection item is now successfully added to your Main Menu.
Importing/Exporting Dynamic Pages
When you export or import pages with dynamic collections, SP Page Builder includes not just the layout but also the associated dynamic data.
Exporting a Dynamic Content Page
-
From the Joomla dashboard, navigate to SP Page Builder > Pages and choose your Dynamic Content Page.
-
Access the Export button at the top right.
-
Choose if you want to include SEO settings and metadata in the file you download. Click on the Export Now button.
-
A downloadable zip file will be generated containing the page layout, dynamic collections, and their items.
Importing a Dynamic Content Page
-
From the Joomla dashboard, navigate to SP Page Builder and choose the page where you wish to import the Dynamic content page.
-
Click the Import button at the top right and select the zip file you exported earlier.
-
Your exported Dynamic Content page, including the collections, items, will be imported.